VAC stands for Valve Anti-Cheat System. It is an automated system designed to detect cheats installed on user’s computers. It was first released with Counter-Strike in 2002.
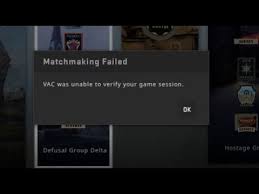
Counter Strike: Global Offensive is a game enjoyed by many players all around the world. Users usually encounter vac was unable to verify your game session error message during the matchmaking process.
It is pretty annoying for all the gamers because it won’t let you to start to game unless and until you don’t fix it. This generally happens when someone changes the file configuration to gain an unfair advantage over others.
In this post, we will provide list of solutions that will help you to remove an error message vac was unable to verify your game session. Thus, users are advised to follow below mentioned solutions one by one in order to get rid of this problem.
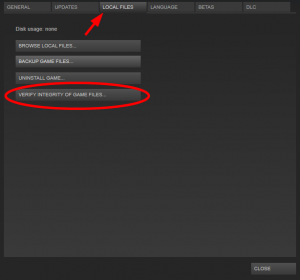
Solution 1: Verify your game files: The error may occur on your CS: GO game due to the integrity issues with your game files. You should check your game files with your Steam Client in order to solve the problem:
Click Library on your Steam Client

Right-click your games and click Properties

Tap the LOCAL FILES tab and click on VERIFY INTEGRITY OF GAME FILES
Wait until the process finished then click CLOSE
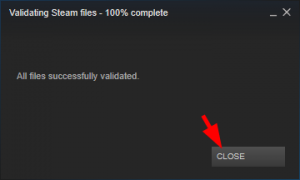
Just after that open your game to see if the error’s gone
Solution 2: Restart your Steam Client: You may get this error due to some corruption issues with your Steam client. In order to fix it, restart your client by following below mentioned steps:
On your Steam client, click Steam in the upper left corner, and then click Exit.

Open your Steam Client again
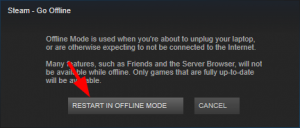
In the upper left corner, click Steam and then click Go Offline

Click RESTART IN OFFLINE MODE
Click Steam and then click Go Online
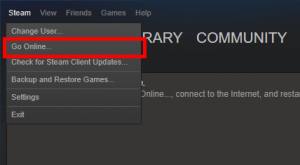
And then, CLICK RESTART AND GO ONLINE

Launch your game
Solution 3: Repair your Steam Client: The major reasons for getting an error message is due to corrupted Steam Client. To troubleshoot this issue, you need to repair Steam Clients. To do so, you may follow the given steps:
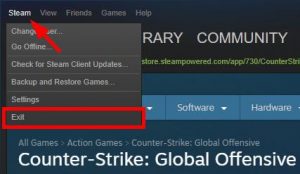
On your Steam client, click Steam in the upper left corner, then click Exit.
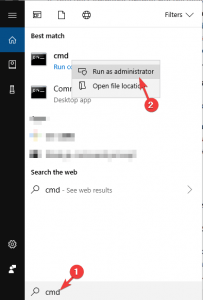
In the lower left corner of the screen, click on the Start button
Type “cmd“, then right click Command Prompt or CMD and click Run as administrator
In the command prompt, type: “C:\Program Files (x86)\Steam\bin\SteamService.exe” /repair and then press Enter
Run your Steam client and launch your game to see if this fixes your error or not.
Solution 4: Update Device Driver: After trying out all these methods if the error still occurs then it might be drivers installed on the computer system which are causing the issue. Corrupted or outdated driver could lead to this error. Thus, users are advised to keep all drivers updated.
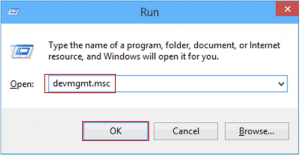
Press Windows + R key > In the Run box, type devmgmt.msc and click on the OK button to open the Device Manager.
In the Device Manager window, click on the device category to expand the section > Now, right-click on the device name and select Update Driver
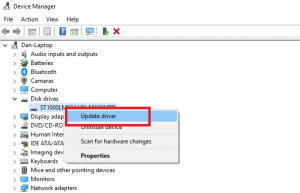
Next, press on Search automatically for updated driver software option

Windows will start searching for new updates and will install it on your system.
Solution 5: Run Steam as an Administrator: It may cause this error if Steam doesn’t have administrator permission. For smooth and effective function, Steam client requires admin privileges. To give admin access to Steam, follow the steps mentioned below:
Go to the directory where the Steam is installed > Open the Steam folder.
Right-click on the steam.exe files and choose the Properties option from the menu.
Go to the Compatibility tab and click on select the Run this program as an administrator checkbox > Click on the Apply and OK button.
Next, right-click on the GameOverlayUI.exe files and selects Properties from the menu > Go to the Compatibility tab.
Select the Run this program as an administrator checkbox > Now, click on the Apply and OK button.
Solution 6: Log out and Log in Steam Client: If the above mentioned fix doesn’t work for you then you need to relog-in to your Steam account. The changes in the OS framework might cause CSGO VAC error on Steam.
Logging out and in into the Steam client can resolve this issue. To do so, you need to simply follow the given mentioned steps:
Open the Steam client,
Click on your profile name located at the top-right corner of the window.
Select Log out of account option from the dropdown list.
After logging out from your Steam account, enter your login credentials to re-login into the Steam account.
Once done, check if VAC error is removed from your Steam game or not.
Solution 7: Disable your Antivirus Temporarily: Antivirus software could also be the factor appearance of this error message because it may disrupt the VAC settings when it is running and scanning applications in the background to protect your PC from virus or malware attack. To solve the problem, you should remove the Steam application from the scanning process.
If the error still persists then you need to disable your antivirus temporarily or even reinstalling the antivirus. In order to uninstall a program, follow the below mentioned steps:
Press Win + S to open Search. Then search for Control Panel and open the app.
In the top right corner, select View by: Category. Then click Uninstall a program.

In the list of programs and features, right-click you’re antivirus and select Uninstall. To complete the task, follow the on-screen instructions.
Recommended Solution
In an attempt to run the programs smoothly on your PC, it needs to perform well without any lagging issue. And if you want to boost the performance of your computer then use PC Repair Tool.
This tool will scan your system and will solve all the performance related issues. It also fixes game, registry error, repair corrupted or damaged Windows system files and protect your system from malware or virus infection.


