What is ‘Windows 10 backup not working’ issue?
If you are experiencing ‘Windows 10 backup not working’, ‘Windows 10 File History not working’, or ‘Backup and Restore not working’ issue, then you are in right place for the solution. Here, you will be guided with easy methods to resolve the issue. Let’s starts the discussion.
Windows 10 backup: In Windows 10, it is quite easy to create and keep backup of entire system using Windows 10 built-in backup tool. Backup Tool in Windows 10 offers you create backup of your Windows 10 that could help you to restore them in case of damage or data losses. Windows 10 includes two backup utilities that’s Backup and Restore, and File History. Both backup utility offers you to create system image or backup files.
However, several users reported that they faced ‘Windows 10 backup not working’ issue or ‘Windows 10 backup failed’ issue while they tried to create backup using Backup and Restore, or File History Windows built-in backup tool. This issue prevents you from completing the creation system backup for some reasons. This issue indicates that either Windows 10 File history – backup utility is not working, or backup and Restore – backup utility is not working in your Windows 10 computer.
Sometimes, ‘Windows 10 backup not working’ issue is occurred while trying to backup to restore files/folders using Windows 10 Backup and Restore Tool, with some error codes including 0x80070001, 0x81000037 and 0x80070003. These error codes indicates you may be unable to browse to files/folders that you want to restore in ‘File Restore’ wizard.
The possible reason behind this issue can be malware or viruses attack in your computer that may impede the backup process and result in Windows fail to search the target file/data. In such case, you should run system scan for malware or viruses with some powerful antivirus in order to fix the issue. This issue can also be occurred due to I/O device errors, when backup operation fails to complete before timeout.
Another possible reason behind ‘backup not working in Windows 10’ issue is an inappropriate connection the targeted drive holding the backup. However, it is possible to resolve the issue with our instructions. Let’s go for the solution.
How to fix Windows 10 backup not working issue?
Method 1: Fix ‘backup not working’ issue with ‘PC Repair Tool’
‘PC Repair Tool’ is easy & quick way to find and fix BSOD errors, EXE errors, DLL errors, problems with programs, malware or viruses issue, system files or registry issues, and other system issues with just few clicks. You can also get this tool through button/link below.
Method 2: Run system scan for malware or viruses with SpyHunter Antivirus software
This issue can also be occurred due to malware or viruses attack in your Windows 10 computer. You can fix the issue by running system scan with SpyHunter Antivirus software. This software offers you to find and remove all types of threats including latest malware in computer. You can get this tool through button/link below.
Method 3: Enable File History and Windows Search Service
This method will help you to resolve if you are facing ‘Windows 10 backup not working’ issue with Windows 10 File History – backup utility.
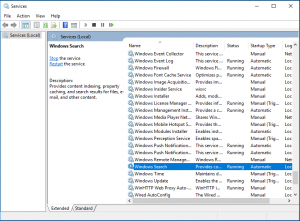
Step 1: Press ‘Windows + R’ keys on keyboard, type ‘services.msc’ in the opened ‘Run’ dialog box and hit ‘Ok’ button to open ‘Services’ window
Step 2: Find and double-click ‘File History and Windows Search’ service to open its ‘Properties’
Step 3: Select ‘Automatic’ from ‘Startup Type’ dropdown and hit ‘Ok’ to save the changes.
Method 4: Enable and Disable System Protection

Step 1: Open ‘Control Panel’ in Windows 10 and go to ‘System and Security > System’
Step 2: Select a driver and select ‘Configure’
Step 3: Click on ‘Disable System Protection’ and after few seconds, turn it ON.
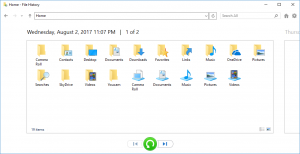
Method 5: Force Refresh Windows 10 File History
If you are facing the issue that the File History not backing up all the files, then you can force refresh the File History in order to fix the issue. To do so, you need to turn OFF File History and then turn it ON. Also, you can remove the folder that causes issue, from included list and add it again in order to fix the issue.
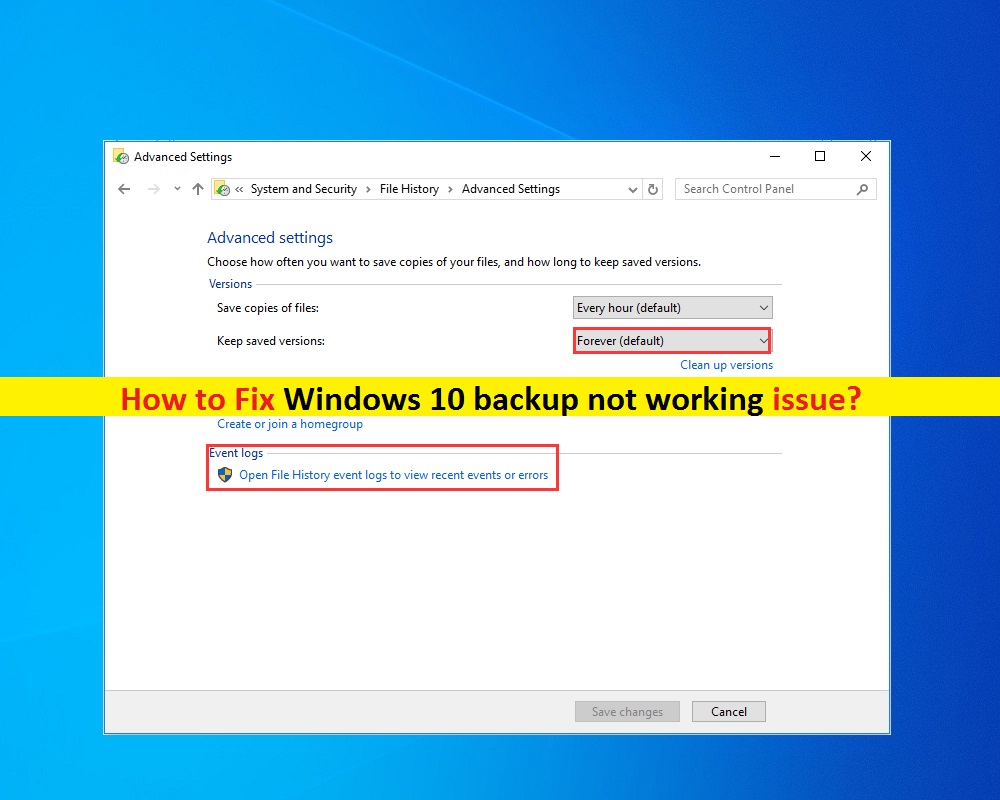
If the issue still persist, then click on ‘Advanced Settings’ on ‘File History’ screen and check ‘Event Logs’ for the error, and set ‘Keep saved versions’ to ‘Forever’.
Method 6: Reset File History
Another possible way to fix the issue is to reset Windows 10 File History.
Step 1: Stop File History and navigate to following path
C:\Users\<username>\AppData\Local\Microsoft\Windows\FileHistory\Configuration
Step 2: Delete File History configuration files from there and once done, restart ‘File History’ and check if the error is resolved.
Method 7: Turn ON Automatically backup my files option
This issue can also be occurred if ‘Automatically backup my files’ option is disabled. You can check and enable it in order to fix the issue.
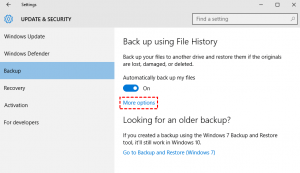
Step 1: Open ‘Settings’ App in Windows 10 and go to ‘Update & Security > Backup’
Step 2: In right pane, turn ON ‘Automatically backup my files’ option. Once done, please check if error is resolved.
Method 8: Change the drive
You can also try to fix the issue by stop using the current drive and replace it with new one.
Step 1: Connect the drive to your device and open ‘Control Panel’
Step 2: Go to ‘System and security > File History’
Step 3: In left pane, select ‘Select Drive’ option
Step 4: Select the new drive you attached and hit ‘Next’ button to proceed, and check if the issue is resolved.
Method 9: Run Chkdsk Scan
Sometimes, this issue can also be occurred due to corrupted hard drive image or bad hard drive sectors. You can fix the issue by running CHKDSK scan to repair hard disk image/drives issue.
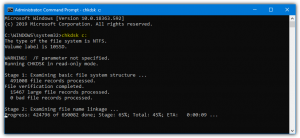
Step 1: Press ‘Windows + X’ keys on keyboard and select ‘Command Prompt as Administrator’
Step 2: Type ‘chkdsk /f /r’ command and hit ‘Enter’ key to execute
Step 3: Once executed, restart your computer and check if the error is resolved.
Method 10: Enable Volume Shadow Copy Service and SPP service in Windows 10
You should make sure Volume Shadow Copy Service and SPP service is enabled in your Windows 10. If disabled, you will face Windows 10 backup issue or error. You can re-enable it in order to fix the issue.
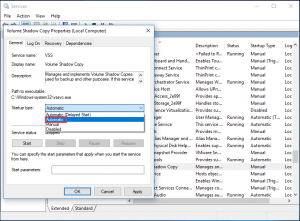
Step 1: Open ‘Control Panel’ and go to ‘System and Security > Administrative Tools > Services’
Step 2: Find ‘SPP’ service and ‘Volume Shadow Copy Service’, and check if these services are disabled. If disabled, double-click on it to open its ‘Properties’, select ‘Automatic (Delayed start)’ option from ‘Startup Type’ dropdown and then hit ‘Ok’ button to save.
Step 3: Restart computer once done, and check if the error is resolved.
Conclusion
I hope this post helped you on How to fix Windows 10 backup not working issue with several easy steps/methods. You can read & follow our instructions to do so. That’s all. For any suggestions or queries, please write on comment box below.


