
What is ‘Tiworker.exe’ or ‘Windows Module Installer Worker’ in Windows 10/8.1/8?
Windows Module Installer Worker or Tiworker.exe is legitimate program associated with Microsoft Windows Operating System. This program in Windows computer checks the Windows updates automatically for your Windows computer. If you want to perform ‘Check for updates’ in Windows computer automatically, then ‘Tiworker.exe’ or ‘Windows Module Installer Worker’ program must be enabled/installed in your computer.
In sort, ‘Tiworker.exe’ is genuine EXE file associated with Microsoft Operating System requires if you want to perform automatically check for Windows update in computer. ‘Windows Module Installer Worker’ (Tiworker.exe) tool will automatically running in computer while checking for on installing Windows update. No way is it associated with malware or virus.
However, several users reported about Tiworker.exe high disk usage issue and explained ‘Windows Module Installer Worker (Tiworker.exe)’ in Windows computer cause High CPU usage. It shows high CPU usage percentage in ‘Task Manager’ that can cause System performance slowdown issue. As mentioned, this program is associated with Microsoft Windows and required in computer if you want to perform automatically check for Windows Updates in computer.
One possible reason behind ‘Tiworker.exe high disk usage’ issue can be malware or viruses attack. If your computer is already infected with malware or viruses, then it might possible to get this type of problem. Note that some malware like Trojans attempts to execute malicious processes in your computer without your knowledge. These malicious processes can corrupt or mislead other legitimate processes already running in computer and can cause high CPU or disk usage. In such case, you should run System scan with some powerful antivirus software for malware or viruses and check if high CPU or disk usage issue is resolved.
Another possible reason behind this issue can be corruption in System files or registry, outdated or corrupted device drivers, problematic programs installed in computer, faculty hardware and other reasons. If you are facing the same issue, you can follow the instructions below to resolve. Let’s go for the solution.
How to fix Tiworker.exe high disk usage Issue in Windows 10/8.1/8?
Method 1: Fix ‘Windows Module Installer Worker or Tiworker.exe high disk usage’ issue with ‘PC Repair Tool’
‘PC Repair Tool’ is easy & quick way to find and fix BSOD errors, DLL errors, EXE errors, problems with programs or files, malware or viruses issues, and other System issues with few clicks. This way, you can fix this issue. You can get this tool through link/button below.
Method 2: Run Windows Troubleshooter
The above method explained you can fix PC problem with ‘PC Repair Tool’ – third-party troubleshooting program. You can also try Windows built-in troubleshooter to resolve this issue. Let’s try.
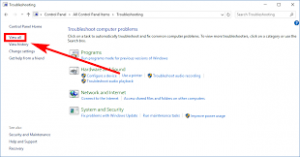
Step 1: Click on ‘Start’ button and type ‘Troubleshooting’ in ‘Windows Search Box’ and open ‘Troubleshooting’
Step 2: In the opened ‘Window’, click ‘View All > System Maintenance’
Step 3: In the opened ‘System Maintenance’ troubleshooter, click on ‘Next’ and follow on-screen instructions to finish troubleshooting
Step 4: Once done, please check if the trouble is resolved.
Method 3: Update Windows Operating System
Updating Windows Operating System can fix problem in Windows computer and improve System performance as well. This way, you can fix high CPU or disk usage issue. Let’s try.

Step 1: Press ‘Windows + X’ keys together on keyboard and select ‘Control Panel’
Step 2: In the opened ‘Control Panel’, click ‘Windows Update’
Step 3: Select ‘Large icons’ from ‘View by’ menu and hit ‘Check for updates’
Step 4: This will automatically download and install the available Windows update in computer. Once, restart your computer to see the changes and check if the trouble is resolved.
Method 4: Perform Clean Boot Operation
Another possible way to fix this issue is to perform Clean Boot operation. Let’s try.
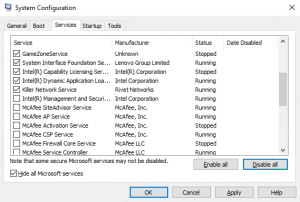
Step 1: Press ‘Windows + R’ keys together on keyboard, type ‘msconfig’ in ‘Run’ dialog box and hit ‘Ok’ button to open ‘System Configuration’ window
Step 2: In the opened ‘System Configuration’ window, click on ‘Services’ tab and check ‘Hide all Microsoft Services’ checkboxes, and hit ‘Disable All’
Step 3: Now, click on ‘Startup’ tab and click on ‘Open Task Manager’
Step 4: In the opened ‘Task Manager’, under ‘Startup’ tab, right-click on first startup item in the list and select ‘Disable’. Repeat this step to disable all startup items in the list, and then close ‘Task Manager’
Step 5: Now, back to ‘System Configuration’ and hit ‘Apply’ and ‘Ok’ to save the changes and restart your computer.
Note: After restarting your PC check if the trouble is still persists. If not, you need to enable all disabled services and applications and check again if the trouble is resolved.
Method 5: Rename ‘SoftwareDistribution’ folder
It might possible to get this error if ‘SoftwareDistribution’ folder has been corrupted. You can fix the issue with below steps.

Step 1: Press ‘Windows + R’, type ‘services.msc’ in ‘Run’ dialog box and hit ‘Ok’ to open ‘Services’ window
Step 2: Find and double-click ‘Windows Update’ service to open its ‘Properties’
Step 3: In the opened ‘Properties’ window, select ‘Manual’ from ‘Startup type’ dropdown and hit ‘Apply’ and ‘Ok’ to save the changes
Step 4: Now, navigate ‘C:\Windows\’ and find ‘SoftwareDistribution’ folder. Right-click it and rename it to ‘SoftwareDistribution.old’
Step 5: Now, open ‘Services’ window again and double-click on ‘Windows Update’ service
Step 6: This time, set ‘Startup type’ to ‘Automatic’ and hit ‘Start’ button under ‘Service Status’ section
Step 7: Finally, click on ‘Apply’ and ‘Ok’ to save the changes and check if the trouble is resolved.
Method 6: Run SFC Scan
SFC (System File Checker) – Windows built-in tool offers you to repair System files. Let’s try.

Step 1: Press ‘Windows + X’ keys together on keyboard and select ‘Command Prompt as Administrator’
Step 2: Type ‘sfc /scannow’ command in command prompt and hit ‘Enter’ key to execute
Step 3: Wait to complete the process. Once done, restart your computer and check if the trouble is resolved.
Method 7: Run DISM scan
DISM – Windows built-in tool offers you to repair disk image. This way, you can fix ‘Windows Module Installer Worker High CPU or Disk usage’ issue. Let’s try.

Step 1: Open ‘Command Prompt as Administrator’ using above method
Step 2: Type the following command in command prompt and hit ‘Enter’ key to execute.
DISM /Online /Cleanup-Image /RestoreHealth
Step 3: Wait to finish the process. Once done, restart your computer and check if the problem is resolved.
Method 8: Exclude ‘Tiworker.exe’ from Windows Defender
You can fix this issue by adding ‘Tiworker.exe’ process to ‘Exclusion’ section of Windows Defender. Note that Windows Defender antivirus won’t scan items that you have excluded. Excluded items could contain threats that make your device vulnerable. You can add ‘Tiworker.exe’ process to ‘Exclusion’ section in Windows Defender that could block Windows Defender from scanning this program.

Step 1: Press ‘CTRL + SHIFT + ESC’ keys together on keyboard to open ‘Task Manager’
Step 2: In the opened ‘Task Manager’, find ‘Tiworker.exe’ or ‘Windows Module Installer Worker’, right-click on it and select ‘Open File Location’
Step 3: Copy the location of this folder since you will need it for future steps
Step 4: Now, Open ‘Windows Defender’ application by searching for ‘Windows Defender’ via ‘Windows Search box’
Step 5: Go to ‘Virus & Threat protection > Virus & threat protection settings’
Step 6: Scroll down to ‘Exclusion’ section and click on ‘Add or remove exclusions’ and click on ‘Add an exclusion’, and select the folder from the list
Step 7: Now, enter the location folder that you have copied in ‘step 3’ and then save the changes and check if the problem is resolved.
Method 9: Remove update folder
Some users reported that Update folder is core reason behind this issue. Deleting this folder can fix the issue. Let’s try.
Step 1: Navigate to ‘C:\Windows\Temp’ folder
Step 2: Find ‘Updates’ folder and delete it.
Method 10: Uninstall HP Software
Some users reported that software like HP Support Assistant can cause this issue. You can fix the issue by removing all HP Software from computer. To do so, you can open ‘Control Panel’ and go to ‘Apps & Features’, ‘Programs & Features’ or ‘Uninstall a program’, find HP Software and delete/uninstall them.
Method 11: Update Windows drivers
Outdated or corrupted drivers can cause this type of issue. You can fix the issue by updating Windows drivers including graphics card drivers, sound drivers, network adapter drivers and all others.

Step 1: Press ‘Windows + X’ keys together on keyboard and select ‘Device Manager’
Step 2: Expand each device category one-by-one and check if any device shows ‘Yellow Exclamation Mark’ on it. If yes, right-click on it and select ‘Update Driver’
Step 3: Follow on-screen instructions to finish update process. Once done, restart your computer to see the changes and check if the trouble is resolved.
Update Windows drivers [Automatically]
‘Automatic Driver Update Tool’ is easy & quick way to find the latest updates for all Windows drivers and then install them into computer. You can get this tool through link/button below.
Method 12: Reinstall Windows operating System
If the above methods didn’t works, you can try to fix this type of issue by reinstalling Windows Operating System again. But before that you should make sure that you have strong backup of your personal files or data on some safe external storage device/media. After reinstallation of Windows OS, please check if the trouble is resolved.
Conclusion
I am sure this post helped you on How to fix Tiworker.exe high disk usage Issue in Windows 10/8.1/8 with several easy steps/methods. You can read & follow our instructions to do so. For any suggestions or queries, please write on comment box below.


