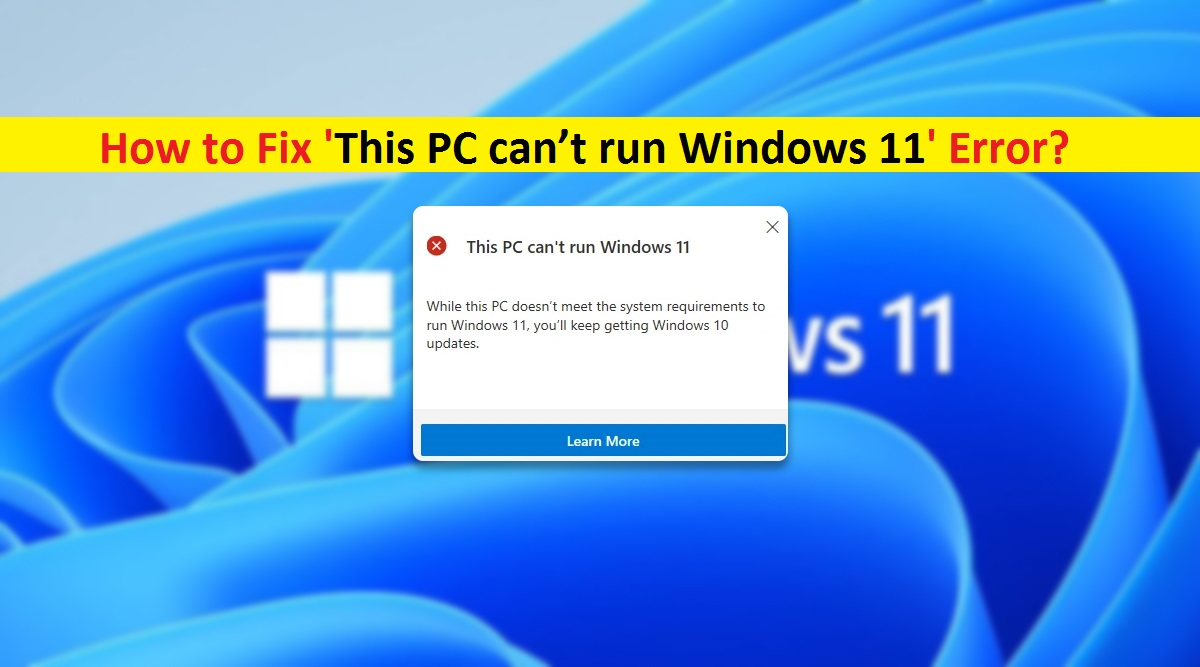
What is ‘This PC can’t run Windows 11’ error?
If you are experiencing ‘This PC can’t run Windows 11’ error message when you run Microsoft’s PC Health Check App in order to check Windows 11 system requirements in your Windows PC, then you are in right place for the solution. Here, you will be guided with easy steps/methods to resolve the problem. Let’s starts the discussion.
‘Windows 11 – The next Generation of Windows Operating System’: Windows 11 OS is recently released Windows OS by Microsoft Corporation as ‘Next Generation of Windows Operating System’ tagline. Microsoft introduces Windows 11 designed to work on all modern hardware. However, there is some basic system requirements for installing Windows 11 OS on PC/laptop, and you should check system requirement before purchasing this new OS.
It is quite simple to check whether your PC meets these requirements or not, with Microsoft’s PC Health Check App, or via Microsoft Official page. Also, you can check with your PC OEM (Original Equipment Manufacturer), and if your Windows 10 users, then you can check system requirements with ‘PC Health Check’ App, and check if your device is compatible to install Windows 11 OS.
When you run Microsoft’s PC Health Check App and trigger ‘Check Now’ button in order to check whether your device is compatible with Windows 11, it shows ‘This PC can run Windows 11’ message that indicates your PC meets all the system requirements for Windows 11. In case if your system doesn’t meet minimum requirements for Windows 11, this App shows ‘This PC can’t run Windows 11’ message window.
‘This PC can’t run Windows 11’ window is appeared usually due to some issue with security features including Secure Boot and TPM (Trusted Platform Module). In sort, you need to enable TPM and Secure Boot security features in your Windows PC in order to fix this error. To enable these settings, you need to enter into UEFI/BIOS mode in your computer and enable them. Let’s take a look at both security features.
‘TPM (Trusted Platform Module)’: TPM Technology is designed to provide hardware-related, security-related functions. It is secure Crypto-processor (Chip) designed to carry out cryptographic operations. It features multiple physical security mechanisms to make it tamper resistant, and any malicious programs are unable to tamper with security functions of TPM.
‘Secure Boot’: Secure Boot is another security feature in UEFI firmware of your device that only allows signed Operating System to work. Secure Boot can help to protect your system against malware. To check if your device supports ‘Secure Boot’, you can go to ‘Settings’ App and go to ‘Check System Information’ section or running ‘System Information’ App.
How to fix ‘This PC can’t run Windows 11’ error?
Method 1: Enable TPM security feature in UEFI Mode
It is necessary to enable TPM security feature if you want to run Windows 11 OS in your device. To enable this feature, follow the steps below.
Step 1: Restart your computer and when restart initiate, press ‘F2’, ‘ESC’ key on keyboard to enter into UEFI Settings (These keys may vary depending on your PC’s motherboard)
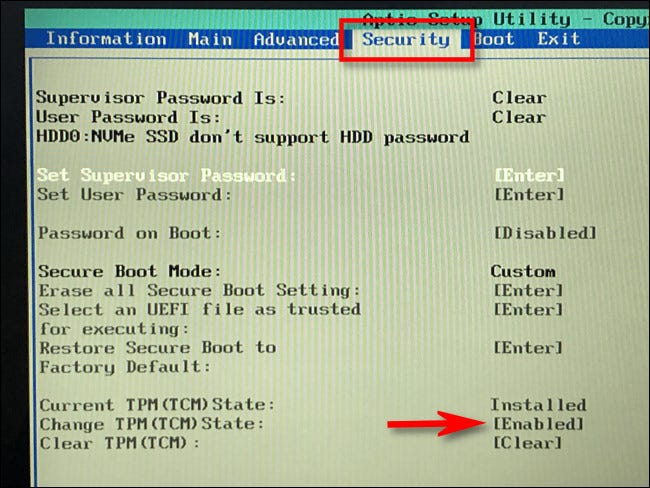
Step 2: Once you are in UEFI Mode, navigate to ‘Security’ tab by pressing ‘Arrow’ key on keyboard
Step 3: Now, find ‘TPM’ in this section and make sure it is enabled. If not, change the settings of ‘TPM’ or ‘Change TPM State’ to ‘Enable’ to turn ON this security feature
Step 4: After that, save the changes and exit UEFI/BIOS Mode and restart your computer.
Step 5: After restart, run ‘PC Health Check’ app again and check if ‘This PC can’t run Windows 11’ error is resolved.
Method 2: Enable Secure Boot – security feature in UEFI Mode
To install Windows 11 OS, it is also necessary to enable Secure Boot in your PC.
Step 1: Follow ‘step 1’ of above method to enter into UEFI/BIOS Mode in computer
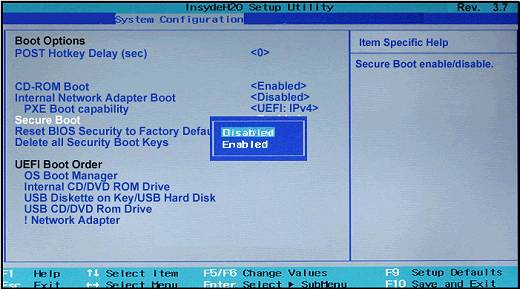
Step 2: Now, go to ‘Boot’ tab using ‘Arrow’ key on keyboard
Step 3: Find ‘Secure Boot’ option and make sure it is enabled. If not, change Secure Boot settings to ‘Enabled’
Step 4: After that, save the changes and restart your computer. After restart, please check if ‘This PC can’t run Windows 11’ error is resolved by running ‘PC Health Check’ App.
Method 3: How to check TPM Chip in PC?
It is possible to check whether your Windows PC have TPM chip/processor or not. To do so, follow the steps below.
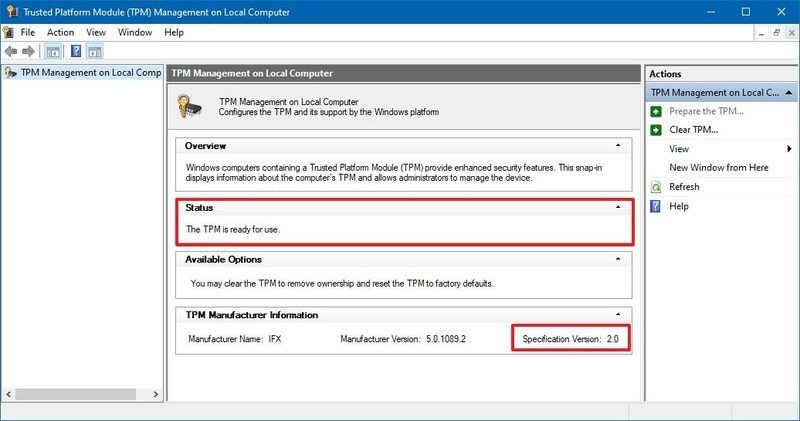
Step 1: Press ‘Windows + R’ keys on keyboard, type ‘tpm.msc’ in the opened ‘Run’ dialog box and hit ‘Ok’ button to open ‘TPM Management Console’
Step 2: This window will show you the information about your PC’s TPM module, and you will see its version number under ‘Specification Version’
Method 4: How to check Secure Boot in PC?
It is possible to check whether your device supports ‘Secure Boot’ or not. To do so, follow the steps below.
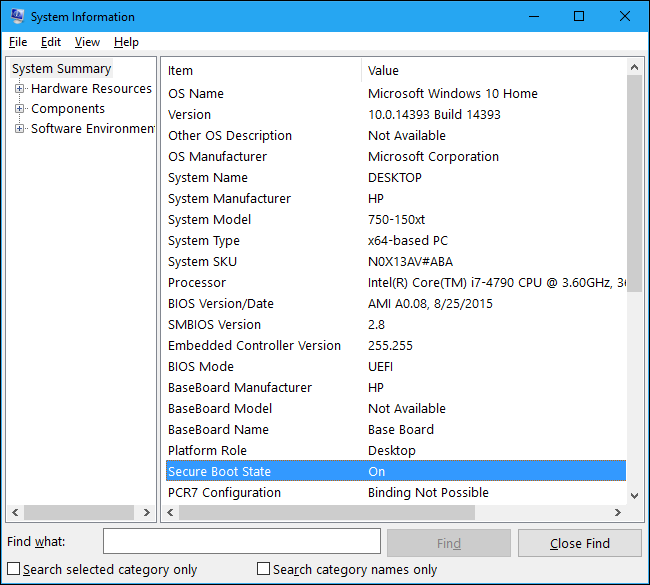
Step 1: Type ‘System Information’ in ‘Windows Search Box’ and open it from results appear
Step 2: In the opened window, click on ‘System Summary’ in left pane and look for ‘Secure Boot’ item in right pane.
Step 3: If it shows ‘ON’ value means Secure Boot is enabled, if it shows ‘OFF’, means it is disabled, and ‘Unsupported’, means it is not support on your hardware.
Fix Windows PC issues with ‘PC Repair Tool’ [Recommended Solution]
‘PC Repair Tool’ is easy & quick way to find and fix BSOD errors, DLL errors, EXE errors, problems with programs, malware or viruses issue, system files or registry issues, and other system issues with just few clicks. You can get this tool through button/link below.
Conclusion
I am sure this post helped you on How to fix ‘This PC can’t run Windows 11’ error in ‘PC Health Check’ App in Windows 10 with several easy steps. You can read & follow our instructions to do so. That’s all. For any suggestions or queries, please write on comment box below.


