What is Network Discovery is turned off Windows 10?
‘Network Discovery’ is networking settings associated with Microsoft Windows Operating System. This setting allows your computer to communicate with other computers and devices connected to network. When this setting enabled in your Windows 10, you will be able to see other computers and devices connected to the same network. If Network Discovery is turned off Windows 10, you might face some trouble while trying to communicate with other computers or devices connected to same network.
To check if ‘Network Discovery’ setting is enabled or not, right-click on ‘Network/WiFi’ icon on System Tray and select ‘Open Network and Sharing Center’, click on ‘Change Advanced Sharing Settings’ and then click the network labeled ‘Private’ and expand it. Check if ‘Network Discovery’ setting in enabled or not under ‘Private’ section.
In sort, if you want to see other computers and devices connected to the same network, then ‘Network Discovery’ setting must be enabled. There is no need of physical connection between your computer and printer via cable. ‘Network Discovery’ feature when enabled, you are allowed to print a document if both computer and printers are on same network.
‘Network Discovery’ feature in Windows 10 offers you to share files between two or more computers/devices on the same network. However, Windows 10 users reported that they are facing ‘Network Discovery is turned off Windows 10’ issue that causes network problem like Network Discovery problem randomly. They explained that the possible reason behind this issue can be antivirus software/Firewall settings. It might possible that Firewall/antivirus setting is blocking this feature that’s why ‘Network Discovery is turned off’ issue occurred.
Another possible reason behind this problem can be problem with some legitimate services including DNS Client, Function Discovery Resource Publication, SSDP Discovery, and UPnP Device Host services. If these services in Windows 10 are not running properly, then you might face ‘Network Discovery is turned off Windows 10’ or similar issue on computer. In such case, you need to start these services and check if its ‘Startup type’ is ‘Automatic’.
Also, disabled ‘SMB’ feature in Windows 10 can cause this issue. Note that SMB (Server Message Block) feature is network protocol associated with Windows computer offers computer within same network to share files, and this feature must be enabled to prevent ‘Network Discovery problem’ or similar. Let’s go for the solution.
How to fix Network Discovery is turned off Windows 10?
Method 1: Fix ‘Network Discovery is turned off’ issue with ‘PC Repair Tool’
‘PC Repair Tool’ is quick & easy way to find and fix BSOD errors, EXE errors, DLL errors, malware or virus issues, problem with programs or files, and other System issues with just few clicks. This way, you can fix problem with Network Discovery in Windows 10. You can get this tool through link/button below.
Method 2: Check if certain services associated with Network Discovery are running
As mentioned, DNS Client, Function Discovery Resource Publication, SSDP Discovery, and UPnP Device Host services are required to run automatically & properly in Windows 10 to prevent you from this type of issue. Also, you should check if ‘Startup Type’ of all these services are ‘Automatic’.
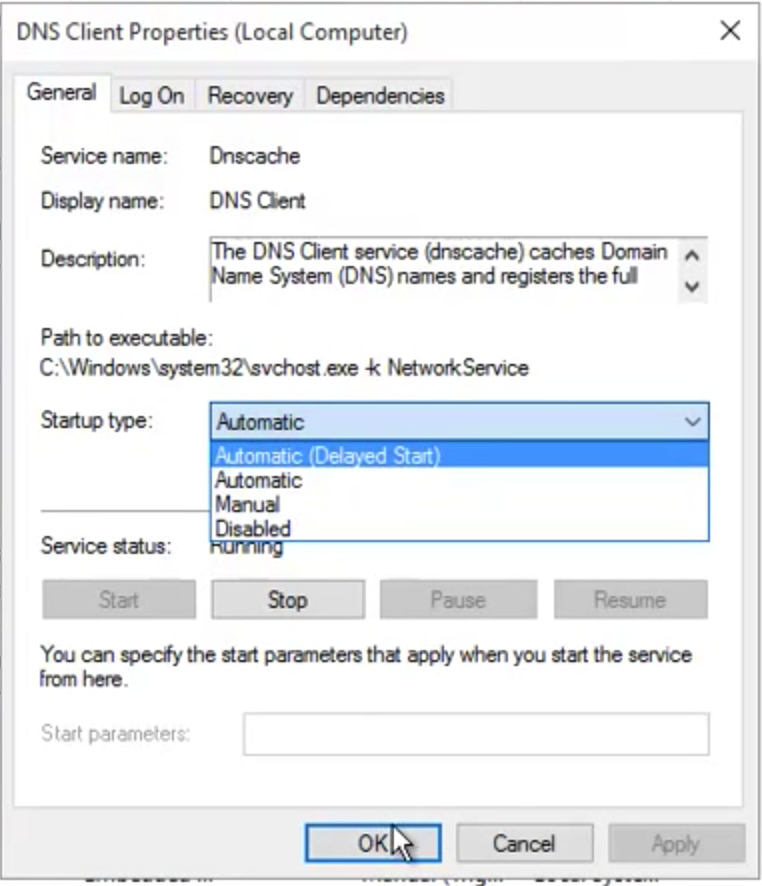
Step 1: Press ‘Windows + R’ keys together on keyboard, type ‘services.msc’ in ‘Run’ dialog box and hit ‘Ok’ button to open ‘Services’ window
Step 2: In the opened ‘Services’ window, locate DNS Client, Function Discovery Resource Publication, SSDP Discovery, and UPnP Device Host services
Step 3: Right-click on each service one-by-one, select ‘Properties’. In ‘Properties’ window, select ‘Stop’ button under ‘Service Status’ section if the service is running.
Step 4: After few seconds, right-click on the service again and select ‘Properties’. Select ‘Automatic’ option from ‘Startup type’ dropdown and hit ‘Start’ button under ‘Service Status’ section. Finally, click on ‘Ok’ to save the changes.
Step 5: Repeat the same steps for each service like DNS Client, Function Discovery Resource Publication, SSDP Discovery, and UPnP Device Host services, and check if these services are running automatically. Once done, please check if the trouble is resolved.
In case if you receive error after implementing these steps saying “Windows could not start the service on Local Computer. Error 1079: The account specified for this service differs from the account specified for other services running in the same process.“, then follow the steps below to fix.
Step 1: Follow the ‘Step 1 and Step 2’ to navigate to dependency services with Network Discovery.
Step 2: Right-click the service that is showing “Windows could not start the service on Local Computer. Error 1079: The account specified for this service differs from the account specified for other services running in the same process.” error, and select ‘properties’
Step 3: In the ‘Properties’ window, click on ‘Log On’ tab and click on ‘Browse…’
Step 4: Under ‘Enter the object name to select’ section, type in your accounts’ name and click on ‘Check Names’
Step 5: Wait for the name to become available and hit ‘Ok’ when finished. If password box is prompted, enter the password to setup and then follow ‘step 4’ of above method to start the services again. Check if the trouble is resolved.
Method 3: Enable SMB feature in Windows 10
As mentioned, disabled SMB feature can cause this issue or the problem with Network Discovery randomly. You can fix the issue by enabling SMB feature.
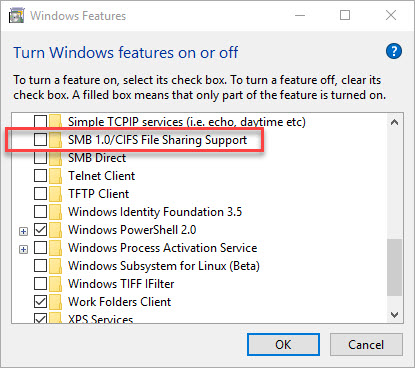
Step 1: Press ‘Windows + X’ keys together on keyboard and select ‘Control Panel’
Step 2: In the opened ‘Control Panel’, click on ‘Category’ option under ‘View By:’ section at the top-right of Control Panel
Step 3: Find and click on ‘Uninstall a program’ under ‘Programs’
Step 4: Click on ‘Turn Windows Feature ON or OFF’ option in left pane and find ‘SMB 1.0/CIFS File Sharing Support’ in the opened window
Step 5: Check the ‘SMB 1.0/CIFS File Sharing Support’ checkbox to turn it ON and then hit ‘Ok’ button to save the changes
Step 6: Once done, restart your computer to see the changes and check if the issue is resolved.
Method 4: Turn ON Network Discovery through ‘Command Prompt’
If Network Discovery is turned off Windows 10, then you can enable/Turn ON it using Command Prompt. This way, you can allow this setting under ‘Windows Firewall’ setting. As mentioned, it might possible that Firewall setting is blocking this feature that’s why you are constantly facing problem with Network Discovery.
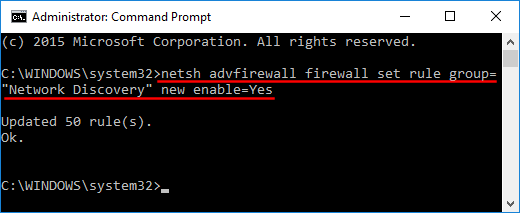
Step 1: Press ‘Windows + X’ keys together on keyboard and select ‘Command Prompt As Administrator’
Step 2: Type the following command and hit ‘Enter’ key to execute
netsh advfirewall firewall set rule group=”Network Discovery” new enable=Yes
Step 3: Wait to complete the process. Once done, please check if error is still persists. If yes, then try following command
REG add “HKLM\SYSTEM\CurrentControlSet\services\dnscache” /v Start /t REG_DWORD /d 2 /f
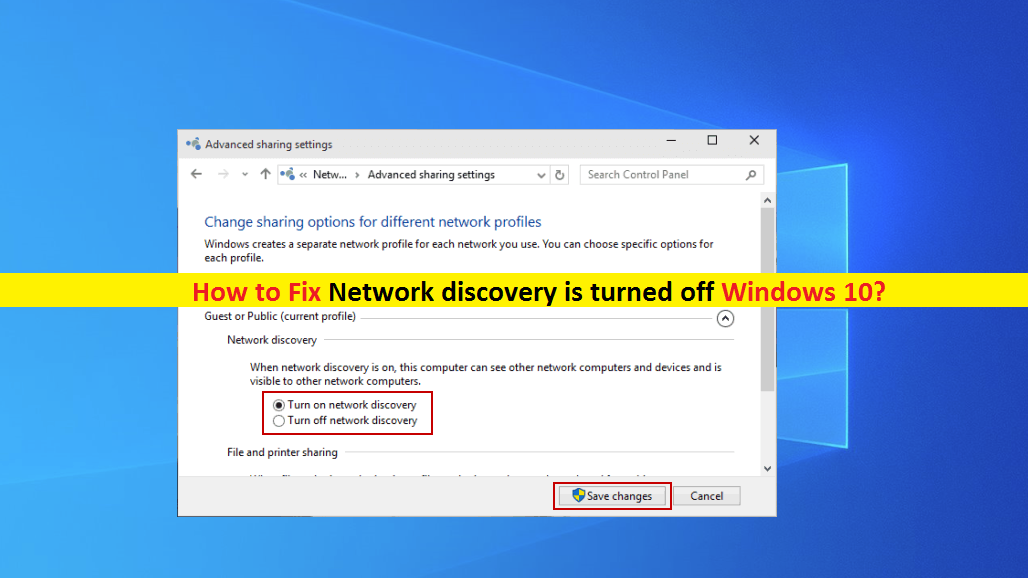
Method 5: Turn ON Network Discovery via Network Sharing Center
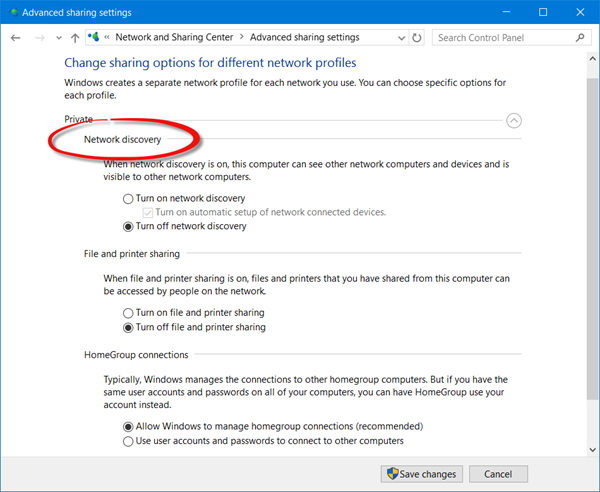
Step 1: Right-click on ‘Network/WiFI’ icon on System Tray and select ‘Open Network and Sharing Center’
Step 2: Click on ‘Change Advanced Sharing Settings’ in left pane
Step 3: Now, expand ‘Private (current profile)’ under ‘Change Sharing Options for different network profiles’ section
Step 4: Locate ‘Network Discovery’ and select ‘Turn ON Network Discovery’
Step 5: Check the ‘Turn on automatic setup of network connected devices’ checkbox and hit ‘Save Changes’ button.
Method 6: Allow Network Discovery feature in Windows Firewall setting
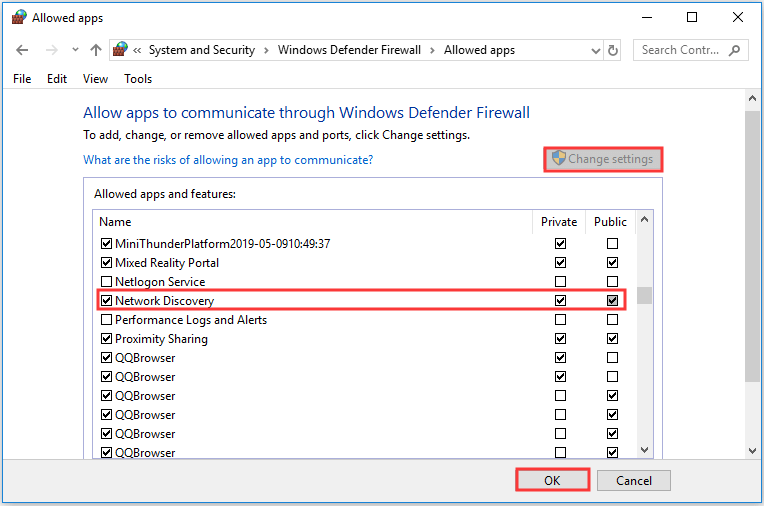
Step 1: Press ‘Windows + X’ keys together on keyboard select ‘Control Panel’
Step 2: Go to ‘System & Security >Windows Firewall’
Step 3: Click on ‘Allow an app or feature through Windows Firewall’ in left pane
Step 4: In the next window, click on ‘Change Settings’ button, and find ‘Network Discovery’ under ‘Allowed Apps and features:’ section
Step 5: Check the ‘Private’ and ‘Public’ checkbox next to ‘Network Discovery’ option and hit ‘Ok’ to save the changes. Then you can follow ‘Method 5’ to turn Network Discovery ON in Windows 10.
Method 7: Reset Network Settings in Windows 10
Resetting Network settings in Windows 10 to default will erase any changes in network settings you have made. This way, you can fix Network Discovery is turned off Windows 10 issue.
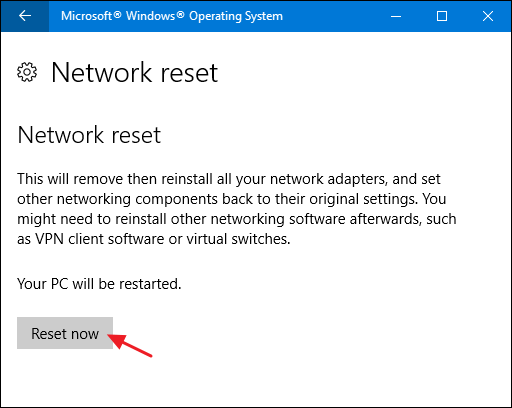
Step 1: Press ‘Windows + I’ keys together on keyboard to open ‘Settings’ App in Windows 10
Step 2: Locate ‘Network & Internet’, scroll down to find ‘Status’. Under ‘Status’ section hit ‘Network Reset’ button and confirm the resetting. Follow on-screen instructions to finish resetting process. Once done, please check if problem is resolved.
Method 8: Run ‘Network Adapter’ and ‘Shared Folders’ Troubleshooter
Windows 10 built-in Troubleshooter Tool offers you to find and fix PC issues. Let’s try.
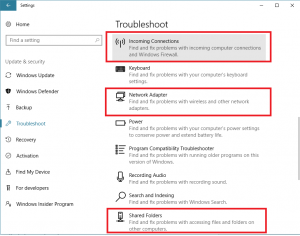
Step 1: Open ‘Settings’ App in Windows 10
Step 2: Go to ‘Update & Security > Troubleshoot’
Step 3: Find ‘Network Adapter’ in list of troubleshooting option. Select it and click on ‘Run the troubleshooter’ button
Step 4: Follow on-screen instructions to finish the steps.
Step 5: After that, find ‘Shared Folders’ troubleshooter in the list of troubleshooting option. Select it and hit ‘Run the troubleshooter’
Step 6: Once done, please check if the issue is resolved.
Method 9: Update Network Adapter Driver in Windows 10
Outdated or corrupted network adapter driver can cause network related issues. You can fix the issue by updating the network driver.
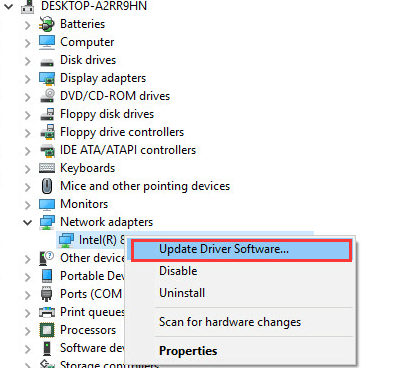
Step 1: Press ‘Windows + X’ keys together on keyboard and select ‘Device Manager’
Step 2: Locate and expand ‘Network Adapters’ category
Step 3: Right-click on your network adapter and select ‘Update Driver’
Step 4: Select ‘Search automatically for updated driver software’ and follow on-screen instructions to finish the update process.
Step 5: Once done, restart your computer to see the changes and check if the trouble is resolved.
Update Network Adapter Driver in Windows 10 [Automatically]
You can also try to update network adapter driver or other System drivers with ‘Automatic Driver Update Tool’. This software will automatically find and install the latest updates for all System drivers. You can get this tool through link/button below.
Conclusion
I am sure this post helped you on How to fix Network Discovery is turned off Windows 10 with several easy steps/methods. You can read & follow our instructions to do so. If this post really helped you, then you can share the post with others to help them. That’s all. For any suggestions or queries, please write on comment box below.


