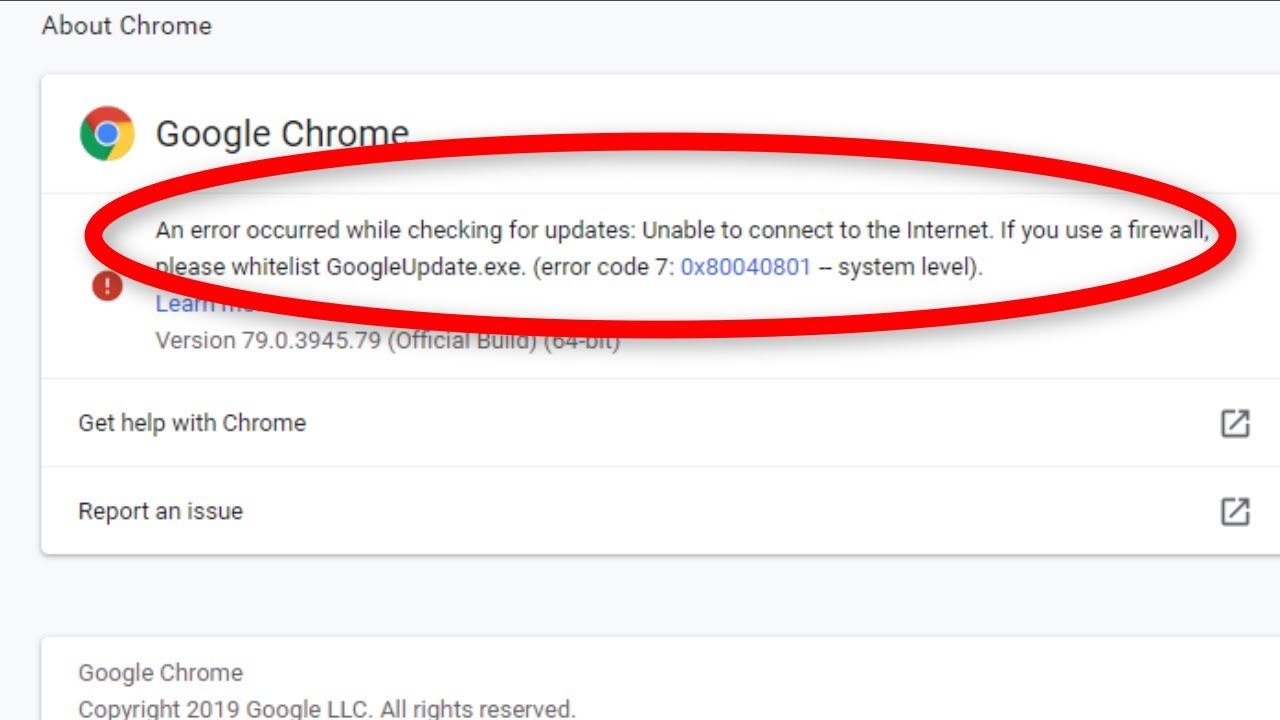
Google chrome is one of the best and most popular browsers being used by a vast number of users as it is available on almost all platforms. As per a lot of Windows users, while they attempt to update their Google chrome version to the latest one available, they often encounter chrome update error 0x80040801.
This issue is mostly reported to occur on Windows 10. This happen due to various reasons and the prime one amongst include: if the Google Update Service is disabled, if the Google Update service is blocked by Firewall or when the Google chrome installation in itself is corrupt.
In order to resolve the issue, here is a list of methods that other affected users have successfully used in order to get rid of these problems.
Solution 1: Whitelisting Google Update Service from your Firewall settings: In order to fix this issue you need to make sure that the active firewall is not currently preventing updating service from facilitating the updating process. For doing so, follow the below mentioned steps:
Firstly, press Windows + R and begin the Run dialogue box.
Now inside the Run prompt, type control firewall.cpl and then click on OK. It will launch the Windows Defender Firewall.
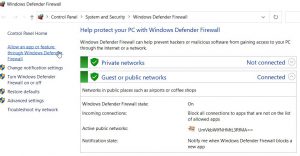
Inside it, navigate to the left-pane menu and then tap on click on Allow an app or feature through Windows Defender Firewall.
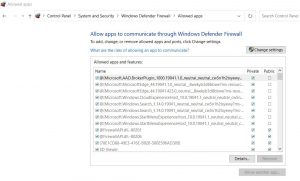
In the Allowed app & features, click on the Change settings tab
Further, on the User Account Control Prompt, tap on Yes button.
After that, scroll down the list of options and locate googleupdate.exe.
Once you find it, tick the checkboxes associated with both Private and Public and then clicks on OK.
Once you have successfully whitelisted the googleupdate.exe, check whether it has helped in resolving the said issue or not.
Solution 2: Force starts Google Update Service: This solution is also effective in resolving this problem. Google Update Service is the main service responsible for updating your Google chrome browser is enabled and permitted to be called into action whenever required.
If your system is using any dedicated app there are some possibilities that the app is forcibly disabling services that are considered unnecessary. Follow the instructions below to force start the Google Update Service:
Press Win + R > type services.msc > click OK. Doing so, will open the Services window
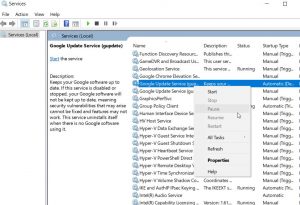
Inside it, scroll down the list of services and locate Google Update Services > Right-click over it > choose Properties
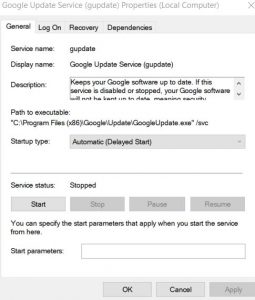
Inside it > under the General tab, set the Startup type as Automatic
Under the Services status section, click on Start tab to force start the service and then click on Apply to save the changes
Now, locate Google Update Services from the list of services and repeat (4th, 5th. 6th) steps as well.
Once done, reboot your PC to see if the issue has been resolved or not.
Solution 3: Reinstall Google Chrome: If none of the above mentioned methods work then reinstalling the latest version of Google chrome is consider. While you uninstall Google chrome, make sure you delete the associated cached folder. Once deleted, you might not lose your user settings, bookmarks or any other data as well. To do so, follow these steps:
First of all, press Windows + R and launch the Run dialogue box.
Now inside the Run prompt, type appwiz.cpl and then click on OK. It will open the Programs and Features window on your screen.
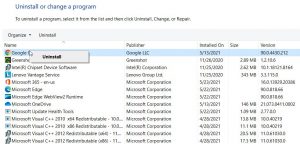
On the next screen, locate Google Chrome from the list of options, right-click over it and select Uninstall. To finish the uninstallation process, follow the on-screen instruction.
Once done, reboot your system.
After the system begins again, relaunch the RUN prompt, type %localappdata% in its empty data box, and then click on OK. It will launch the Local folder associated with your active Microsoft account.
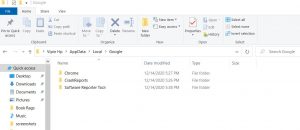
Further, open the Google folder, right-click on Chrome folder and then delete the entire directory along with all its children folders.
Once you are done with deleting the local data cache folder of Chrome, now reinstall Chrome again.
Navigate to the official download page of Google Chrome and download the latest version into your computer.
After downloading, open the executable, and follow the on-screen instructions in order to complete the installation process.
Best and easy way to speed up your Windows 10 PC
If your Windows 10 PC or laptop is running slow or showing various errors and issues then here it is suggested to scan your machine with the recommended PC Repair Tool. This is a multifunctional tool that just by scanning once detect and fix various computers errors, remove malware, hardware failure, prevent file loss, and repair the corrupted system files to speed up Windows PC performance.
Not only this but you can also fix other PC fatal errors like DLL errors, application error, BSOD errors, runtime errors and many others. To do so, you just need to download and install the tool.


