The Windows operating system relies on services and processes to run properly but sometimes these processes start causing issues. And many users reported one of these processes iastordatasvc is causing an issue for them.
Iastordatasvc (Intel Storage Data Service) is a major component of the Windows operating system used by the pre-installed Intel Rapid Storage Technology. Its main function is to ensure proper data transfer on your PC as well as grant quick access to programs/apps you normally use.
It is a program that consumes the CPU memory around 60-80% and therefore it directly affects the speed of your computer. Generally, it happens when users run any application then the PC gets slow automatically.
This error occurs not only high CPU usage but also high memory and disk usage as well as overheating and slow performance. Usually, seen in HP computers, most probably it appears on any PC using Intel Rapid Storage Technology.
If iastordatasvc in your PC is found to be genuine and is often using high CPU usage then it can be a problem. In that situations, follow the instructions mentioned below to solve iastordatasvc high cpu usage windows 10 problem.
How to fix iastordatasvc high cpu usage windows 10?
Method 1: Uninstall and Reinstall Intel Rapid Storage Technology: The main cause of this issue is Intel Rapid Storage Technology software from your computer. So, to fix it uninstall it by following below steps:
Press Win + R > write “appwiz.cpl > hit OK

In the list of installed programs, find Intel Rapid Storage Technology
Double-click on it and choose Uninstall
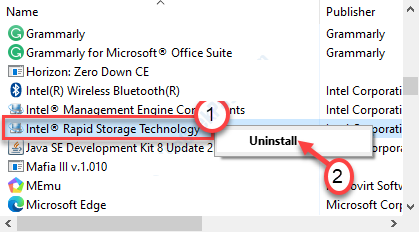
Once done, reboot your computer
After that, Install Intel Rapid Storage Technology on the official website, run it, and install it.
Method 2: Run a full system scan: Users are advised to perform full system scan on Windows 10 PC to remove malware, viruses and spyware. This error may occur due to virus infection present on your system. Here are the steps to do this:
Search for Windows Security and click on it

Inside this, click on “Virus and threat protection”

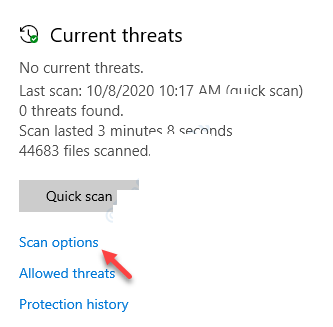
After that, to view the available scan options, click on “Scan options”
Then tap on “Full Scan” and then press on Scan Now button
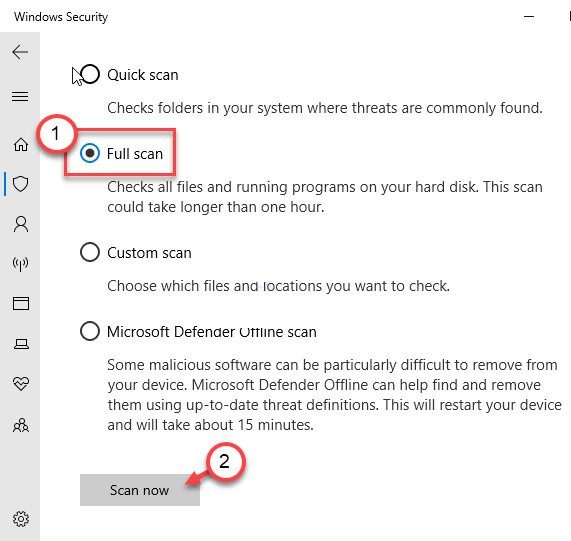
Wait for the scanning to be complete and follow the prompts to clean your computer.
However, you can run a full system scan by using Spyhunter or any third-party antivirus present on your computer.
Method 3: Manually kill IAStorData service: Killing the IAStorData is just a workaround. You can do this whenever you boot your system.
To open the Task Manager, press Ctrl + Shift + Esc altogether
Once opened, find IAStorData service
Right-click on it and then click on End Task

Lastly, exit from the Task Manager.
Method 4: Disable IAStorData service: You can disable/deactivate the autostart of Intel Raid Storage service. Follow these instructions:
In the Run prompt, type services.msc, and hit Enter.

Locate Intel Rapid Storage Technology services, and then double-click it.

Change the Startup type to Disabled.
To stop the service, click on “Stop” option
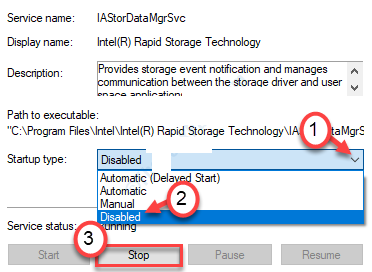
Click on Apply and then OK to save the change.

Exit the Services window and see if the problem is resolved for you.
Method 5: Run Windows Update: Running Windows Update can solve this issue because your drivers may be obsolete which causes overheating, high CPU usage and distorted Windows performance. Follow these steps to do so:
Press Win + I > select Update & Security > go to the Windows Update tab

Lastly, click on “check for updates” button
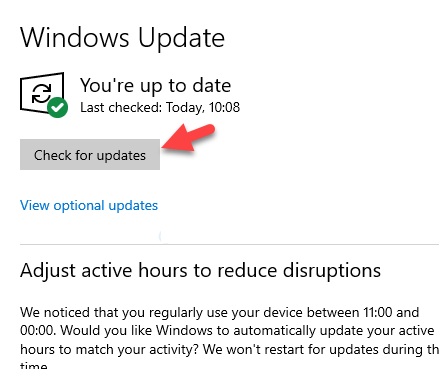
Hope to install the latest updates work for you to troubleshoot iastordatasvc high cpu usage windows 10.
Recommended Solutions
Hope after following the above-given solution you are able to fix iastordatasvc high cpu usage windows 10, but if in case you are unable to follow the given manual solutions then it is recommended to scan your PC with the PC Repair Tool.
This tool is specially designed to deal with all types of Windows errors and other factors that affect PC performance. It is also capable to fix infected registry database, damaged DLL files, corrupt system files, application issues and more.


