What is Wireless Mouse not working Windows 10?
‘Wireless Mouse’ is one of the best alternatives of touchpad in Windows laptop. This input device helps you to work through GUI (Graphical User Interface) on Microsoft Windows machine. However, Windows 10 users reported that they are facing ‘Wireless Mouse not working Windows’ issue and explained that their wireless mouse is stopped detected by Microsoft Windows even when USB device associated with wireless mouse is connected.
Users also reported that they are unable move mouse pointer and sometimes the mouse pointer keeps freezing, or moving slow while trying to move the pointer. They also explained that the possible reasons behind this issue can be corrupted, outdated or incompatible mouse & Bluetooth drivers, mouse battery discharge, power management issues, USB port problem and others.
However, it might possible that your wireless mouse (hardware) is problematic means it is unable to function anymore. To check if wireless mouse hardware is problematic or not, you can plug or connect the wireless mouse to other PC/laptop and check if it works. If yes, then something wrong in your Windows computer that are causing ‘Wireless Mouse not working’ issue. And if you found that the wireless mouse is not working on another computer as well, then you need to contact your mouse manufacturer to resolve or replace the wireless mouse with new one.
As mentioned, ‘Wireless Mouse not working Windows’ issue occurs possibly due to problematic mouse or Bluetooth drivers. You should make sure that your wireless mouse drivers if you have wireless mouse and check your Bluetooth driver also if you have Bluetooth mouse is up-to-date or not. Note that outdated or corrupted drivers can triggers issues. So, wireless mouse driver update is necessary.
Some common issue associated with ‘Wireless Mouse not working Windows 10’
- Wireless mouse pointer get stuck or freezes
- Wireless mouse button click does not responding
- Wireless Mouse settings grayed out
- Mouse drivers is not detected by Microsoft Windows
- Mouse pointer moves randomly
How to fix Wireless Mouse not working Windows 10?
Method 1: Fix ‘Wireless Mouse not working’ Issue with ‘PC Repair Tool’
‘PC Repair Tool’ is easy & quick way to find and fix BSOD errors, DLL errors, EXE errors, malware or viruses issues, problems with applications or programs, and other System issues with just few clicks. This way, you can fix ‘Wireless Mouse not working’ problem. You can get this tool through link/button below.
Method 2: Update Wireless Mouse Drivers in Windows 10
As mentioned, outdated or corrupted mouse drivers can cause mouse not working problem. You can fix the issue by updating the drivers.
Step 1: Press ‘Windows + X’ keys together on keyboard and select ‘Device Manager’
Step 2: Locate and expand ‘Mice and other pointing devices’ category
Step 3: Right-click on your wireless mouse and select ‘Update Driver’
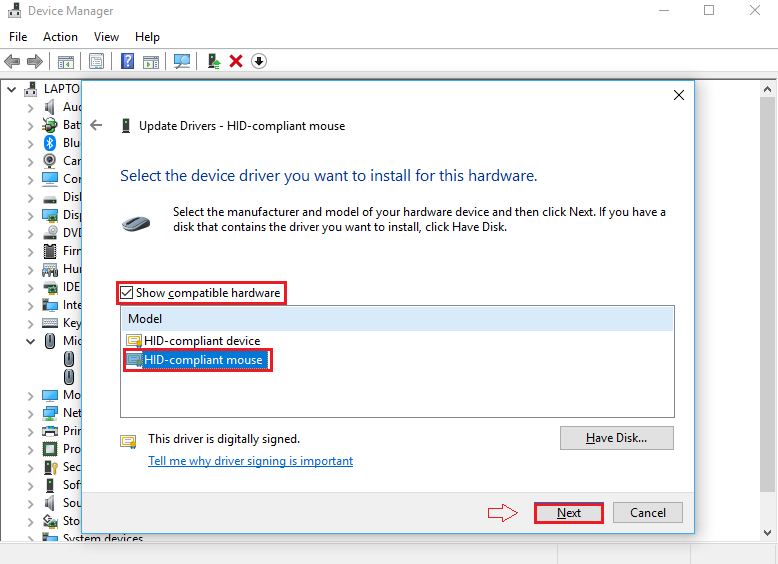
Step 4: Select ‘Browse my computer for driver software > Let me pick from a list of device drivers on my computer’
Step 5: In the next window, untick the ‘Show Compatible Hardware’ checkbox and select your mouse device from the list and hit ‘Next > Yes’ and follow on-screen instructions to finish update
Step 6: Once done, restart your computer to see the changes please check if trouble is resolved.
Update Wireless Mouse driver [Automatically]
You can also try to update mouse driver using ‘Automatic Driver Update Tool’. This software will automatically find the latest update for all Windows drivers including mouse drivers and then install into computer. You can get this tool through below link/button.
Method 3: Disable ‘Fast Startup’
You can also try to fix the issue by disabling Fast Startup. Let’s try.

Step 1: Press ‘Windows + X’ keys together on keyboard and select ‘Power Options’
Step 2: In the opened ‘Power Options’ window, select ‘Choose what the power buttons do’ in left pane and select ‘Change settings that are currently unavailable’
Step 3: Uncheck the ‘Turn On Fast Startup (recommended)’ checkbox and click ‘Save Changes’
Step 4: One done, restart your computer and check if the issue is resolved.
Method 4: Check Wireless mouse hardware, devices and connections
- Check the wireless mouse receiver on different port: As mentioned, this issue can also occur due to hardware issue. Let’s check. You can try connecting mouse receiver to other USB port of your computer and checking if it works. Try connecting the wireless mouse receiver to USB 2.0 and check if works.
- Change your wireless mouse battery: At first, you should make sure that battery is properly inserted to your wireless mouse. If the issue is still persists, you can try to fix the issue by replacing the battery with new one.
- Unplug Wireless mouse receiver and reconnect it: One possible way to fix this issue is to unplug your wireless mouse receiver from your computer and wait for few seconds. After that, re-plug the mouse receiver and check if it works.
- Try wireless mouse on different computer: You should try to check your wireless mouse on other computer. If it doesn’t work, then contact your mouse manufacturer to resolve or replace the mouse with new one.
Method 5: Turn OFF Filter keys
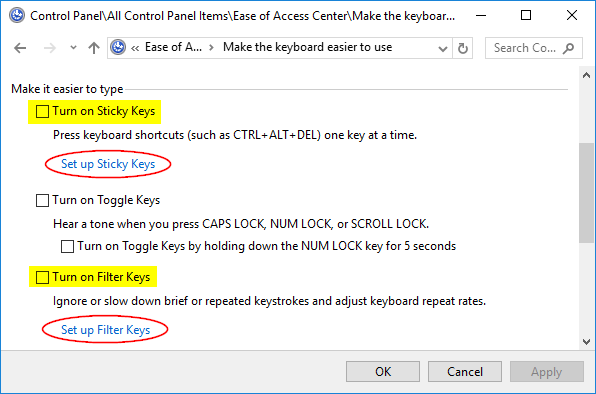
Step 1: Open ‘Control Panel’ and go to ‘Ease of Access > Ease of Access Center’
Step 2: Select ‘Make the keyboard easier to use’ option
Step 3: Uncheck the ‘Turn ON Filter keys’ option and hit ‘Apply’ and ‘Ok’ button
Step 4: After that, restart your computer and check if the trouble is resolved.
Method 6: Perform ‘Clean Boot’
This method offers you to boot your computer with selective Startup items. Let’s try.
Step 1: Press ‘Windows + R’ keys together on keyboard, type ‘msconfig’ and hit ‘Ok’ to open ‘System Configuration’
Step 2: In the opened ‘System Configuration’ window, click on ‘General’ tab and select ‘Selective Startup’
Step 3: Check ‘Load System services’ and untick ‘Load Startup items’ checkbox
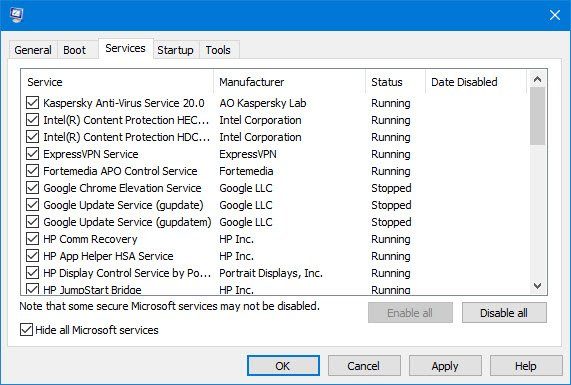
Step 4: Now, click on ‘Services’ tab and check ‘Hide All Microsoft Services’
Step 5: Now, click on ‘Startup’ tab and hit ‘Open Task Manager’
Step 6: In the opened ‘Task Manager’, Under ‘Startup’ tab, right-click on each process one-by-one and select ‘Disable’ to disable all processes
Step 7: Close ‘Task Manager’ and back to ‘System Configuration’ and hit ‘Apply’ and ‘Ok’, and then restart your computer. Once done, please check if trouble is resolved.
Conclusion
I am sure this post helped you on How to fix Wireless Mouse not working Windows 10 with several easy steps/methods. You can read & follow our instructions to do so. That’s all. If this post really helped you, then you can share the post with others to help them.


