What is ‘Webcam not working’ issue in Windows 10?
It is common problem occurs in Windows 10 computer due to several reasons. If webcam integrated/connected to your Windows computer is not working or causing some error while you trying to access camera through ‘Camera App’, then you are in right place for the solution. One possible reason behind Webcam/camera not working issue is faculty camera drivers or driver conflicts.
To check the status of your camera drivers in Windows 10, you need to open ‘Device Manager’, expand ‘Imaging Devices’ or ‘Other Devices’ category and check if it shows ‘Yellow Exclamation/Questioned Mark’ on your camera device in ‘Device Manager’. If yes, then outdated or problematic camera driver is core reason behind this issue. In such case, you can fix ‘Camera not working’ issue in Windows 10 by updating the camera driver to latest build.
Sometimes, webcam not working issue occurs with specific app like ‘Camera App’ possibly if camera is already in use by some other application like ‘Skype’. In such case, you need to close the application already running the camera in background and then check if issue is resolved. In sort, this problem can occur if you want to use camera through two apps simultaneously. Closing the app that is using your Windows camera offers you to use the camera with another application.
If Windows Firewall or antivirus software’s settings offers not access to your Windows camera, then you can’t access it. It might possible that you have applied the changes in antivirus settings that no application installed into computer can access Windows camera. In such case, you need to check and change the settings and allows accessing Windows camera, or you can also try to disable the antivirus temporarily and check if the trouble is resolved.
Check if webcam is problematic or not
‘Webcam not working’ issue occurs possibly if webcam/camera hardware is not in good condition. It means this issue can be occurred due to hardware issue. In such case, you can check your camera/webcam on different computer. If your webcam is working on other device, then the reason behind camera not working is your System or something went wrong in your computer, and if not, then your webcam hardware is problematic. You can contact your camera manufacturer to resolve camera hardware issue.
Also, you should check if USB port and USB cable that plays important role in making connection to computer, is in good condition. To check this, plug your camera into other USB port and check if the trouble is resolved. You should also check if camera device is enabled in your computer or not. If not, re-enable the camera device and check if error is still persists. Let’s go for the solution.
How to fix ‘Webcam not working’ in Windows 10?
Method 1: Change Camera Privacy Settings
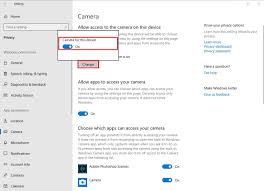
Check if the ‘Camera App’ or the specific app is allowed to access your camera in ‘Camera Privacy Settings’.
Step 1: Press ‘Windows + I’ keys together from keyboard to open ‘Settings’ App in Windows 10
Step 2: In the opened ‘Settings’ App, go to ‘Privacy’ and click on ‘Camera’ in left pane
Step 3: Click on ‘Change’ under ‘Camera Access to this device is on’ and enable it
Step 4: Enable ‘Allow Apps to access your camera’
Step 5: Scroll down to ‘Choose which apps can access your camera’, and select the app from the list you want to allowed them to access camera, and enable them. For example, enable ‘Camera App’ if you want to access camera through this app.
Method 2: Enable Camera device in ‘Device Manager’
Check if camera device is enabled or not.
Step 1: Press ‘Windows + X’ keys together on keyboard and select ‘Device Manager’
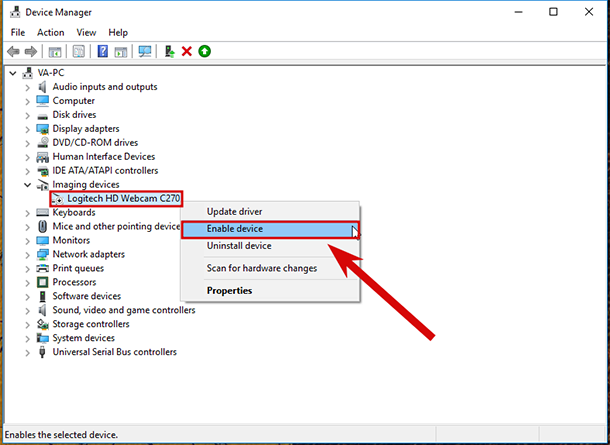
Step 2: Find your camera device in list of devices, or expand ‘Imaging Devices’ or ‘Other Devices’ category to see your camera device.
Step 3: Double-click on your camera device to open its ‘Properties’
Step 4: In the opened ‘Properties’ window, click on ‘General’ tab and make sure camera is enabled. If not, close ‘Properties’ window, right-click on your camera device and select ‘Enable Device’. Once done, please check if problem is resolved.
Method 3: Update camera/webcam drivers in Windows 10
As mentioned, outdated or corrupted camera drivers can cause ‘camera/webcam not working’ issue or similar. So, driver update is necessary.
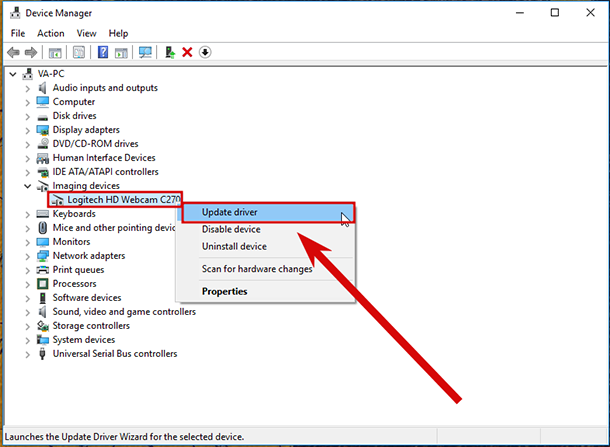
Step 1: Open ‘Device Manager’ and expand ‘Cameras’, or ‘Sound, video and game controllers’, or ‘Imaging Devices’ category
Step 2: Right-click on your camera device and select ‘Update Driver’ and follow on-screen instructions to finish update process.
Step 3: Once done, restart your computer and check if trouble is resolved.
Update Camera driver [Automatically]
You can also try to update camera driver using ‘Automatic Driver Update Tool’. This software will automatically find the latest update for Windows driver and install them into computer. You can get this tool through link/button below.
Method 4: Download and install camera drivers in Windows 10
If Windows can’t find drivers, then you can get the latest drivers from manufacturer’s website.
Step 1: Open your browser and visit your camera manufacturer’s official website.
Step 2: Search for driver for your camera model according to your Windows OS architecture like Windows 10 64-bit, and download the latest version of camera driver.
Step 3: Now, repeat ‘Step 1 to Step 3’ of above method to reinstall or update the latest version of driver.
Step 4: Once done, restart your computer and check if issue is resolved.
Method 5: Reinstall camera driver in Compatibility Mode
If camera driver is not compatible in your Windows 10 computer and even after Windows 10 upgrade, then you can reinstall the camera driver separately in compatibility mode.
Step 1: Open ‘File Explorer’ and navigate to ‘Camera driver Setup file’ or ‘webcam software program folder’ and find ‘driver setup file’
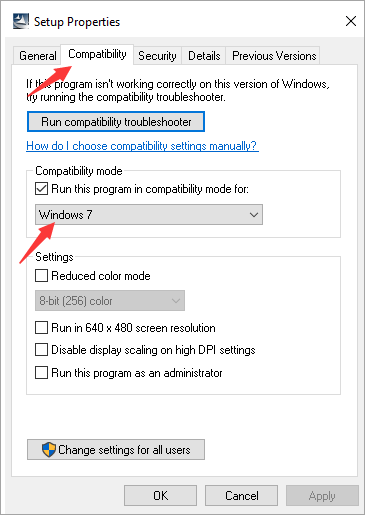
Step 2: Right-click on the ‘setup file’ and select ‘Properties’
Step 3: In the opened ‘Properties’ window, click on ‘Compatibility’ tab, check the ‘Run this program in compatibility mode for’ checkbox and select your Windows OS version like ‘Windows 10 64-bit’ from dropdown, under ‘Compatibility Mode’ section
Step 4: After that, click on ‘Apply’ and ‘Ok’ to see the changes.
Step 5: Now, double-click on setup file and follow on-screen instructions to install the driver. Once done, please check if the issue is resolved.
Method 6: Reset Windows 10
If you are unable to fix webcam not working issue in Windows 10 with methods mentioned above, then you can try to fix the issue by resetting Windows 10. While performing resetting Windows 10, ensure to select ‘Keep my files’ so that your personal files will be saved.
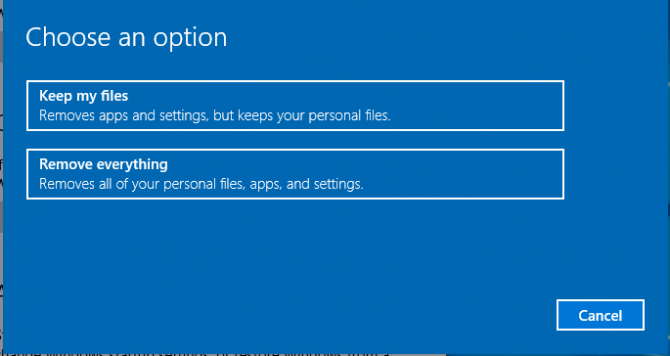
Step 1: Create a backup of your all personal files or data before performing reset. After that, hold the ‘Shift’ key and restart your computer. Make sure you hold ‘SHIFT’ key down when Windows is restarting and don’t release the key until you see ‘Choose an Option’ under ‘Advanced Startup’
Step 2: Now, select ‘Troubleshoot > Reset This PC > Keep my files’ and follow on-screen instructions to finish resetting process.
Step 3: Wait to complete the process. Once done, reboot your computer and check if trouble is resolved.
Method 7: Fix ‘Webcam not working’ issue in Windows 10 with ‘PC Repair Tool’
If you don’t have enough time or knowledge to implement manual steps mentioned above, then you can try ‘PC Repair Tool’. This software offers you to find and fix BSOD errors, DLL errors, EXE errors, malware or viruses issues, and other System issues with just few clicks. You can get this tool through link/button below.
Conclusion
I hope this post helped you on How to fix Webcam not working in Windows 10 with several easy steps/methods. You can read & follow our instructions to do so. That’s all. For any suggestions or queries, please write on comment box below.


