
What is ‘This site can’t be reached’ error in Google Chrome?
If you are experiencing ‘This site can’t be reached’ error while trying to access certain WebPages or website on Google Chrome browser in Windows 10, then you are in right place for the solution. Here, you will be guided with easy steps/methods to resolve the error. Let’s starts the discussion.
‘This site can’t be reached’ error in Google Chrome: It is common Google Chrome error usually appeared when you try to access or visit certain webpage or website on Google Chrome browser. This error indicates that you can’t access the site you entered into URL due to site’s DNS server/address issue. This error is appeared with some error code like ‘DNS_PROBE_FINISHED_NXDOMAIN’. Let’s take a look at error message.
“This site can’t be reached
www.dhfhd.com’s server DNS address could not be found.
DNS_PROBE_FINISHED_NXDOMAIN”
The above error message is appeared when you try to access ‘www.dhfhd.com’ site which has DNS lookup failed issue or problem with DNS address/server. In sort, the core reason behind this error is to DNS lookup failed that’s why you are receiving the error while trying to access the site. If you are not aware, DNS is the network service that converts a website’s name to its Internet address.
‘This site can’t be reached’ is occurred usually due to problem with internet connection, misconfigured network, unresponsive DNS server, bad configured network settings and DNS address, problem with Google chrome browser itself and other reasons. At first, you should make sure that there is no issue with your internet connection and internet speed, and check if you have stable network/internet.
Also, this error can be occurred due to interference of Windows Firewall or third-party antivirus software in computer. It might possible your Windows Defender Firewall or third-party antivirus software is blocking the certain webpage or website from accessing for some security reasons or due to its over security. In such case, you can disable your firewall and antivirus software temporarily in order to access the webpage. Let’s go for the solution.
How to fix This site can’t be reached error on Google Chrome in Windows 10?
Method 1: Fix ‘This site can’t be reached’ error with ‘PC Repair Tool’
If this error is occurred due to some problems in your Windows PC, then you can try to fix the issue with ‘PC Repair Tool’. This software offers you to find and fix BSOD errors, DLL errors, EXE errors, problems with programs, malware or viruses issues, system files or registry issues, and other System issues with just few clicks. You can get this tool through button/link below.
Method 2: Restart ‘Network Store Interface Service’, ‘DNS Client’ and ‘DHCP Client’ service in Windows 10
One possible way to resolve this issue is to restart ‘Network Store Interface Service’, ‘DNS Client’ and ‘DHCP Client’ services in ‘Services’ window in Windows 10.
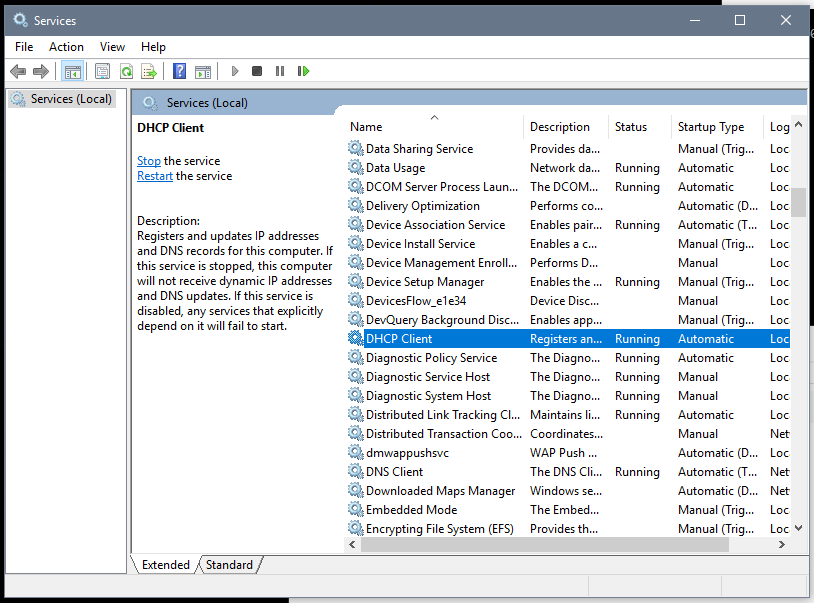
Step 1: Press ‘Windows + R’ keys on keyboard, type ‘services.msc’ in the opened ‘Run’ dialog box and hit ‘OK’ to open to ‘Services’ window
Step 2: Find ‘Network Store Interface Service’, ‘DNS Client’ and ‘DHCP Client’ services in the list of services one-by-one
Step 3: Right-click each service one-by-one and select ‘Restart’ option to restart the service. If the service is not running, then you can select ‘Start’ option in order to start these services.
Step 4: Once done, restart your computer and check if the error is resolved.
Method 3: Modify Internet Protocol version 4 DNS address
You can make certain changes in network settings like changing DNS address of IPv4 for your network adapter in order to fix the issue.
Step 1: Open ‘Control Panel’ in Windows 10 and go to ‘Network and Internet > Network and Sharing Center’
Step 2: Click on ‘Change Adapter Settings’ option in left pane, and right-click on your current active network and select ‘Properties’
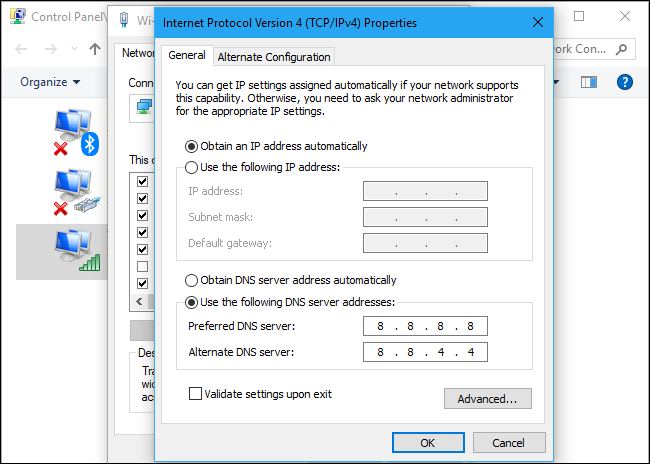
Step 3: Find and select ‘Internet Protocol Version 4 (TCP/IPv4)’, and click on ‘Properties’ button
Step 4: In the opened ‘IPv4 properties’ window, check ‘Use the following DNS server addresses’ radio button and enter ‘8.8.8.8’ and ‘8.8.4.4’ in preferred and Alternate DNS server field. This is called Google DNS servers.
Step 5: Check ‘Validate settings upon exit’ checkbox, and then hit ‘Ok’ to save the changes
Step 6: Once done, try accessing the same site on the Google Chrome that was causing the error, and check if the error is resolved.
Method 4: Reset TCP/IP
If modifying TCP/IP didn’t work for you, then you can perform TCP/IP reset in computer in order to fix the issue.
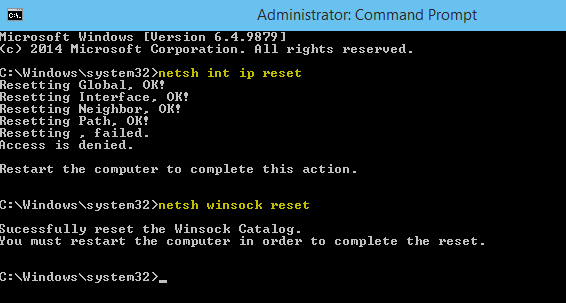
Step 1: Press ‘Windows + X’ keys on keyboard and select ‘Command Prompt as Administrator’
Step 2: Type the following commands one-by-one and hit ‘Enter’ key to execute
ipconfig /release
ipconfig /all
ipconfig /flushdns
ipconfig /renew
Step 3: Wait for the execution. After that, restart your computer to save the changes and check if the error is resolved.
Method 5: Run ‘Windows Network Diagnostics’ troubleshooter
Windows 10 built-in ‘Windows Network Diagnostics’ troubleshooter can fix this error. Let’s try.
Step 1: Right-click on ‘Network/WiFi’ icon on ‘System Tray’ and select ‘Open Network and sharing center’ or ‘Open Network and Internet settings’
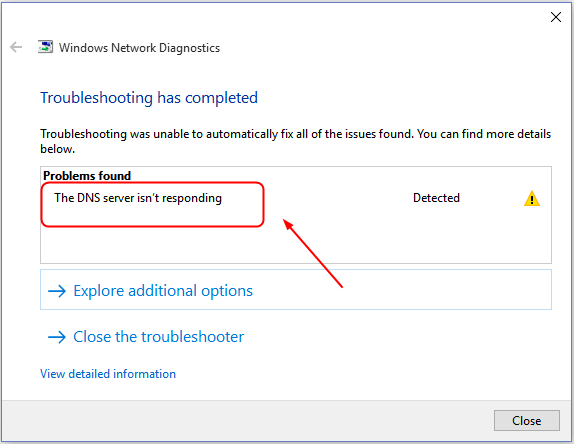
Step 2: Find and right-click on your network adapter, and select ‘Diagnose’ option. This will open ‘Windows Network Diagnostics’ troubleshooter and check for the issue.
Step 3: Follow on-screen instructions to finish troubleshooting process. Once troubleshooting finished, it shows results with ‘Try these repairs as an administrators’ button if any problem is detected, click this button to resolve the error.
Step 4: In next prompt, click ‘Apply this Fix’ option and check if the error is resolved.
Method 6: Clear Google chrome cache, cookies or data
Outdated or corrupted browser cache, cookies or data can cause this type of error. You can clear browser cache, cookies or data in order to fix the issue.
Step 1: Open Google Chrome browser and click on ‘Three-Dots’ icon or ‘Chrome Menu’ at top-right corner
Step 2: Select ‘More Tools > Clear browsing data…’ option.
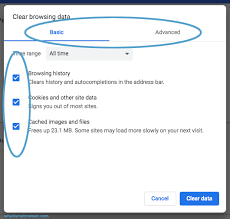
Step 3: In the opened ‘Clear browsing data’ dialog box, select ‘All Time’ from ‘Time Range’ dropdown, select the checkbox next to cache, browser history, cookies and cached images & videos, and then hit ‘Clear Data’ button
Step 4: In the confirmation dialog box, click on ‘Clear data’ again to start clearing process. Once done, restart your browser and check if the error is resolved.
Method 7: Reset Google Chrome
This error can also be occurred due to corruption in Google Chrome settings or setting is bad configured. You can fix the issue by performing Google chrome reset in your computer.
Step 1: Open ‘Google Chrome’ and click on ‘Three-Dots’ icon or ‘Chrome Menu’ at top-right corner, and select ‘Settings’
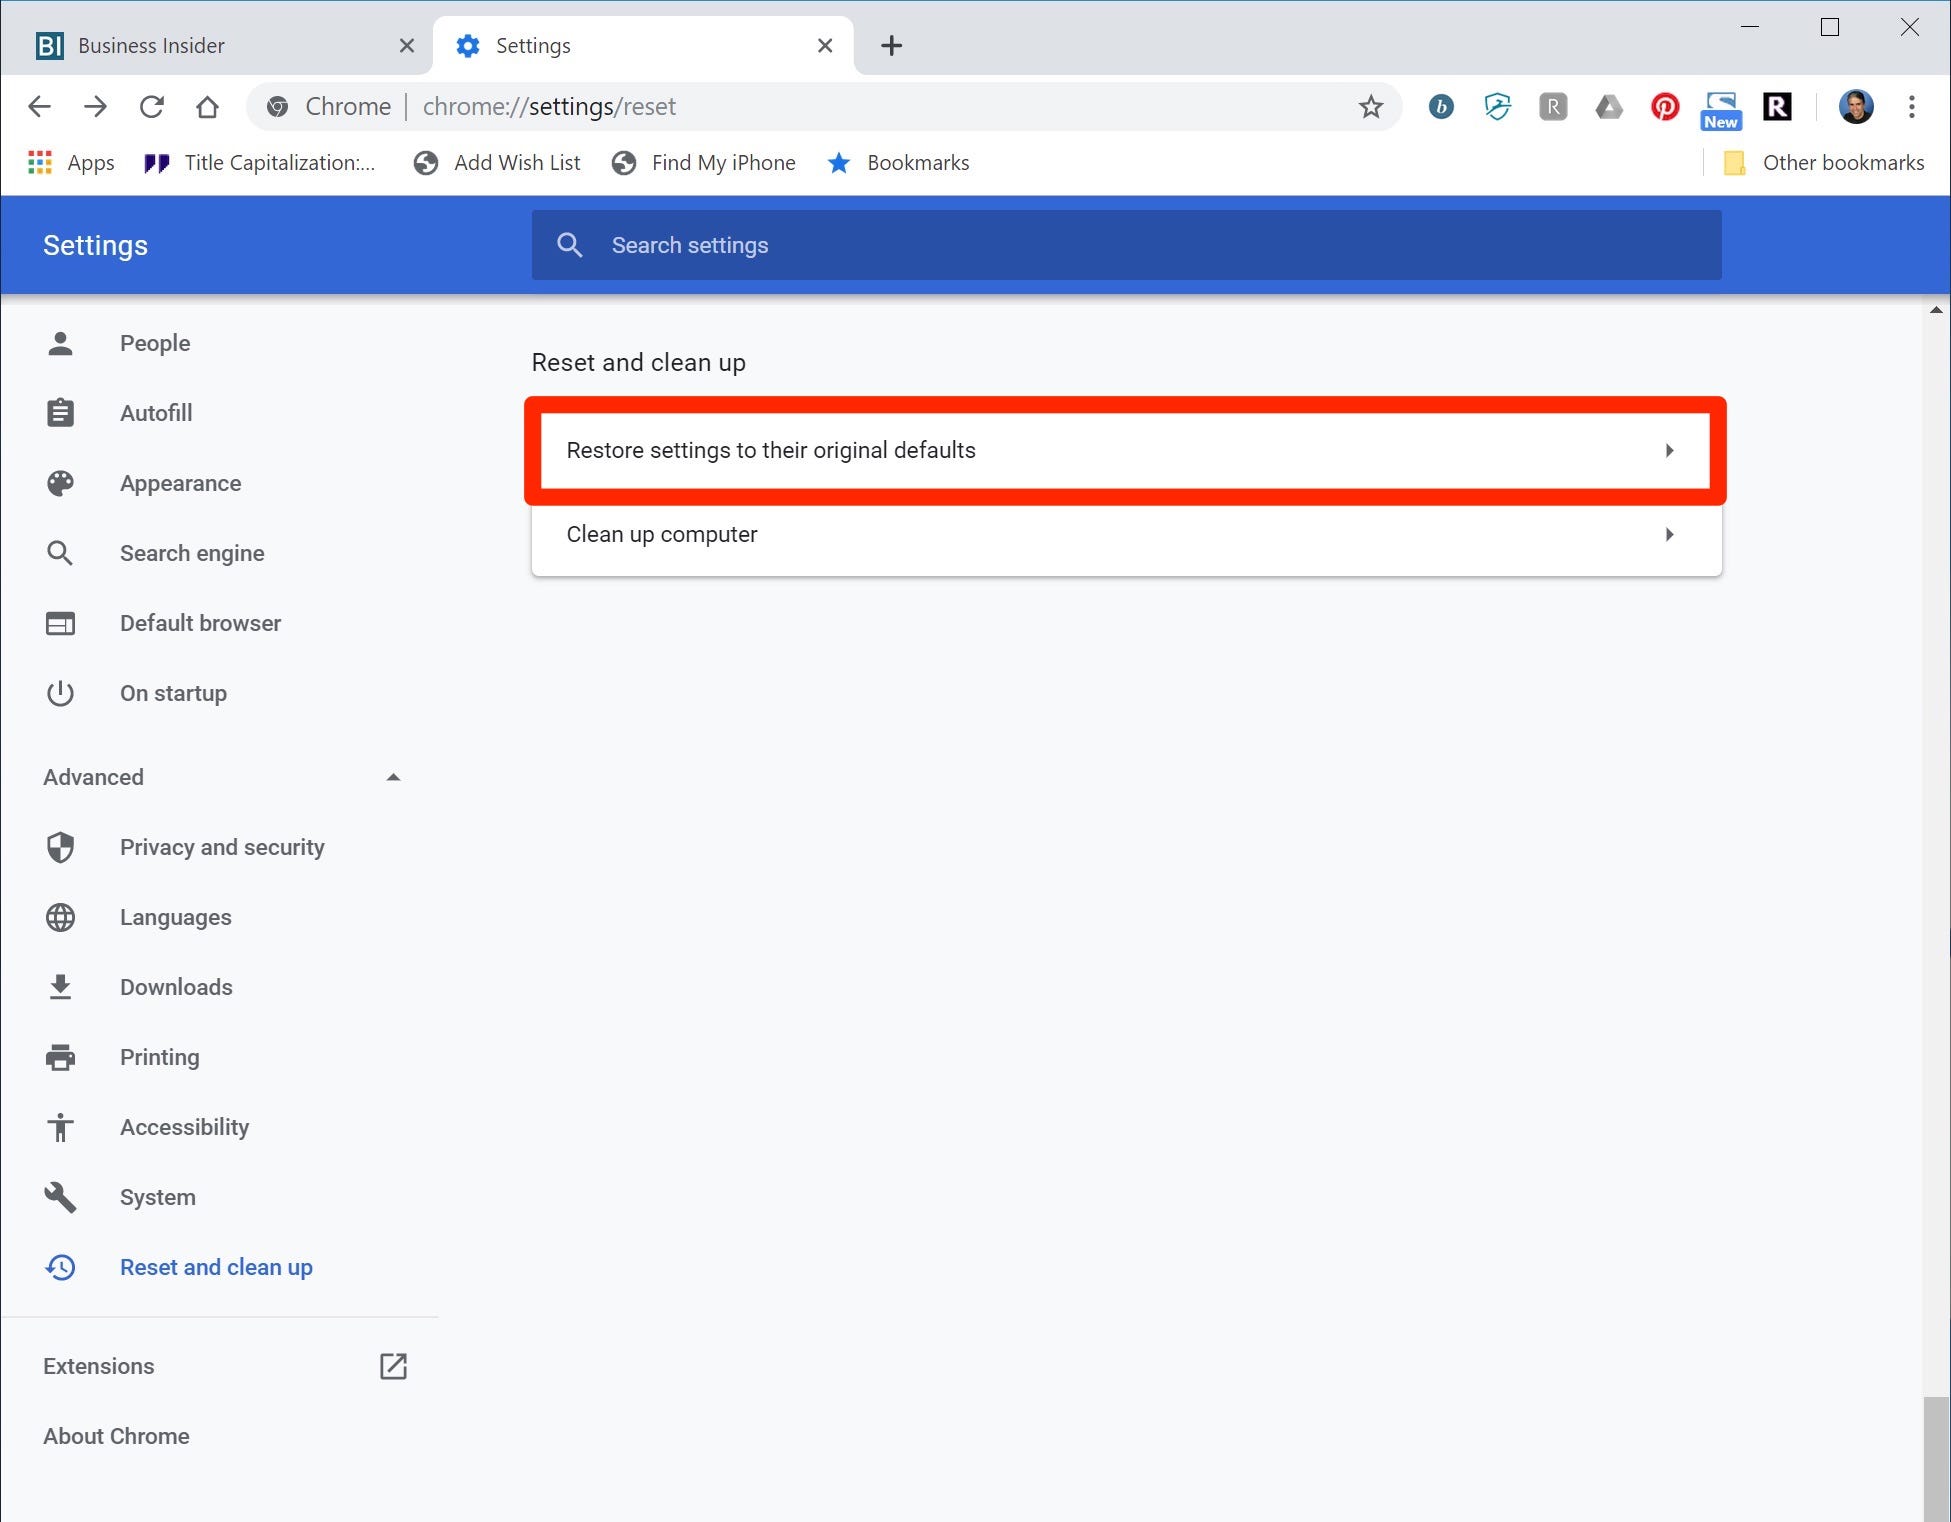
Step 2: In ‘Settings’ page, click on ‘Advanced’ option in left pane and click on ‘Reset and clean up’ option
Step 3: Now in right pane, click on ‘Restore settings to their original defaults’, and click on ‘Reset settings’ on the confirmation dialog box if appeared in order to perform resetting.
Method 8: Reinstall Google Chrome
If resetting Chrome didn’t work for you, then you can uninstall and then reinstall Google Chrome in your Windows 10 computer in order to fix the issue.
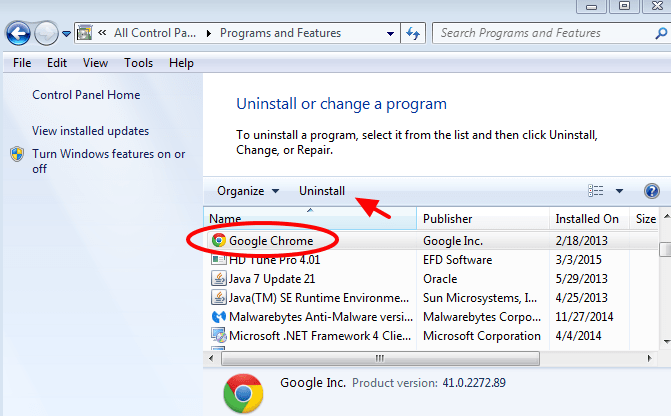
Step 1: In Windows 10, open ‘Settings’ App and go to ‘Apps > Apps & Features’
Step 2: Find and select ‘Google Chrome’ app, and select ‘Uninstall’. Follow on-screen instructions to finish uninstall process and after that, restart your computer
Step 3: After restart, open another browser like Internet Explorer or Mozilla Firefox and download and install latest version of Google Chrome browser. Once done, open Google chrome browser and check if the error is resolved.
Conclusion
I am sure this post helped you on How to fix This site can’t be reached error on Google chrome in Windows 10 with several easy steps/methods. You can read & follow our instructions to do so. That’s all. For any suggestions or queries, please write on comment box below.


