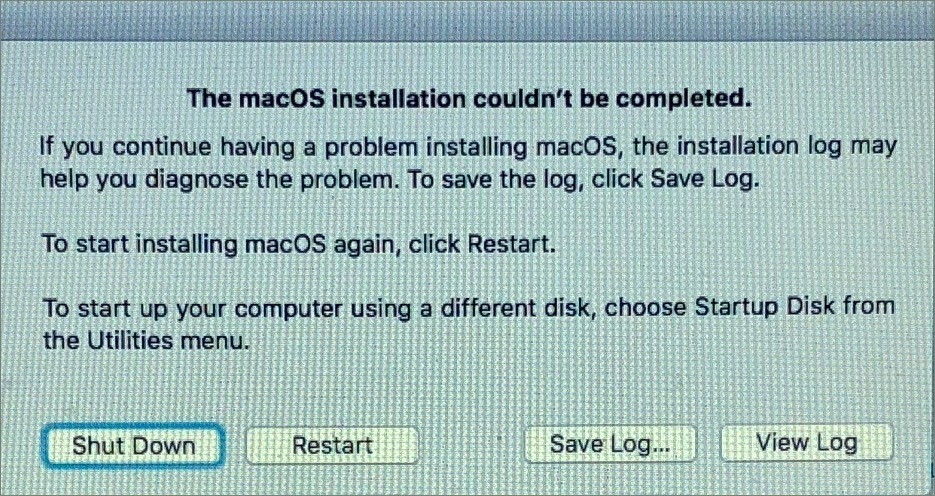
What is ‘The macOS installation couldn’t be completed error’ in Mac?
It is common error associated with MacOS Installation occurs possibly when you are updating or reinstalling macOS. Also, this error may occur even when no upgrade or update is initiated as per MacOS reported about this issue.
This error window is appeared with four options/buttons including Shut Down, Restart, Save Log, and View Log. The error message asks to go with following options to diagnose the problem. Before trying any options, you can follow our instructions to fix this issue. Also, you should try to know the reasons behind this issue.
Reasons behind ‘The macOS installation couldn’t be completed error’:
- Incompatible hardware: It might possible that some hardware device is not compatible in your Mac computer. So, you can fix the issue by removing/unplugging incompatible hardware
- Malware or Viruses attack can cause several issue like ‘The macOS installation couldn’t be completed error’.
- Missing or corrupted important MacOS installer file
- Faculty Mac’s startup disk
- Lack of free storage space in Mac
As mentioned, if your System is already infected with malware or viruses, and attempted to corrupt MacOS installer files and other legitimate functions, then it might possible to get this type of error in your device. In such case, you can find and remove all types of threats, junk files, unnecessary programs, and fix System issues with ‘MacKeeper’ – antivirus software. You can download this tool trough ‘Download MacKeeper’ link.
How to fix The macOS installation couldn’t be completed error in Mac?
One method to fix this issue is already given and you can fix this issue with just few clicks using the tool mentioned above. However, you can try manual method to fix this error. You can try to update MacOS in Safe Mode.
Method 1: Try to MacOS update from Safe Mode

Step 1: Restart your Mac
Step 2: Press & holds the ‘Shift’ key while device boots
Step 3: Release the ‘Shift’ key once login window appears and enter your credentials to log into your Mac
Step 4: After entering the Safe Mode, open ‘App Store’ and try to install update again.
Method 2: Use Terminal
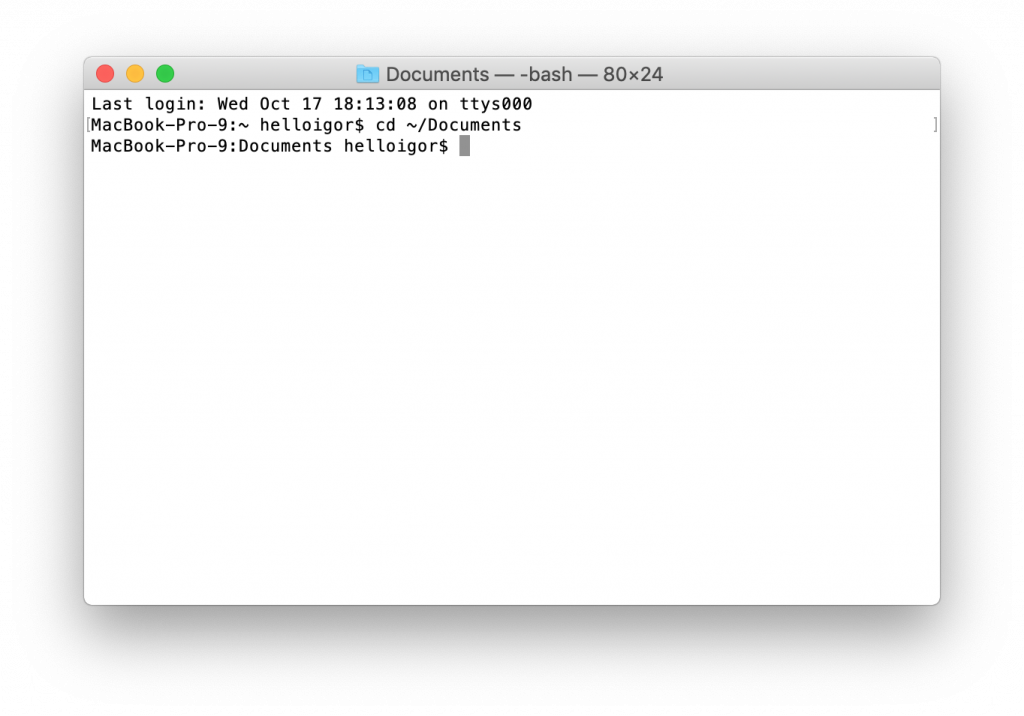
Step 1: Open ‘Terminal’ in Mac
Step 2: Type the following command one-by-one and hit ‘Enter’ key after each
cd /
csrutil disable
rm -rf macOS\ Install\ Data/
csrutil enable
reboot
Step 3: Wait to complete the process. Once done, you can try to install the MacOS update again
Method 3: Reinstall MacOS from ‘Recovery Mode’
If you are unable to install or update MacOS due to this error, you can reinstall macOS from the recovery mode.
Step 1: Turn off your Mac and start it again
Step 2: Press & hold ‘Command + R’ keys on keyboard to see ‘Apple LOGO’ or any other startup screen
Step 3: When ‘MacOS Utilities’ window appear, select ‘Reinstall MacOS > Continue’, and follow on-screen instructions to finish reinstallation process. Once done, you can try to upgrade MacOS again and check if trouble is resolved.
Method 4: Create Bootable USB and perform a clean MacOS installation
You can fix this type of issue by installing MacOS with bootable USB. But before that, you should make sure that you have strong backup of your all personal files or data on some safe external storage media.
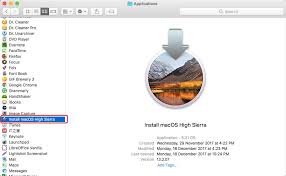
Step 1: Download the MacOS installation. If installer starts automatically, disable it.
Step 2: Open ‘Applications’ folder and you should see an app ‘Install MacOS (with version name)’
Step 3: Connect a USB flash drive to your Mac. You need a drive with at least 12GB of storage and is formatted as ‘Mac OS Extended’
Step 4: Now, open ‘Terminal’ from the ‘Applications’ folder
Step 5: Enter the following command
sudo /Applications/Install\ macOS\ Catalina.app/Contents/Resources/createinstallmedia –volume /Volumes/Name_of_your_USB_drive
Step 6: Enter your Administrator password when asked and press ‘y’ to confirm that you want to erase the volume
Step 7: Make sure bootable USB is connected. Restart your Mac, and hold ‘Options’ key until ‘Startup Manager’ appears
Step 8: Select your USB flash drive and select ‘Install macOS’
Step 9: Click on ‘Continue’ and follow on-screen instructions to finish installation process.
Method 5: Run System scan with ‘MacKeeper’ to find and fix ‘The macOS installation couldn’t be completed error’ with just few clicks
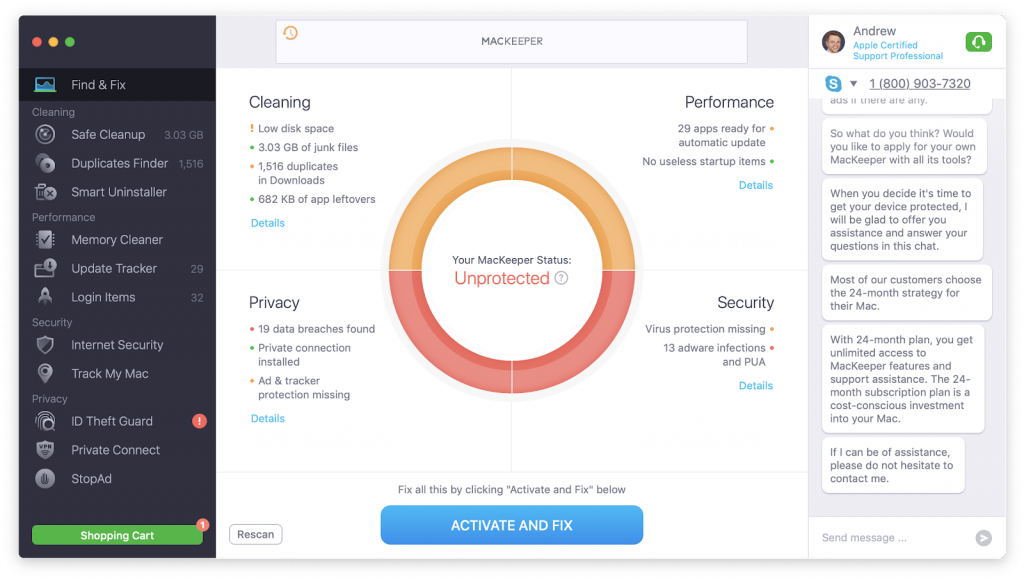
If you are unable to fix this issue with methods mentioned above, then the problem is mostly likely a glitch with your System. Malware or viruses attacks can cause this type of issue. It might possible that malware or malicious programs installed in your computer has corrupted some legitimate functions or files associated macOS installer so that you couldn’t finish the upgrade process. In such case, you can use ‘MacKeeper’ – antivirus software to find and remove all types of threats, junk files, unnecessary programs, and fix System issues. You can download this tool though link below.
Conclusion
I am sure this post helped you to How to fix The macOS installation couldn’t be completed error in Mac with several easy steps. You can read & follow our instructions to do so. Note that ‘Method 5’ offers you to find and fix this issue with just few clicks. So, you can try this tool. That’s all. For any suggestions or queries, please write on comment box below.


