
What is ‘Sysprep was not able to validate error’ in Windows 10?
‘Sysprep was not able to validate error’ is common Windows error associated with Windows OS image creation. This error is usually appeared ‘Sysprep Windows tool’ to prepare image for Windows OS deployment. If ‘Sysprep Windows tool’ fails to prepare the reference OS image, then it returns with error message saying ‘Sysprep was not able to validate your Windows Installation’.
The core possible reaons behind this issue is applications or software you might have downloaded from ‘Windows Store’ or your have performed deletion of default system apps. If you are not aware, ‘Sysprep Tool – Windows 10 built-in Tool’ is designed to prepare a reference Windows OS iamge and its depersonalization, remove all unique (SID, GUID) identifiers from the system. However, running Sysprep Windows tool can return with ‘Sysprep was not able to validate your Windows Installation’ error in some cases. Let’s take a look at error message.
“Sysprep was not able to validate your Windows installation. Review the log file at %windir%\system32\Sysprep\panther\setupact.log for details. After resolving the issue use Sysprep to validate your installation again.”
Reasons behind ‘Sysprep was not able to validate error’:
This error occurs usually if you have downloaded certain apps from Windows Store which is preventing the ‘Sysprep Tool’ from implementing its operation. In most cases, Candy Crush and Twitter app were detected as problem creator while peppering Windows OS image using ‘Sysprep Tool’ in Windows 10. Another possible reasons behind this issue can be the removal of default Windows applications. If you are facing the same error, then you are in right place for the solution. Let’s go for the solution.
How to fix ‘Sysprep was not able to validate error’ in Windows 10?
Method 1: Fix ‘Sysprep was not able to validate your Windows Installation’ error with ‘PC Repair Tool’
‘PC Repair Tool’ is easy & quick way to find and fix PC problems like BSOD errors, EXE errors, DLL errors, problems with programs or files, malware or viruses issues, and other system issues with just few clicks. You can get this tool through button/link below.
Method 2: Uninstall problematic applications
As mentioned, some applications like Candy Crush and Twitter applications downloaded from Windows Store are causing ‘Sysprep was not able to validate’ error. So, you can remove such applications to resolve the issue.
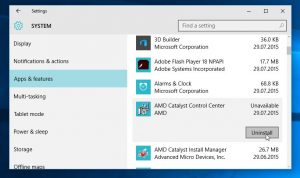
Step 1: Press ‘Windows + I’ keys on keyboard to open ‘Settings’ App in Windows 10
Step 2: Go to ‘Apps > Apps & Features’, find the app like ‘Candy Crush’ and ‘Twitter’ and problematic software that is causing this issue.
Step 3: Select it and click ‘Uninstall’. Follow on-screen instructions to finish uninstall process.
Step 4: Repeat the same steps for ‘Twitter’ and other problematic applications. Once done, restart your computer and check if the trouble is resolved.
Method 3: Install Default Windows Applications
As mentioned, removal of default Windows applications can cause ‘Sysprep was not able to validate your Windows Installation’ error, then you can resolve the issue by refreshing the default Windows applications.
Step 1: Press ‘Windows + X’ keys on keyboard and select ‘Windows PowerShell as Admin’
Step 2: Type the following command in ‘PowerShell’ and hit ‘Enter’ key to execute
Get-AppxPackage -AllUsers| Foreach {Add-AppxPackage -DisableDevelopmentMode -Register “$($_.InstallLocation)\AppXManifest.xml”}
Step 3: Wait to complete the process. Once done, try running ‘Sysprep Tool’ and check if the trouble is resolved.
Method 4: Fix ‘Sysprep was not able to validate error’ with Windows Registry
Sometimes, this error occurs usually after Windows 10 OS upgrade. In such case, you can change some registry settings to resolve the issue.
Step 1: Press ‘Windows + R’ keys on keyboard, type ‘regedit’ in the opened ‘Run’ dialog box and hit ‘Ok’ button to open ‘Registry Editor’
Step 2: In the opened ‘Registry Editor’, navigate to following path:
HKEY_LOCAL_MACHINE\SYSTEM\Setup\
Step 3: Locate ‘Upgrade’ key in right pane, right-click on it and select ‘Delete’ option to delete the key
Step 4: Once done, restart your computer to save the changes and check if the problem is resolved.
Method 5: Login with new Administrator account
Another possible way to resolve the issue is to create and login with new admisntrator account in Windows 10. Let’s try.
Step 1: Make sure you are logged in as admisntrator in Windows 10
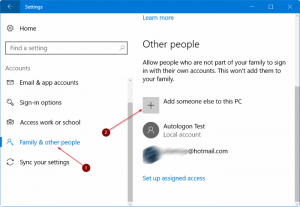
Step 2: Now, open ‘Settings’ App in Windows 10 and go to ‘Accounts > Family & other users > Add someone else to this PC’
Step 3: Click ‘I don’t have this person’s sign-in information > Add user without a Microsoft Account’
Step 4: Enter a username and password of your choice and once done, click on newly created account and select ‘Change Account Type’
Step 5: Under ‘Account Type’, select ‘Admisntrator’ and hit ‘Ok’ button
Step 6: Now, restart your computer and log in with newly created admisntrator account
Step 7: After restart, open ‘Settings’ App again, go to ‘Accounts > Family & other users’ tab, select the older admisntrator account and select ‘Remove’ to remove the user account
Step 8: Again restart your computer and check if ‘Sysprep was not able to validate error’ is resolved.
Conclusion
I am sure this post helped you on How to fix Sysprep was not able to validate error in Windows 10 with several easy methods. You can read & follow our instructions to do so. That’s all. For any suggestions or queries, please write on comment box below.


