What is ‘storport.sys error’ – Blue Screen of Death (BSOD) error in Windows 10?
In this post, we are going to discuss on “How to fix storport.sys error Windows 10”. You will be guided with easy steps/methods to resolve the issue. Let’s starts the discussion.
‘storport.sys error BSOD’: It is common Windows problem associated with Blue Screen of Death – BSOD error. This BSOD error is appeared usually in the middle of your work on computer, or while you try to turn ON your Windows computer. This error prevents you from accessing or opening your Windows desktop means you can’t log into your Windows computer.
storport.sys error is appeared with some message saying ‘Your PC ran into a problem and needs to restart. We’ll restart for you’, along with some Windows Stop codes like KMODE EXCEPTION NOT HANDLED,,KERNEL DATA INPAGE, PAGE FAULT IN A NONPAGED AREA, SYSTEM THREAD EXCEPTION NOT HANDLED, IRQL NOT LESS OR EQUAL, SYSTEM SERVICE EXCEPTION or other Windows Stop codes.
Also, this BSOD error shows ‘storport.sys’ on the error screen. If you are not aware, storport.sys is legitimate Windows system file associated with Storage of data on Storage unit of your computer. This file is created by Microsoft Storage Port Driver. However, several users reported that they faced ‘storport.sys BSOD error’ in their Windows 10 computer while they tried to turn ON their computer, or the error occurred in the middle of work on computer.
The possible reason behind this BSOD error can be corruption in system files or registry, corrupted or outdated device drivers and Windows OS, incompatible firmaware, hardware issues, malware or viruses issues in computer, and other reasons. However, it is possible to resolve the issue with our instructions. Let’s go for the solution.
How to fix storport.sys error Windows 10?
Method 1: Fix storport.sys – Blue Screen of Death (BSOD) error with ‘PC Repair Tool’
‘PC Repair Tool’ is easy & quick way to find and fix BSOD errors, EXE errors, DLL errors, problems with programs, malware or viruses issue, system files or registry issues, and other system issues with just few clicks. You can get this tool through button/link below.
Method 2: Update device drivers in Windows 10
Outdated or corrupted device drivers can cause this type of issue. You can update your Windows 10 drivers in order to fix the issue.
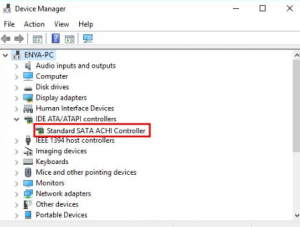
Step 1: Press ‘Windows + X’ keys on keyboard and select ‘Device Manager’
Step 2: Expand each device category one-by-one and check if any device is showing ‘Yellow Exclamation Mark’ on it. If yes, then driver update is necessary for such device. For example, you can expand IDE ATA/ATAPI Controllers‘ and ‘Storage Controllers’ category and update the drivers under this category if required.
Step 3: Right-click on the device with ‘Yellow Exclamation Mark’, and select ‘Update Driver Software’. Follow on-screen instructions to finish update process
Step 4: Once done, reboot your computer and check if the issue is resolved.
Method 3: Download or reinstall Device drivers update in Windows 10 [Automatically]
You can also try to update your all Windows drivers with ‘Automatic Driver Update Tool’. This software will automatically find the latest updates for all Windows drivers including IDE ATA/ATAPI controllers and Storage Controllers driver, and then install them into your computer. You can get this tool through button/link below.
Method 4: Run SFC Scan, DISM Scan and CHKDSK Scan
You can also try to resolve the issue by running SFC scan to repair system files, running DISM Scan to repair hard disk image issue, and running CHKDSK Scan to repair hard disk issue, in order to fix this BSOD error.
Step 1: Press ‘Windows + X’ keys on keyboard and select ‘Command Prompt as Administrator’
Step 2: Run SFC Scan. Type ‘sfc /scannow’ command and hit ‘Enter’ key to execute
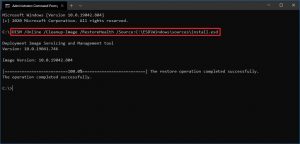
Step 3: Once executed, run DISM scan. Type the following command one-by-one and hit ‘Enter’ key after each to execute
Dism /Online /Cleanup-Image /CheckHealth
Dism /Online /Cleanup-Image /ScanHealth
Dism /Online /Cleanup-Image /RestoreHealth
Step 4: Run CHKDSK Scan. Type ‘CHKDSK C:’ and hit ‘Enter’ key to execute
Step 5: Wait to complete the process. Once done, reboot your computer and please check if the error is resolved.
Method 5: Run Blue Screen Troubleshooter
Windows 10 built-in ‘Blue Screen’ troubleshooter can resolve the issue. Let’s try.
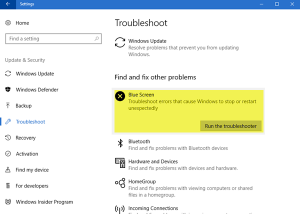
Step 1: Press ‘Windows + I’ keys on keyboard to open ‘Settings’ App
Step 2: Go to ‘Update & Security > Troubleshoot’, find and select ‘Blue Screen’ troubleshooter, and click on ‘Run the troubleshooter’
Step 3: Follow on-screen instructions to finish troubleshooting process. Once done, please check if the error is resolved.
Method 6: Power Cycle SSD
Another possible way to resolve this issue is to perform power cycle SSD.
Step 1: Turn OFF your computer and disconnect your computer from all power supplies
Step 2: Now, press & hold the ‘Power’ button for more than 30 seconds and then wait for 10 minutes
Step 3: Now, reconnect all of power supplies and turn ON your computer
Step 4: Press & hold ‘SHIFT’ key on keyboard and then click on ‘Windows LOGO icon > Power > Restart’
Step 5: Now, press the function key to enter into BIOS settings. Let your PC stay in BIOS mode for 20 minutes
Step 6: Now, repeat ‘step 1 to step 2’ and then remove SSD, unplug cables and after few seconds, reconnect all of power supplies. Once done, turn ON your computer and check if the issue is resolved.
Method 7: Re-create storport.sys file in Windows 10
Step 1: Open ‘File Explorer’ and navigate to ‘(C:)\Windows\System32\drivers’
Step 2: Find ‘storport.sys’ file and rename it to ‘storport.old’
Step 3: Now, restart your computer and check if the issue is resolved.
Conclusion
I am sure this post helped you on How to fix storport.sys error Windows 10 with several easy steps/methods. You can read & follow our instructions to do so. That’s all. For any suggestions or queries, please write on comment box below.


