
What is ‘Steam Overlay not working’ issue in Windows 10?
‘Steam’ is popular video game digital distribution service by ‘Valve Corporation’. This platform offers digital management (DRM), server hosting, video streaming, and social networking services. It features like friends lists and groups, cloud storage and in-game voice and chat functionality. ‘Steam’ – video game digital platform also features ‘Steam Overlay’ which is used to access ‘Steam’ platform while you are playing any game.
Steam Overlay offers you can invite your friends and groups, send messages and find guides, and reply to messages, and so on. However, users reported that they faced ‘Steam Overlay not working’ issue in Windows 10 and explained the possible reason behind this issue can be that programs don’t have administrator access. In such case, you need to granting administrator access for this application.
Another possible reason behind this issue can be third-party applications that are trying to interfere process/program related to ‘Steam’ or Steam Overlay’ in Windows 10. Disabling such applications that are causing the issue can resolve the issue. However, the solution for this problem can be varied depending on hardware and software configuration your system have. Let’s go for the solution.
How to fix ‘Steam Overlay not working’ Issue in Windows 10?
Method 1: Fix Steam Overlay not working issue with ‘PC Repair Tool’
‘PC Repair Tool’ is easy & quick way to find and fix PC problems like BSOD errors, DLL errors, EXE errors, malware or viruses issue, problems with applications or programs and other system issues with just few clicks. You can get this tool through link/button below.
Method 2: Give Steam Overlay administrator access
As mentioned, one possible reason behind this issue can be the programs don’t have admin access. You can change to give ‘Admin’ access to resolve the issue.
Step 1: Open ‘File Explorer’ and navigate to ‘C:\Program Files (x86)\Steam’
Step 2: Locate ‘Steam.exe’ file, right-click on it and select ‘Properties’
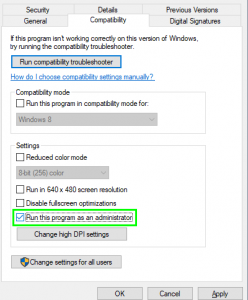
Step 3: In the ‘Properties’ window, click on ‘Compatibility’ tab and select ‘Run this program as Administrator’ and hit ‘Ok’ to save the changes
Step 4: Now, locate ‘GameOverlayUI.exe’ file and repeat the same step to give administrator access.
Step 5: Once done, restart your ‘Steam App’ and check if the trouble is resolved.
Step 6: If the issue is still persist, locate the folder of game that causes this issue, right-click on its executable and select ‘Properties’ and repeat ‘step 3’ to give your game admin access.
Step 7: Once done, please check if the trouble is resolved.
Method 3: Enable ‘Steam Overlay’
Disabling and re-enabling ‘Steam Overlay’ can also resolve the issue. Let’s try.
Step 1: Open ‘Steam Client’ in Windows 10
Step 2: Click on ‘Steam’ option at top of window and select ‘Settings’
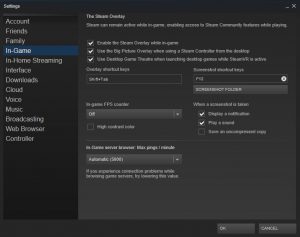
Step 3: In left pane, click on ‘In-Game’ tab and check ‘Enable the Steam Overlay while in-game’ checkbox in right-pane and also check if you are pressing the correct Overlay shortcut keys. You can change them if you want.
Step 4: Now, click on ‘Library’ tab, right-click on your game from list of games appeared and select ‘Properties’
Step 5: You will asked to check another checkbox ‘Enable the steam Overly while in-game’ and make sure it is checked.
Step 6: Restart your Steam once done and check if the trouble is resolved
Method 4: Open the game from main game folder
If you are unable to play game in ‘Steam’ due to disabled ‘Steam Overlay’, then you can try opening the game from main game folder.
Step 1: Open ‘C:\Program Files (x86)\Steam’ location in ‘File Explorer’
Step 2: Navigate to ‘Steamapps <Common’, locate and open your game folder, go to ‘bin > win 32 or win 64’
Step 3: Now, locate the executable of main game launcher and, right-click on it and select ‘Run as Administrator’. Once done, please check if Steam Overlay is working.
Method 5: Disable third-party applications
It might possible to get this problem due to third-party applications like Fraps or Razer Synapse while try to access ‘Steam Overlay’ in Windows 10. In such case, you can disable such third-party applications that cause this issue to resolve the issue.
Step 1: Press ‘CTRL + SHIFT + ESC’ keys on keyboard to open ‘Task Manager’
Step 2: In the opened ‘Task Manager’, under ‘Processes’ tab, disable all third-party applications running and close it. Once done, restart ‘Steam’ and check if the trouble is resolved.
Method 6: Check local game files and library files
Corruption in local game files and library files can cause this type of issue. Let’s check.

Step 1: Open ‘Steam Client’ in Windows 10 and click on ‘Library’
Step 2: Locate the problematic game, right-click on it and select ‘Properties’
Step 3: In the opened ‘Properties’ window, click on ‘local files’ tab and click on ‘Verify Integrity of Game Files’ option. This will then start verifying all files present according to main manifest it has. If there is any file problematic or not found, it will automatically download that files and replace it accordingly.
Step 4: Now, navigate to ‘Settings’ in ‘Steam Client’ app and open ‘Downloads’ tab, click ‘Steam Library folders’ box, right-click on it and select ‘Repair Library Files’
Step 5: Restart ‘Steam’ app and open the app with admin access and check if it resolved.
Method 7: Disable or Delete GameoverlayUI.exe
‘GameoverlayUI.exe’ is not important Windows OS file and disabling this file not problems. Yes, disabling this file in Windows 10 can be one possible solution to resolve ‘Steam Overlay not working’ issue in Windows 10. To do so, open ‘Task Manager’, locate ‘GameoverlayUI.exe’ process in ‘Processes’ tab, right-click on it and select ‘End Task’.
Once done, restart ‘Steam’ and check if the trouble is resolved. If disabling the process didn’t help, you can delete ‘‘GameoverlayUI.exe’’ file from ‘C:\Program Files (x86)\Steam’ location and again restart ‘steam’ and check if the trouble is resolved.
Method 8: Enable Overlay for specific game
It might possible that Overlay is disabled for one specific game which it is not showing up that game. In such case, you can fix the issue by changing its configuration.
Step 1: Open ‘Steam’ and sign into your account
Step 2: Click on ‘Library’ tab, right-click on the game that cause the issue, and select ‘Properties’
Step 3: Click on ‘General’ tab and check ‘Enable In-Game Overlay’ option and then check if the trouble is resolved.
Method 9: Refresh Steam files
If the problem is still persist, then you can try to resolve the issue by refreshing steam file.
Step 1: Open ‘Steam’ folder or navigate to ‘C:\Program Files (x86)\Steam’ location
Step 2: Locate the ‘Userdata, Steam.exe, Steamapps’ and delete all folders except these folders & files in this location.
Step 3: Once done, restart your computer and open ‘Steam’ platform with admin access, and check if the trouble is resolved.
Other methods:
Step 1: Disable Firewall/antivirus software temporarily
Step 2: Update Windows 10 OS to latest built
Step 3: Restart your computer. Sometimes, restarting computer can fix several issues like this.
Conclusion
I am sure this post helped you on How to fix Steam Overlay not working issue in Windows 10 with several easy ways. You can read & follow our instructions to do so. If this post really helped you, then you can share the post with others to help them. That’s all. For any suggestions or queries, please write on comment box below.


