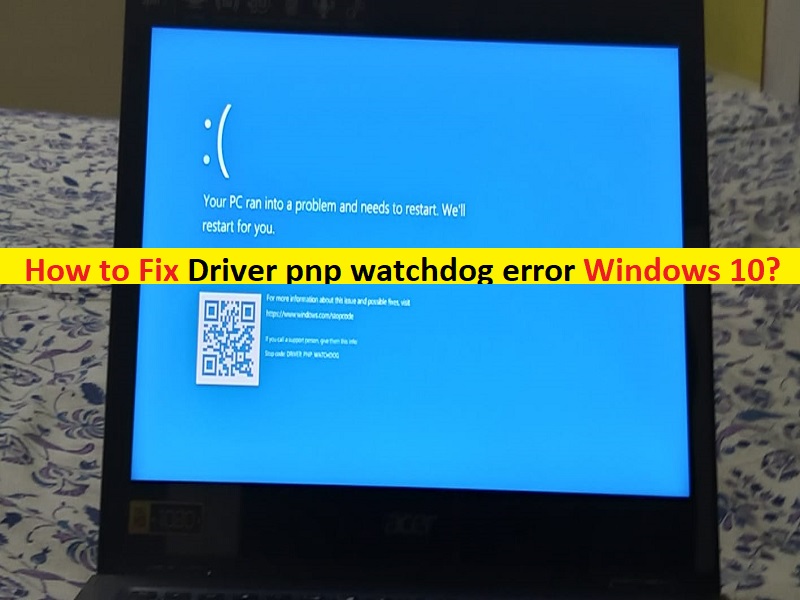
What is Driver pnp watchdog error Windows 10? [Blue Screen of Death (BSOD) error]
‘DRIVER PNP WATCHDOG Error’ is common Windows error categorised as Blue Screen of Death (BSOD) error. This BSOD error is appeared with message saying ‘Your PC ran into a problem and needs to restart. We’re just collecting some error info, and then we’ll restart for you’. The possible reasons behind this error can be wrong SATA controller settings in BIOS, corrupted system registry values, problem with Volume Shadow Service, malware or viruses issues, and others.
Like other Blue Screen of Death (BSOD) error, Driver pnp watchdog error Windows 10 or DRIVER PNP WATCHDOG error is appeared in the middle of your work on PC or during system starting up or reboot. This error prevents you from accessing your Windows desktop. However, it is possible to resolve this BSOD error in Windows 10 with our several easy steps. But before that, let’s take a look at reasons behind the issue.
Reasons behind ‘DRIVER PNP WATCHDOG Error – BSOD’:
Wrong SATA Controller settings in BIOS can be one possible reason behind the issue. Depending on SATA Controller mode like IDE, AHCI and others, the SATA Controller mode must be correctly configured in BIOS settings. Correcting the SATA Controller settings can resolve the issue. Another possible reason can be problematic Windows update and Windows drivers.
Missing, corrupted, outdated or incompatible device drivers can cause a lot of issues like ‘DRIVER PNP WATCHDOG Error – BSOD’ in Windows 10, while problematic Windows update installed or outdated Windows OS can also trigger this type of issue. In such case, updating Windows 10 OS and all Windows outdated or corrupted drivers to resolve the issue.
Moreover, Driver pnp watchdog error Windows 10 can also be occurred due to problem with system services, system files and drives, problems with software/program and hardware device like RAM issues, hard drive issues, and others. Also, Volume Shadow Service – used to create a backup in Windows 10 and if this service is triggered wrongly, then access to the file/drive can be restricted and can cause this type of error. Let’s go for the solution.
How to fix Driver pnp watchdog error Windows 10?
Method 1: Fix DRIVER PNP WATCHDOG Error in Windows 10 with ‘PC Repair Tool’
‘PC Repair Tool’ is quick & easy way to find and fix BSOD errors, DLL errors, EXE errors, Windows system files and registry issues, malware or viruses issues, problems with programs and other system issues with just few clicks. You can get this tool through button/link below.
Method 2: Modify SATA Controller Settings in BIOS
One possible way to resolve the issue is to change & correct the SATA Controller Settings in BIOS settings. Let’s try.
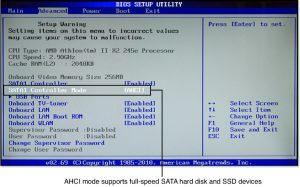
Step 1: Restart your computer and keep pressing ‘F2’ key on keyboard to enter into BIOS settings (Key to enter into BIOS setting can differ depending on your computer brand)
Step 2: Using ‘Arrow’ key to select ‘Advanced’ or ‘Main’ tab and hit ‘Enter’ key
Step 3: Now, find the option like IDE Configuration, Storage Configuration or Drive Configuration and then hit ‘Enter’ key
Step 4: Find the option like ‘Configure SATA’, ‘SATA Mode’ or ‘SATA Configuration’ and change the ‘SATA as’ to ‘ATA’, ‘IDE’ or ‘Compatible’
Step 5: Finally, hit ‘F10’ or supported key to save the changes and exit BIOS settings. Once done, please check if the trouble is resolved.
Method 3: Make sure ‘Volume Shadow Copy Service’ is running
VSS (Volume Shadow Copy Service) is designed to manage and implements volume shadow copies used for backup and other purpose. You can resolve the issue by checking and starting this service.
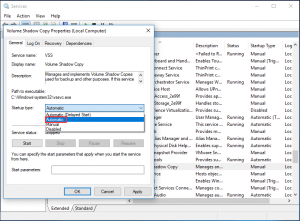
Step 1: Press ‘Windows + R’ keys on keyboard, type ‘servies.msc’ in the opened ‘Run’ dialog box and hit ‘Ok’ to open ‘Services’ window
Step 2: Find and double-click on ‘Volume Shadow Copy’ service to open its ‘Properties’
Step 3: Select ‘Automatic’ from ‘Startup type’ dropdown and click ‘Start’ button under ‘Service Status’ section
Step 4: Finally, click on ‘Apply’ and ‘Ok’ to save the changes and check if the trouble is resolved.
Method 4: Run SFC scan
SFC (System File Checker) – Windows built-in tool offers you to repair system files. This way, you can fix this BSOD error.
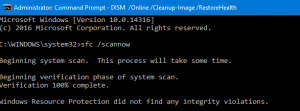
Step 1: Press ‘Windows + X’ keys on keyboard and select ‘Command Prompt as Administrator’
Step 2: Type ‘sfc /scannow’ command in the command prompt and hit ‘Enter’ key to execute
Step 3: Wait to finish the process. Once done, restart your computer to see the changes and check if the issue is resolved.
Method 5: Run DISM Scan
DISM tool – Windows built-in tool offers you to check and repair Disk image.
Step 1: Open ‘Command Prompt as Administrator’ using ‘Step 1’ of above method
Step 2: Type the following command and hit ‘Enter’ key to execute
DISM.exe /Online /Cleanup-image /Restorehealth
Step 3: Wait to complete the process. Once done, reboot your computer and check if the trouble is resolved.
Method 6: Run CHKDSK Scan
CHKDSK scan can resolve your hard disk drive issue in order to resolve Driver pnp watchdog error Windows 10.
Step 1: Open ‘Command Prompt as Administrator’
Step 2: Type ‘chkdsk C: /F’ command in Command Prompt and hit ‘Enter’ key to execute the command
Step 3: Wait for completion and once done, restart your computer to save the changes. Please check if Driver pnp watchdog error is resolved.
Method 7: Changes Windows Services through command prompt
Another possible way to resolve the issue is to make some changes with required Windows services. As mentioned, this BSOD error can also be occurred due to problem with services.
Step 1: Press ‘Windows + X’ keys on keyboard and select ‘Command Prompt as Administrator’
Step 2: Now, type the following command one-by-one and hit ‘Enter’ key after each to execute.
net stop wuauserv
net stop cryptSvc
net stop bits
net stop appIDSvc
Step 3: Wait to complete the process and once done, navigate to ‘c:\Windows\SoftwareDistribution’ and rename ‘SoftwareDistribution’ folder to ‘SoftwareDistribution.old’, and then navigate to ‘c:\Windows\System32\Catroot2’ and rename ‘Catroot2’ folder to ‘Catroot2.old’
Step 4: Now, type the following command in Command Prompt one-by-one and hit ‘Enter’ key after each to execute
net start wuauserv
net start cryptSvc
net start bits
net start msiserver
net start appIDsvc
Step 5: Wait for completion and once done, close ‘Command Prompt’ and then press ‘Windows + X’ keys on keyboard and now select ‘Windows PowerShell as Administrator’
Step 6: Type ‘wuaucIt.exe /updatenow’ and hit ‘Enter’ key to execute
Step 7: Restart your computer once done and check if the trouble is resolved.
Method 8: Use ‘Windows Update’ troubleshooter
You can also try to resolve the issue by running ‘Windows update’ troubleshooter – Windows 10 built-in troubleshooter offers you to find and fix problem with Windows update.
Step 1: Press ‘Windows + I’ keys on keyboard to open ‘Settings’ App
Step 2: Go to ‘Update & Security > Troubleshoot’, select ‘Windows Update’ troubleshooter and hit ‘Run the troubleshooter’ button
Step 3: Wait to complete the process and cone done, reboot your computer to see the changes and check if the trouble is resolved.
Method 9: Update Device drivers in Windows 10
Updating device drivers can fix problem with device and improve performances as well as resolve this BSOD error.
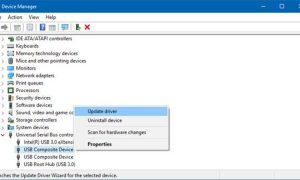
Step 1: Press ‘Windows + X’ keys on keyboard and select ‘Device Manager’
Step 2: Expand each device category one-by-one and check if any device is showing ‘Yellow Exclamation Mark’ on your device. If yes, right-click on it and select ‘Update driver’
Step 3: Follow on-screen instructions to finish update. Repeat the same steps to update all outdated device drivers. Once done, restart your computer to save the changes and check if the trouble is resolved.
Update Windows 10 drivers [Automatically]
You can also try to update all Windows drivers using ‘Automatic Driver Update Tool’. This software will automatically find the latest updates for all windows drivers and then install them into computer. You can get this tool through button/link below.
Method 10: Reset Windows 10 to default settings
If you are unable to resolve the issue with any methods mentioned above, then you can try to Windows 10 Reset. Resetting Windows 10 will reset OS to its factory settings.
Step 1: Restart your computer several times to enter into ‘Automatic Repair’ or ‘Automatic Startup’ screen
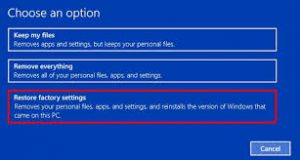
Step 2: Once opened, navigate to ‘Advanced Options > Troubleshoot > Reset this PC > keep my files > Reset’
Step 3: Wait to finish the resetting process. Once done, reboot your computer and check if the trouble is resolved.
Conclusion
I am sure this article helped you on How to fix Driver pnp watchdog error Windows 10 with several easy steps/methods. You can read & follow our instructions to do so. For any suggestions or queries, please write on comment box below.


