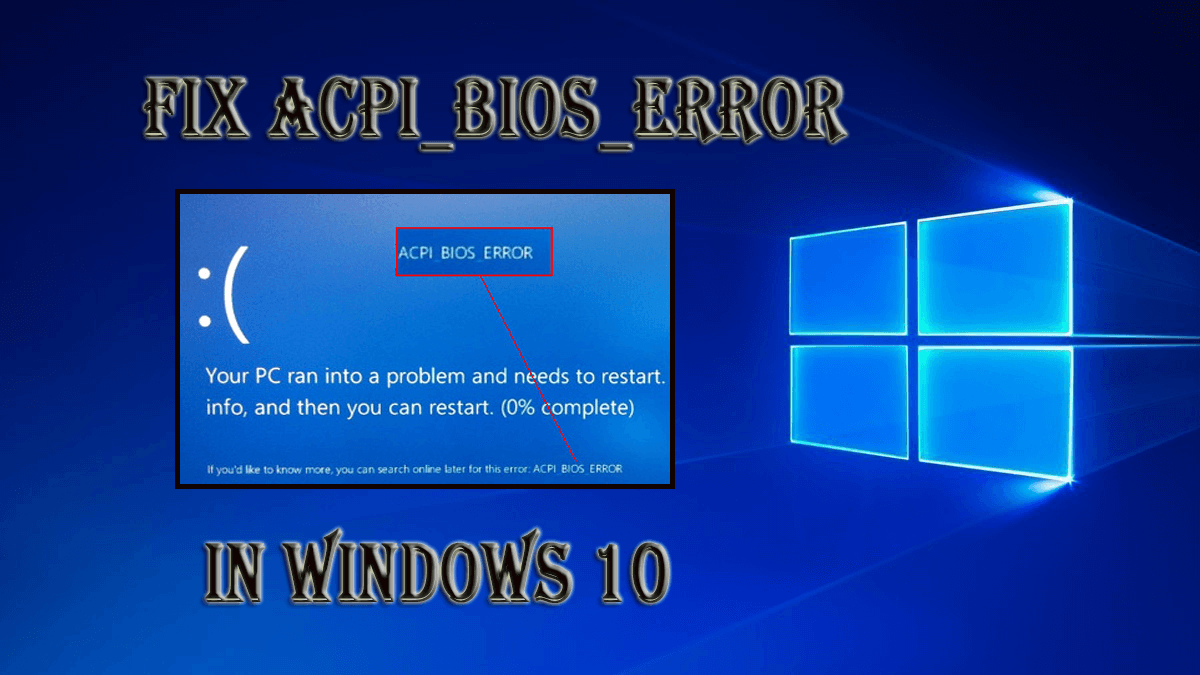
acpi_bios_error windows 10 is a harazdous computer threat which restarts your PC time to time whenever it appears. This notorious issue generally occurs when users tries to install Windows 10. And hence, you should change and check the BIOS settings before installing the Win 10.
What is ACPI?
ACPI stands for Advanced Configuration and Power Interface. It is responsible for managing the power usage in both PC and mobile phones that includes determining the time when the system would start or shut down, switch the PC to the lower power utilization mode when battery low and more.
Many users have complained that when they were using earlier version of Windows, they had no issues but the moment they upgraded their OS to the latest version, they start dealing with various nasty problems including this one.
Once your PC gets affected by this harmful issue, most of your installed apps especially games begin crashing. For example, suppose you are playing a very popular game PUBG, you suddenly start receiving an error message on your screen.
Reasons behind this annoying issue:
- Corrupt or outdated device drivers
- Recent software or hardware changes
- Damaged hard drive
- Clash of system drivers after installing fresh hardware
- Due to malware or spyware infection
- Error while updating Windows 10
Here, we are providing you easy and simple steps to make your system free from this annoying issue. Follow them one by one to get the better results:
Procedure 1: Remove Overclock Settings
Most of the users use overclocking software in order to get best performance out of their hardware but by using this software it can cause all kinds of problems including this one. In case, if you are suffering from aforementioned errors on Windows 10, then we recommend you to remove it as soon as possible if you have any overclock settings. Many users reported that after altering the RAM frequency to the default value in BIOS this issue can be solved. So, users are instructed to do so.
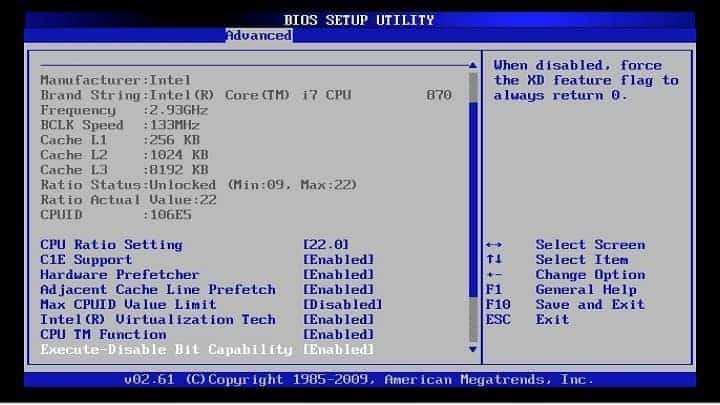
Procedure 2: Enter BIOS and disable AHCI
This error can only be fixed by entering BIOS and disabling AHCI. In order to get complete instructions on how to enter BIOS and to disable AHCI, we strongly advise you to check your motherboard manual.

Procedure 3: Boot the PC into safe mode if it is unable to load Windows normally
Attach the bootable disk or USB and restart the computer, wait for it to start.
After booting click on the Next

Now click on Repair your computer

Click Troubleshoot
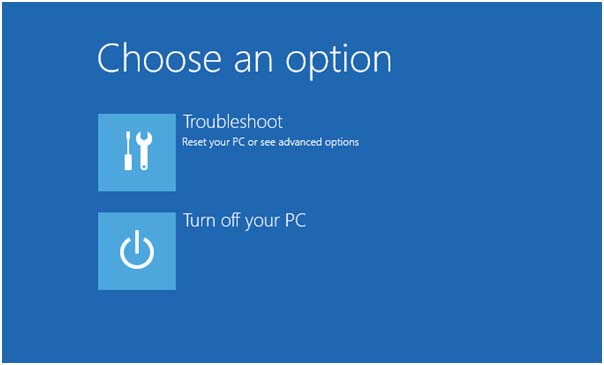
Now click on “Advanced Options”
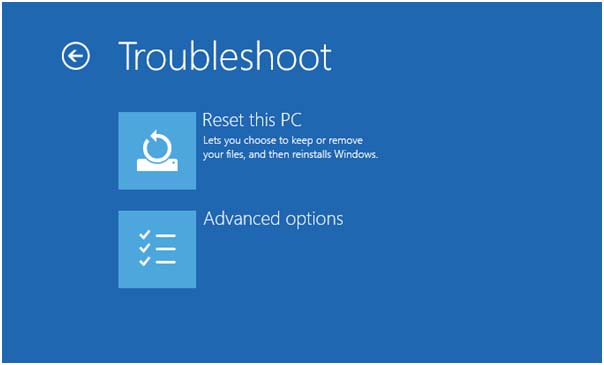
Click Startup Settings

On the bottom-right, click on restart
Once the PC restarts, choose the “Safe mode with Networking” option
Procedure 4: Set ACPI mode to S1 in BIOS
Many users have reported that this error normally occurs after waking up the device from sleep mode. And hence, to get rid of this threat, you need to set the ACPI mode to S1 in BIOS. In order to set acpi in Bios mode 1, see the detailed instructions given on the motherboard manual.
Procedure 5: Install Windows 10 in UEFI mode
To fix acpi_bios_error windows 10 problem, you may also try installing the Win 10 in UEFI mode and for this you should have a bootable USB flash drive. To do so, follow the steps:
Connect your bootable USB flash drive to your system and “reboot” the PC.
While your device boots, press F11 to choose boot device. It is possible that your motherboard might use a different key, so you need to confirm the detailed instructions given on the motherboard manual.
After that, you will see list of options. Choose “UEFI: USB Flash Drive”
To complete the Windows 10 setup, follow the on-screen instructions
It will probably install UEFI mode in Windows 10 and fix the issue.
Procedure 6: Update BIOS drivers
This issue can be occurred when drivers are outdated or incompatible to your system. Updating the BIOS driver may help you to get rid of the existing problem. You can update it by visiting manufacturer’s website or you can simply download it from official Microsoft website. Steps to update BIOS Driver:
First, you have to boot your PC into Safe Mode.
Now, find out the brand of your system’s motherboard. Search for the motherboard brand name and download the suitable Drivers from the manufacturer’s website
After downloading, now you have to install the BIOS driver.
Procedure 7: Reset BIOS to default
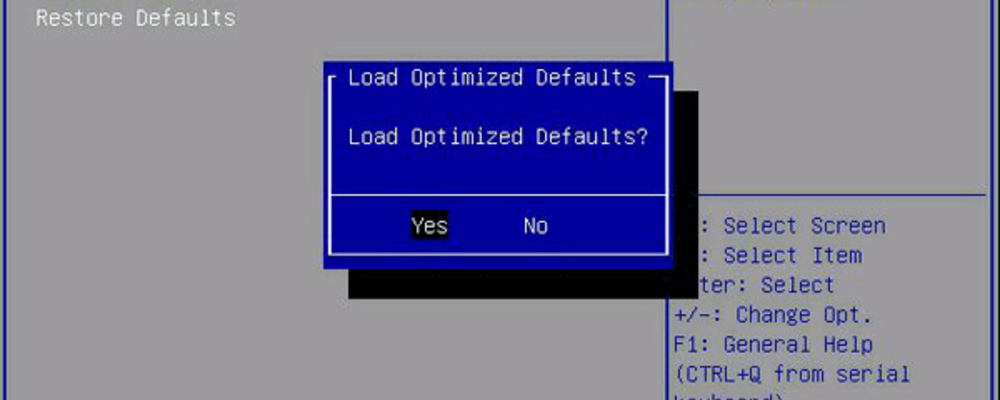
If you cannot access Windows due to this pop-up error message then the problem is most likely your BIOS settings. To solve it, you need to rearrange your BIOS to default values. You can also reset it by removing the battery from your motherboard. After doing that, insert the battery back into its motherboard and check if the issue persists.
Procedure 8: Deactivate JPME1 jumper and upgrade BIOS
According to the owner of X9DAI motherboard, disabling JPME1 jumper and re-updating the BIOS solve the problem. If you do not perform this process correctly then it can permanently damage your motherboard. So, be attentive. After updating, you need to shut down your computer.

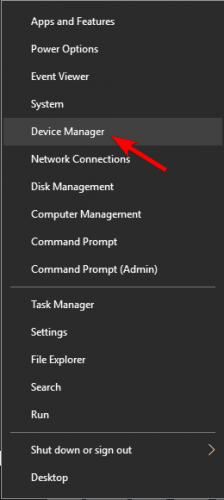
Procedure 9: Uninstall Microsoft ACPI Compliant driver
Press Win + X > select Device Manager
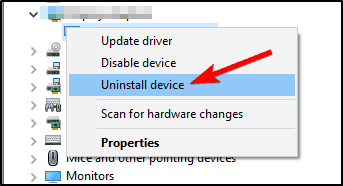
When Device Manager starts, locate Microsoft ACPI Compliant Control method battery.
Right-click on it and choose Uninstall
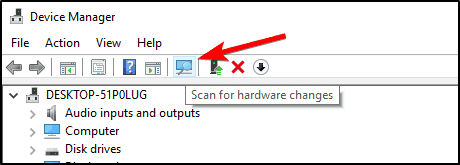
Click the Scan for hardware changes button and let Win 10 install any new drivers
Reboot your Computer
Procedure 10: Remove your SSD and upgrade your BIOS

Locate your SSD drive and disconnect it
Start your laptop and you should see Samsung prompt asking you to press F4 to start Recovery Mode.
Press F4 and immediately connect your SSD drive
Choose the option to restore and wait until the process complete
Run SW Update software and install BIOS update
Procedure 11: To fix this issue, attach Automatic Startup with Win 10 Setup Disk
This process is automatically executed by Windows 10 but if it is unable to cause automatically then you need to run it manually. And hence, apply the steps given below to run this task to complete the process; you need a bootable Windows 10 installation DVD or USB.
Attach the bootable disk or USB and restart the computer, wait for it to start.
After booting click on the Next > Select Repair your computer > Click Troubleshoot
After that, Click Advanced Options > Click Startup Repair
To finish the process, follow the on-screen instructions.
Recommended Solution to fix the issue
All the solutions I have mentioned in this article will help you to solve acpi_bios_error windows 10 problem. All the solutions are easy to perform and even for non-techy people. But in case, if are not comfortable in performing these manual methods then you can use automatic PC Repair Tool as this is capable to fix BSOD errors and other stubborn computer issues and errors. Despite this, if you are having any queries then please writes on comment box below.


