0xc00d36b4 video error windows 10 may occur when you are trying to play the video or music file. Some users are admitted that this error occur for the first time after upgrading Windows 10.
The most affected video players are Xbox, Windows Media Player and Groove but other apps can also encounter this issue. The error code usually comes with a message similar to Can’t play, This item is in a format we don’t support. Please choose something else.
If you are one of these users then this article will help you to fix this error on your computer. But before moving to the solutions let’s take a look at the reason that cause this issue on the PC.
- The media file does not support the video file format.
- The video file is corrupt or damage
- The file extension is incorrect
- Glitched Audio Format
- Third-party Codec Confliction
Various methods to fix 0xc00d36b4 video error windows 10:
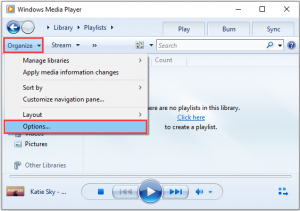
Solution 1: Disable the Copy Protection in WMP: Some Windows has solved this issue by disabling the Copy Protection feature. To do so, follow the steps below:
To open the Windows Search utility, press Win +S and then search for Windows Media Player and open it
On the WMP screen, click on the Organize > Options
Go to the Rip Music tab > untick Copy Protect Music box
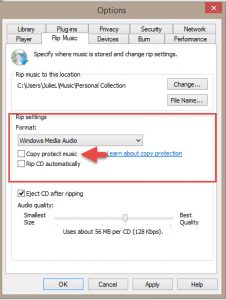
Click Apply and OK to save the changed settings
Close the window and try again to play the video to see if the error is gone or not.
Solution 2: Check Windows File Format: If the format of your video file is not supported by the media app you are using then you would fail to open the file and receive this error. As the default media player on Windows 10, WMP supports various file formats such as mp3, AAC, 3GP and so on.
So, before begin with any troubleshooting process, verify that the file is supported by the player or not. If the format of your file is not supported, then you can use converter to change its format or try using another media player.
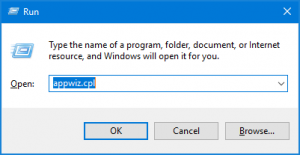
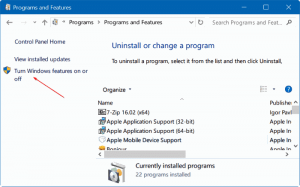
Solution 3: Reinstall Windows Media Player: Another way to solve this error is to reinstall Windows Media Player. By doing this, all the components of the media player will get back to work and you would be able to play the files without encountering this error anymore. For this, you need to follow below steps:
Press Win +R >type appwiz.cpl and press Enter key
Now, the Programs and Files window will appear on your screen. Here, click on the Turn Windows features on or off link given at the left pane of the window.
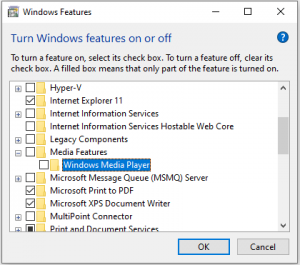
On Windows Features window, scroll down and click on the Media Features to expand the list.
Untick the Windows Media Player box
In the pop-up window, tap Yes to confirm the operation
Click on the OK button to save the changes
Restart your computer and turn on the WMP feature in Control Panel
Reboot your PC again and then you can check if the error has been fixed or not.
Solution 4: Uninstalling Nero Codecs: The Groove music app tend to conflict with 3rd party codec pack supplied by NERO. Several affected users have confirmed that they managed to resolve the error after they uninstalled the third party codecs. For this, you need to do the following:
Press Win + R keys > type appwiz.cpl > click on the OK button.
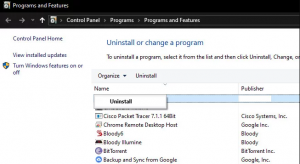
On the Programs and Features window, search for the Nero codec pack.
After locating the codec pack, right-click on it and select Uninstall
In order to finish the uninstallation process, follow the on-screen instruction
After that, restart the computer
Solution 5: Move Music Files: If you are trying to play the media file stored on external device then also WMP can fail to open it. So, in such case, move this file to your computer’s internal storage and then try to play it. To move these files, you can follow these instructions:
Go to the external drive and select the media file.
Press the Ctrl+ C keys to copy the file > press Ctrl + V to paste it on any of your internal drive (C: D: E:).
Now, try to run the music or video file and check if it is working properly.
Solution 6: Playback Settings Misconfiguration: Playing corrupt music tunes on media player may also cause this error. If that the case, follow the below instructions:
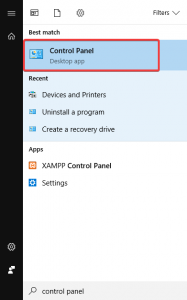
Press Win +S >Type Control Panel in the Search box
Click on the Control Panel
Click on the Sound category
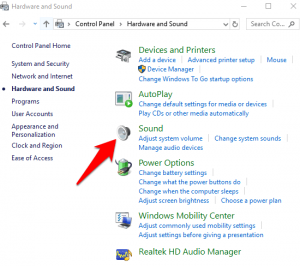
Go to the Playback tab and select the Speaker
Click on Configure to open the Speaker setup window.
Now, you will get the list of all the audio channels. Here, choose each of them and click on the Test button.
If you’re getting the Failed to play test tone error message, then note down that audio channel.
Finish the testing of all media files > click on the Next button.
Now, untick all the tunes that have given the error message, then close the window
Finally, restart the PC.
Solution 7: Use VLC Media Player: In case, if the above mentioned solution doesn’t help you to resolve the issue then this is the time to switch to another media player app. You can use VLC Media Player without making it a default media player app or tool.

To run the file on this tool, right-click on the media file and select the Open with > VLC media player option from the context menu.
Recommended Solutions to fix various Windows 10 problems
Well, if none of the above given manuals work for you, then here is an easy solution. Run the PC Repair Tool, this is an advanced tool that just by scanning once detects and fixes various computer errors and issues.
By using this tool, you can fix the DLL error, BSOD error, application error, registry error, repair corrupted system files and much more.


