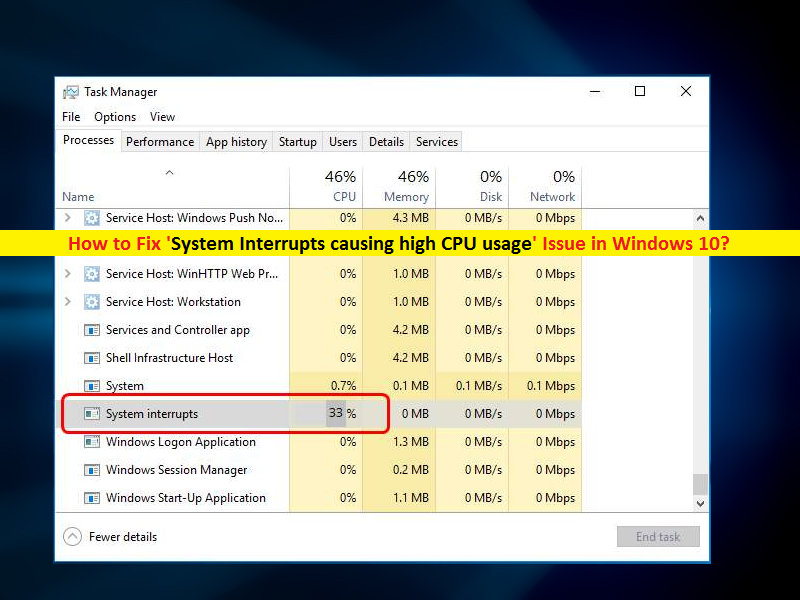
What is ‘System Interrupts’? What is ‘System Interrupts causing high CPU usage’ Issue in Windows 10?
‘System Interrupts’ is presented as ‘Windows Process’ in ‘Task Manager’ in your Windows 10 computer. This process can easily be seen in ‘Task Manager’ under ‘Windows Processes’ section as running process which use usually 0.1% -2% of CPU depending of CPU frequency, running software and attached hardware. If ‘System Interrupts’ process running within this range of CPU Usage, then it indicates your Windows 10 computer is in good condition.
Also, CPU Usage of ‘System Interrupts’ between 3% – 7% can be considered as healthy System, depending on System startup. But if this range is more than 5% to 10%, then it is not good sign of System health. System Interrupts High CPU Usage indicates something is wrong in your computer.
System Interrupts: If you are not aware, ‘System Interrupts’ is not a process actually. It acts as representative that notify the processor to high priority condition requiring the interruption of current code the processor is executing. However, CPU processor responds the ‘System Interrupts’ by suspending the current activities, saving its state, and executing the function called ‘Interrupt Handler’.
For example, when you start typing on your keyboard, the respective hardware and software sends interrupt to CPU to execute this process as the first priority. It means keyboard inputs will be the first priority compare to other processes. Once ‘System Interrupts handler’ task is completed, the CPU will continue to execute further instructions or commands.
In sort, ‘System Interrupts’ is part of Microsoft Windows Operating System designed to manage the communication between computer hardware and Systems. However, if System Interrupts causing high CPU usage, then problematic hardware driver (software) or hardware itself can be reason behind this issue. In such case, you can fix hardware driver issue to fix this High CPU usage issue. Updating outdated or corrupted drivers used for keyboard, graphics card, network adapter or other hardware components can fix this High CPU usage issue and improve the performances as well. Let’s go for the solution.
How to fix ‘System Interrupts causing high CPU usage’ Issue in Windows 10?
Method 1: Fix ‘System Interrupts causing high CPU usage’ issue with ‘PC Repair Tool’
Here, you will be guided with automatic and manual method to fix this High CPU Usage issue. If you don’t have enough time or technical knowledge to implements manual steps, then you can try ‘PC Repair Tool’. This software offers you to find and fix BSOD errors, DLL errors, EXE errors, High CPU & GPU Usage issue, malware or viruses issue and other System issues with just few clicks. You can get this tool through link/button below.
Method 2: Restart your computer
One possible way to fix this issue is to restart your computer. Restarting Windows 10 computer can save the significant changes especially the settings you have applied but require System restart to save. After restart, you will see that your machine is working smoothly again and check if the trouble is resolved.
Method 3: Disconnect all peripheral devices
As mentioned, ‘System Interrupts causing high CPU usage’ issue occurs possibly due to connected external hardware to your computer. You can try to fix the issue by disconnecting all peripheral devices except the necessary hardware. Unplug all connected external devices including headphones, microphone, mouse, keyboard and other external hardware, and check if the High CPU Usage issue is resolved.
Method 4: Check for Windows 10 Updates
Updating Windows 10 OS can fix bugs or issues in computer and improve the performances. Let’s try.
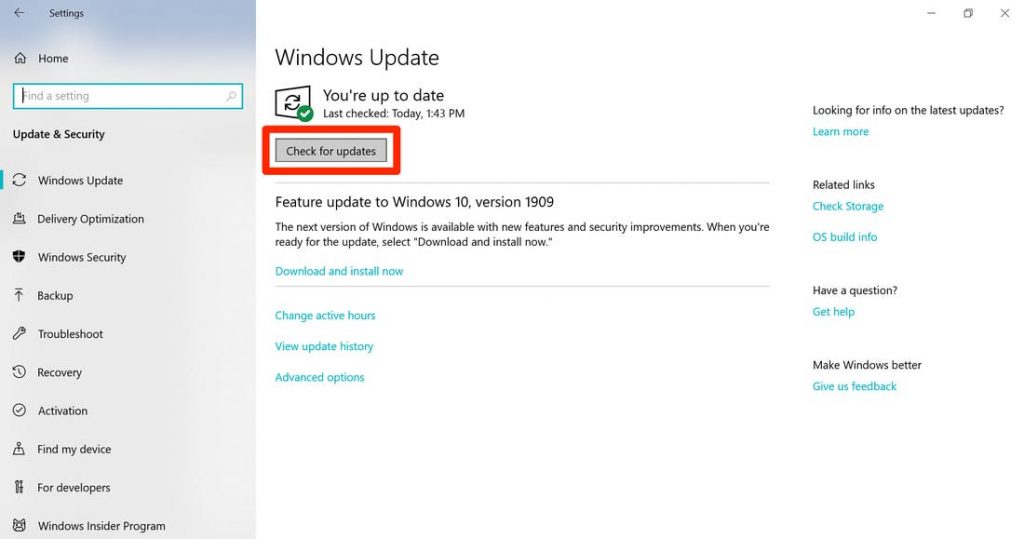
Step 1: Press ‘Windows + I’ keys together on keyboard to open ‘Settings’ App in Windows 10
Step 2: In the opened ‘Settings’ App, go to ‘Update & Security > Windows Update’
Step 3: Click on ‘Check for updates’ button under ‘Windows Update’.
Step 4: This will automatically download and install available updates. Once done, restart your computer to see the changes and check if problem is resolved.
Method 5: Disable ‘Fast Startup’
You can also try to fix ‘System Interrupts causing high CPU usage’ issue by disabling ‘Fast Startup’ feature in Windows 10.

Step 1: Press ‘Windows + X’ keys together on keyboard and select ‘Power Options’
Step 2: In the opened window, click on ‘Choose what the power button does’ in left pane
Step 3: Select ‘Change settings that are currently unavailable’ and uncheck the ‘Turn OFF Fast Startup (recommended)’ checkbox
Step 4: Finally, click on ‘Save Changes’ and restart your computer to see the changes.
Method 6: Update Windows 10 drivers
Outdated or corrupted hardware driver like graphics card driver, network adapter driver and other hardware driver can cause High CPU Usage issue or similar. So, you can fix the issue by updating the Windows drivers.
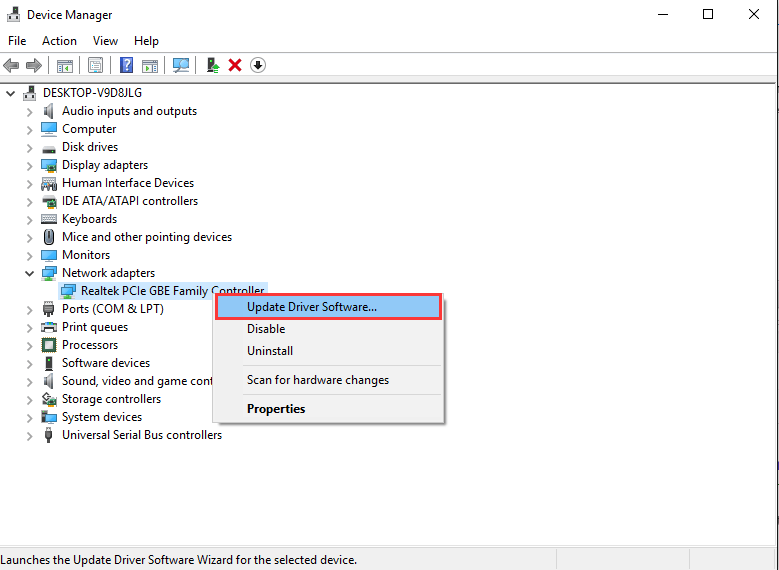
Step 1: Press ‘Windows + X’ keys together on keyboard and select ‘Device Manager’
Step 2: In the opened ‘Device Manager’, expand each device category one-by-one and check if any driver shows ‘Yellow Exclamation Mark’ on it. If yes, right-click on it and select ‘Update Driver’
Step 3: Repeat the same step for other drivers which require update. Follow on-screen instructions to finish update process. Once done, restart your computer to see the changes and check if the issue is resolved.
Update Windows 10 drivers [Automatically]
You can also try to update all hardware drivers with ‘Automatic Driver Update Tool’. This software will automatically find and install the latest update for Windows drivers. You can get this tool through link/button below.
Method 7: Run CHKDSK Scan
CHKDSK Tool in Windows 10 offers you to check and repair your System hard drive. This way, you can fix High CPU usage issue. Let’s try.
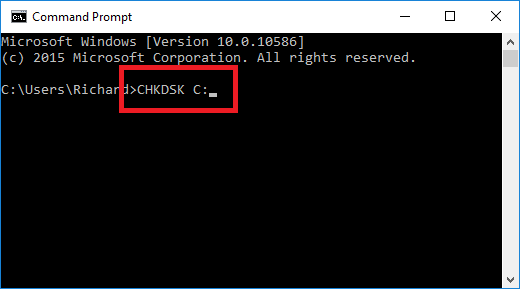
Step 1: Press ‘Windows + X’ keys together on keyboard and select ‘Command Prompt as Administrator’
Step 2: In the opened ‘Command Prompt’, type ‘chkdsk C: /f /r’ command and hit ‘Enter’ key to execute
Step 3: Wait to complete the process. Once done, reboot your computer and check if trouble is resolved.
Method 8: Disable Audio Enhancements
‘Audio Enhancements’ are used to enhance the quality of sound on Windows 10. But sometimes this feature might start causing High CPU Usage issue. You can disable this feature to fix the issue.
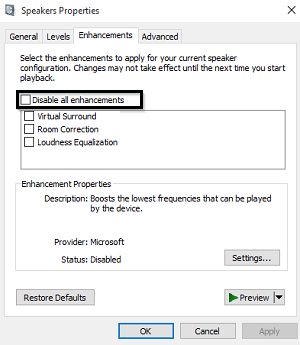
Step 1: Right-click on ‘Sound’ or ‘Speaker’ icon in System Tray and select ‘Sound’
Step 2: In the opened ‘Sound’ window, click on ‘Playback’ tab and select the speaker/headphone device you are using, and hit ‘Properties’ button
Step 3: In the opened ‘Properties’ window, click on ‘Enhancement’ tab and select ‘Disable All Enhancements’ option.
Step 4: Finally, click on ‘Apply’ and ‘OK’ to save the changes and check if problem is resolved.
Method 9: Disable ‘Wake on Magic Packet’ and ‘Wake on Pattern Match’ properties in Network Adapter
‘Wake on Magic Packet’: It causes the Network Adapter awaken the computer when it receives a ‘Magic Packet’. A Packet is considered as ‘Magic’ when it contains ‘FF FF FF FF FF FF’ followed by 16 instances of network card’s Six byte MAC address.
‘Wake on Pattern Match’: It is superset of ‘Wake on Magic Packet’. It causes network adapter to wake the machine when various things come including magic packet, NetBIOS name query, etc. For more details about these two features, you can search about them on the web. Here, disabling these two features in your network adapter can fix ‘System Interrupts causing high CPU usage’ issue. Let’s try.
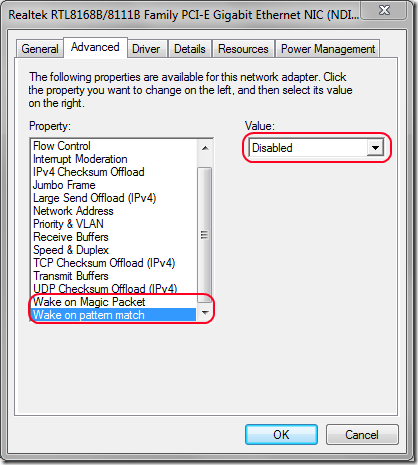
Step 1: Open ‘Device Manager’ and expand ‘Network Adapters’ category
Step 2: Right-click on your Network Adapter and select ‘Properties’
Step 3: In the opened ‘Properties’, click on ‘Advanced’ tab and select ‘Wake on Magic Packet’ under ‘Property’ section, and select ‘Disabled’ from ‘Value’ option
Step 4: Repeat the same step for ‘Wake on Pattern match’
Step 5: Finally, click on ‘Ok’ to see the changes and check if trouble is resolved.
Method 10: Disable USB Root Hubs
USB hardware can cause this issue. You can fix the issue by disabling USB Root hubs.

Step 1: Open ‘Device Manager’ and expand ‘Universal Serial Bus Controllers’ category
Step 2: Right-click on each USB Root Hub expect the device for keyboard and mouse, and select ‘Disable Device’
Step 3: Once done, check if the trouble is resolved.
Conclusion
I am sure this post helped you on How to fix ‘System Interrupts causing high CPU usage’ issue in Windows 10 with several easy steps. You can read & follow our instructions to do so. If this post really helped you, then you can share the post with others to help them. That’s all. For any suggestions or quires, please write on comment box below.


