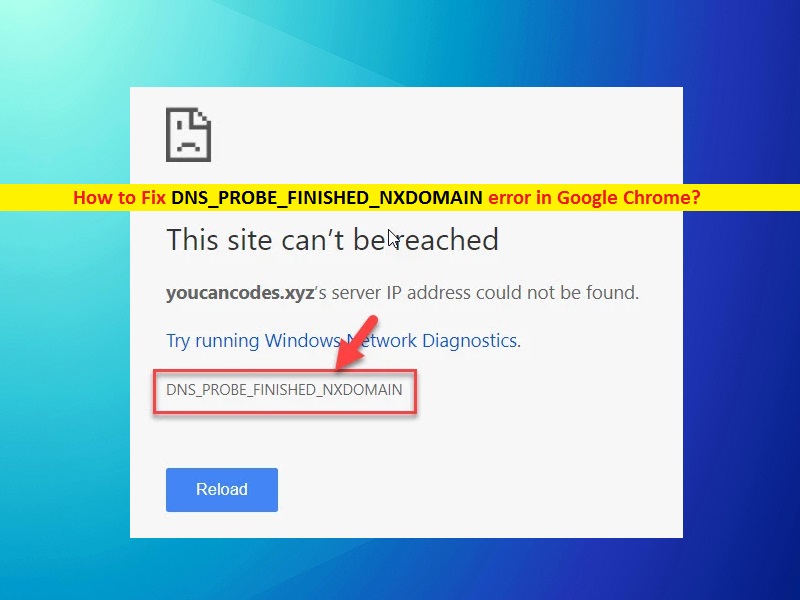
What is ‘DNS_PROBE_FINISHED_NXDOMAIN error’ in Google Chrome?
‘DNS_PROBE_FINISHED_NXDOMAIN’ is error code appeared possibly when you trying to access particular website. Here, NXDOMAIN stands for Non-Existent Domain. This error code states DNS can’t find the IP address corresponding to the domain name. The text presented in error message can be varied depending on web browser variants. For example, in Mozilla Firefox, the error is usually appeared as ‘Hmm. We’re having trouble finding that site’.
‘DNS_PROBE_FINISHED_NXDOMAIN error occurs usually while to access the particular site. In such case, you should at first check if your computer is properly connected to the internet and you are capable of accessing other websites. If the problem is still persists with several other domains while try accessing, then you need to fix internet connection problem. As mentioned, this error is limit to the Google Chrome browser but other browsers display the error in some other ways. Let’s take a look at error message.
Mozilla Firefox: Hmm. We’re having trouble finding that site
Safari: Safari Can’t Find the Server
MS Edge: Hmmm… can’t reach this page
Google Chrome: This webpage is not available. DNS_PROBE_FINISHED_NXDOMAIN
The possible reason behind this issue is incorrect DNS settings and problem with internet connection. Also, this error can occur due to your antivirus software/Firewall settings. It might possible that your antivirus/Firewall is blocking you from accessing a particular site for some reasons. In such case, you can disable your Firewall/antivirus temporarily to resolve the issue. Also, you need to modifying your System’s DNS settings. Let’s go for the solution.
How to fix DNS_PROBE_FINISHED_NXDOMAIN error in Google Chrome?
Method 1: Fix DNS_PROBE_FINISHED_NXDOMAIN error in Windows 10 with ‘PC Repair Tool’
Sometimes, this type of error occurs due to problem with Windows 10 System files, registry, network adapters and other problems in computer. It means the problem with Windows 10 and programs installed in computer can cause ‘ DNS_PROBE_FINISHED_NXDOMAIN’ or similar error. You can fix the issue with ‘PC Repair Tool’. This software offers you to find and fix PC problems like BSOD errors, DLL errors, EXE errors, problems with programs, malware or viruses issues and other System issues. You can get this tool through link/button below.
Method 2: Clear DNS Cache in Windows 10
DNS cache stores the IP addresses of previously visited websites. Sometimes, DNS_PROBE_FINISHED_NXDOMAIN error occurs due to outdated IP addresses of domain you want to access. You can fix the issue by clearing DNS cache.
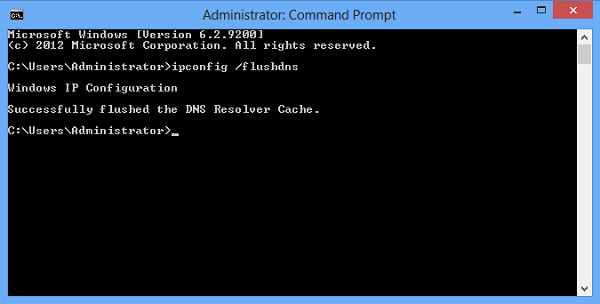
Step 1: Press ‘Windows + X’ keys together on keyboard and select ‘Command Prompt as Administrator’
Step 2: Type the following command in command prompt and hit ‘Enter’ key to execute.
‘ipconfig/flushdns’
Step 3: Wait to complete the process. Once done, please check if the trouble is resolved.
Method 3: Reset Winsock program
You can also try to fix the issue by resetting Winsock program. Let’s try.
Step 1: Follow ‘Step 1’ of above method to open ‘Command Prompt as Administrator’
Step 2: Type ‘netsh winsock reset’ command in command prompt and hit ‘Enter’ key to execute
Step 3: After that, restart your computer to see the changes.
Method 4: Release and Renew IP address using Command prompt
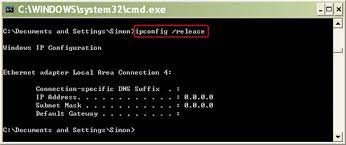
Step 1: Open ‘Command prompt as Administrator’
Step 2: Type the following command one-by-one and hit ‘Enter’ key after each to execute
ipconfig /release
ipconfig /all
ipconfig /flushdns
ipconfig /renew
netsh int ip set dns
netsh winsock reset
Step 3: Wait to complete the process. Once done, reboot your computer and check if the problem is resolved.
Method 5: Restart DNS Client Service
Another possible way to fix the issue is to restart DNS Client Service in ‘Windows Service’.
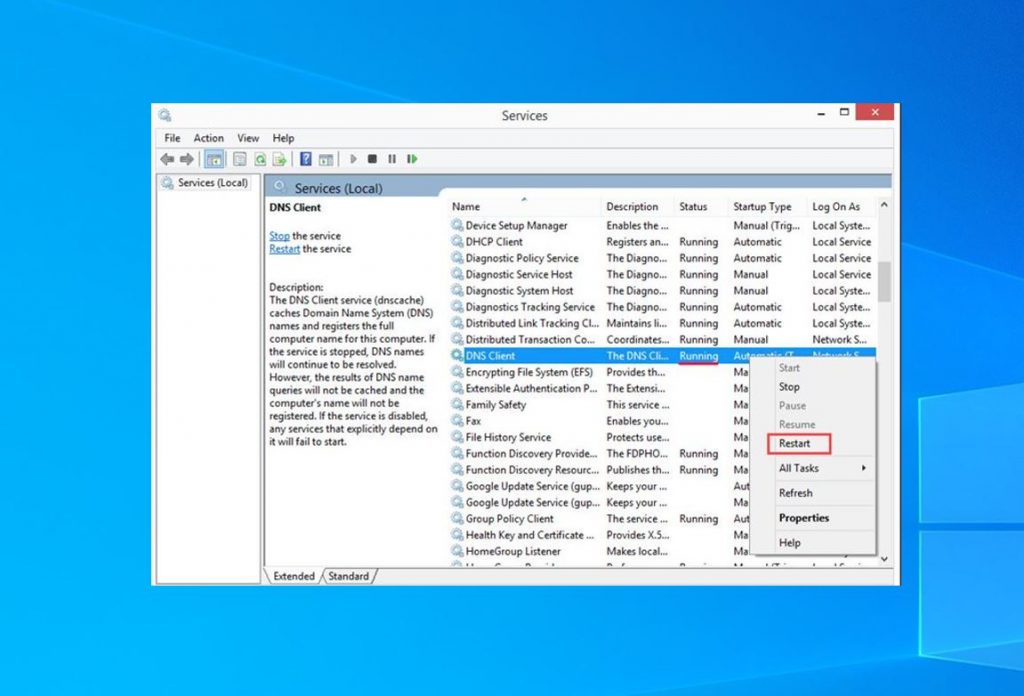
Step 1: Press ‘Windows + R’ keys together on keyboard, type ‘services.msc’ and hit ‘Enter’ key to open ‘Services’ window
Step 2: Find ‘DNS Client’, right-click on it and select ‘Restart’
Step 3: Once done, check if the issue is still persists.
Method 6: Clear Google Chrome Cache & browsing data
In some cases, this type of error occurs possibly due to outdated cache of domain you want to access. You can fix the issue by clearing the cache of browser. This way, you can erase browsing data, browsing history, cookies and other site data and cached images and files as well. Let’s try.
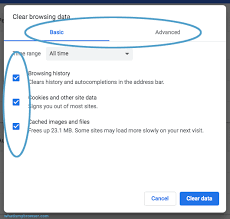
Step 1: Open ‘Google Chrome’ and click on ‘Three Dots’ or ‘Chrome Menu’
Step 2: Select ‘Settings > Privacy and Security > Clear browsing data’
Step 3: Under ‘Time Range’, Select ‘All Time’ from dropdown
Step 4: Check ‘browsing history’, ‘Cookies and other site data’ and ‘Cached images And files’ checkboxes and then hit ‘Clear Data’ button
Or
Step 1: Type ‘Chrome://flags/’ in URL bar of Chrome browser and hit ‘Enter’ key
Step 2: Click on ‘Reset All’ button to reset Google Chrome completely.
Method 7: Modify DNS settings in Windows 10
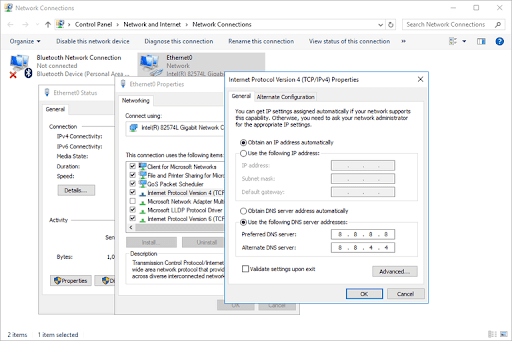
Step 1: Right-click on your Network/WiFi icon at System Tray and select ‘Open Network and Sharing Centre’
Step 2: In the opened ‘Network and Sharing Centre’ window, click on ‘Change Adapter Settings’ in left pane
Step 3: Locate your network connection provider in ‘Local Area Connection’ or ‘Wireless Connection’, and right-click on it and hit ‘Properties’
Step 4: In the opened ‘Properties’ window, Find ‘Internet Protocol 4 (TCP/IPv4)’ and click on ‘Properties’
Step 5: Now, check the ‘Use the following DNS server addresses’ checkbox, type ‘8.8.8.8’ and ‘8.8.4.4’ in preferred DNS server and Alternate DNS server and then hit ‘Ok’ to save the changes.
Method 8: Disable your antivirus/Firewall
As mentioned, this error occurs possibly due to third-party antivirus and Firewall settings. It might possible that your third party antivirus/Firewall is blocking you from visiting a particular site and triggers ‘DNS_PROBE_FINISHED_NXDOMAIN’ error while try accessing. You can fix the issue by disabling antivirus/Firewall temporarily and check if the trouble is resolved.
Method 9: Check the local host file in Windows 10
Host file is local file in Windows 10 computer that maps names to IP addresses. You can check the website you want to visit on ‘Host file’ and if the problematic website is recorded, you can remove them from host file and then save the file to fix the issue.
Step 1: Type ‘Notepad’ in ‘Run’ dialog box and hit ‘CTRL + SHIFT + ENTER’ keys together to open ‘Notepad as Administrator’
Step 2: Now, click on ‘File > Open’ and copy & paste the following path in ‘Address bar’
%SystemRoot%:\Windows\System32\Drivers\etc
Step 3: Locate and double-click on ‘hosts’ file. Check the domain name and IP address of the site that you are unable to visit, if site is recorded here, remove it and then save the file. Once done, please check if the trouble is resolved.
Conclusion
I am sure this post helped you on How to Fix DNS_PROBE_FINISHED_NXDOMAIN error in Google Chrome with several easy methods/steps. You can read & follow our instructions to do so. For any suggestions or queries, please write on comment box below.


