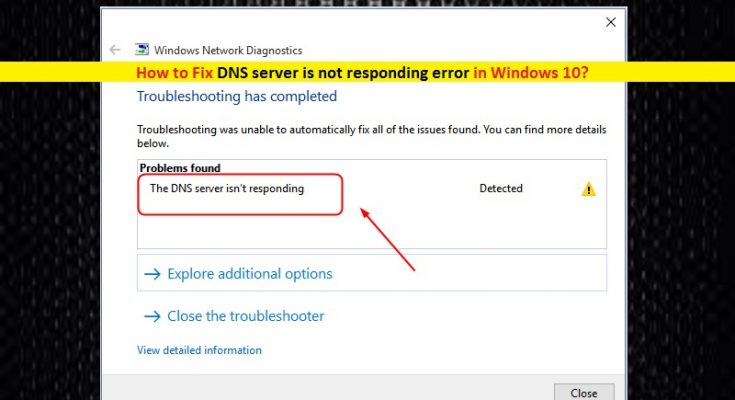
What is DNS server is not responding error in Windows 10?
‘DNS server is not responding’ is common error occurred in Microsoft Windows computer for while running ‘Network’ troubleshooter. ‘Network Troubleshooter’ – Windows built-in troubleshooter tool offers you to find network related issue. Sometimes, Network Troubleshooter shows error after finish the troubleshooting process and says that ‘DNS server is not responding’. This error occurs due to several reasons.
DNS (Domain Name System): It is decentralized naming System for computers, services, and other resources connected to internet or the private network. DNS translates hostnames to IP (Internet Protocol) addresses. For example, DNS server is not responding.com is hostname and DNS then translates it to some unique address ‘IP address’ with contains 4 blocks and each block ranges from 0 to 255 number.
In sort, DNS plays important role in translating the hostnames of website to IP addresses. If DNS server is not more exists or DNS is not responding at the moment, then surfing the web would not be easy. However, it is quite easy to understand the words or website names rather than number of IP address. It means it will hard to access the website by entering their IP address on the URL bar while entering website name on URL bar will easily be access. So, DNS server must be running properly for this purpose.
Moreover, Windows computer stores DNS responses locally so that DNS request doesn’t happen every time you connect to particular domain that you have visited previously. Once your computer has remembered the IP address associated the website you want to access, it will be remembered for long period of time. However, users reported that they are facing ‘DNS server is not responding error’ when trying to connect their Windows computer to home network or the other network with internet access. Let’s take a look at error message.
“The DNS server isn’t responding. Your computer appears to be correctly configured, but the device or resource (DNS server) is not responding.”
This error states that your web browser was unable to establish the connection to the internet. The possible reason behind this issue can be problem with network or internet connection, misconfigured DNS settings, or the problem with browser application. Problem with browser application can be corruption in browser or browser is outdated. In such case, you can fix the issue by updating your browser. Also, you can fix misconfigured DNS settings to fix ‘DNS server is not responding error’ in Windows 10.
You should also make sure that Windows Firewall or third-party antivirus software is running properly and not causing issue with network or internet connection. It might possible that your antivirus/firewall is blocking particular site from accessing or opening for some security reasons. In such case, you can fix the trouble by disabling your firewall or antivirus software temporarily. Let’s go for the solution.
How to fix DNS server is not responding error in Windows 10?
Method 1: Fix ‘DNS server is not responding error’ in Windows 10 with ‘PC Repair Tool’
‘PC Repair Tool’ is easy & quick way to find and fix PC problems like BSOD errors, EXE errors, DLL errors, malware or viruses issue, System registry or files issue, network related issues and other System issues with just few clicks. You can get this tool through button/link below.
Method 2: Change DNS server settings in Windows 10
You can resolve the issue by changing your current DNS server to ‘Google’s public DNS’ – free alternative DNS offered to internet users around the world. Let’s try.
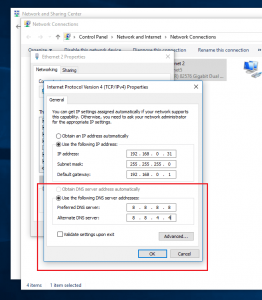
Step 1: Press ‘Windows + X’ keys together on keyboard and select ‘Network Connections’ option
Step 2: In the opened ‘Network Connections’ window, right-click on your connection and select ‘Properties’
Step 3: In the opened ‘Properties’ window, find and select ‘Internet Protocol Version 4 (TCP/IPv4)’ and click ‘Properties’
Step 4: Now, tick the ‘Use the following DNS server addresses’, enter 8.8.8.8 and 8.8.4.4 in ‘Preferred DNS server’ and ‘Alternate DNS server’ respectively.
Step 5: Finally, click on ‘Ok’ to save the changes and check if the trouble is resolved.
Method 3: Disable IPv6 (Internet Protocol Version 6) in Windows 10
Note that IPv6 (Internet Protocol Version 6) is most recent version of IP (Internet Protocol). This new IP variant offers an identification and local System for computers on networks and route traffic across the internet. However, you can fix the ‘DNS server is not responding error’ issue by disabling ‘IPv6’ in computer. Let’s try.
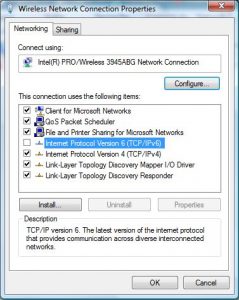
Step 1: Right-click on ‘Network/WiFi’ icon on ‘System Tray’ and select ‘Open Network and Sharing Center’
Step 2: In the opened window, click on your connection next to ‘Connections’ like ‘Ethernet’ or ‘WiFi Name’ to open its ‘Properties’
Step 3: In the opened ‘Properties’ window, click on ‘Properties’ button and find ‘Internet Protocol Version 6 (IPv6), and untick the checkbox to disable it, and hit ‘Ok’ to see the changes. Once done, please check if the trouble is resolved.
Method 4: Restart your router/modem/WiFi
Another possible way to fix this type of error is to restart your router/modem/WiFi. Let’s try.
Step 1: Press ‘Power’ button on your router/modem to turn it OFF
Step 2: Wait for few seconds or minutes.
Step 3: Turn ON your router/WiFi again and wait to establish internet connection and then check if the problem is resolved.
Note: If there is no button on your router/modem, then you can restart router by disconnecting and then reconnecting the router.
Method 5: Reset router to its default settings
Misconfiguraiton in router settings can cause this issue. You can fix the problem by resetting router to default settings. Let’s try.

Step 1: Press & hold ‘Reset’ button on router for 10 seconds
Step 2: Note that resetting router settings to default will also erase router’s password. Once resetting process finished, wait to light of router to turn ON and check if the trouble is resolved.
Method 6: Enter MAC address manually
MAC Address or Media Access Control Address of your computer is unique identifier assigned to network interfaces for communication at data link layer of network segment. MAC addresses are assigned by manufacturer of NIC (Network Interface Controller) and stored in its hardware such as card’s read-only memory or other firmware mechanism. You can also enter your MAC address manually to resolve ‘DNS server is not responding error’ issue in Windows 10. Let’s try.
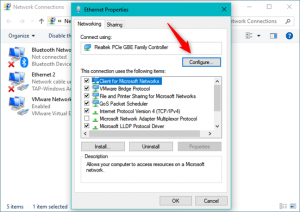
Step 1: Press ‘Windows + X’ keys together on keyboard and select ‘Command Prompt as Administrator’
Step 2: In the opened ‘Command Prompt’, type ‘ipconfig /all’ command and hit ‘Enter’ key to execute
Step 3: This will show you the list of information about configuration. Find ‘Physical Address’ and note down the address or copy the address on ‘Notepad’
Step 4: Now, right-click on ‘Network/WiFi’ icon on ‘System Tray’ and select ‘Open Network and Sharing Center’
Step 5: In the opened window, click on ‘Change Adapter Options’
Step 6: Right-click on your connection and select ‘Properties’.
Step 7: In the ‘Properties’ window, find ‘Client for Microsoft Networks’ and hit ‘Configure’
Step 8: Now, click on ‘Advanced’ tab, select ‘Network Address’ under ‘Property’ section. Select ‘Value’ in right pane and enter your MAC Address that you have copied using ‘step 3’ on ‘Notepad’.
Step 9: Finally, click on ‘Ok’ to save the changes and check if the trouble is resolved.
Method 7: Reset IP configuration settings and clear DNS cache
Another possible way to fix this error is to reset IP configuration settings and clearing DNS cache through ‘Command Prompt’. Let’s try.
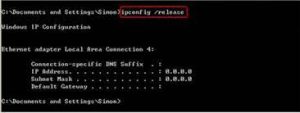
Step 1: Press ‘Windows + X’ keys together on keyboard and select ‘Command Prompt as Administrator’
Step 2: Type the following command one-by-one and hit ‘Enter’ key after each to execute.
netsh int ip reset
netsh winsock reset
ipconfig /flushdns
ipconfig /renew
Step 3: Wait to finish the process. Once done, restart your computer and check if problem is resolved.
Method 8: Enter Windows 10 in Safe Mode
If you are facing this problem in ‘Windows 10 Normal Mode’, you can try to resolve the issue by entering Windows 10 in Safe Mode. Note that ‘Safe Mode’ in Windows 10 is used to obtain limited access to Windows while OS doesn’t start or function normally. Let’s try.
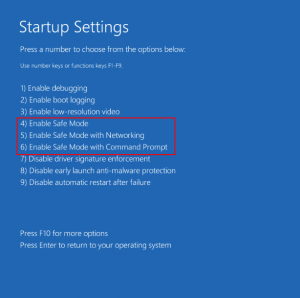
Step 1: Restart your computer several times until Advanced Startup settings window is appeared
Step 2: Select ‘Troubleshooter > Advanced Options > Start-up settings > Restart’
Step 3: Now, press ‘F4’, ‘F5’ or ‘F6’ to select ‘Safe Mode’, ‘Safe Mode with Networking’, or ‘Safe Mode with Command Prompt’
Step 4: Once entered into Windows 10 Safe Mode, check if the trouble is resolved.
Method 9: Update Network Adapter drivers in Windows 10
Updating Network Adapter drivers to latest version can fix network related problem in Windows 10. Let’s try.
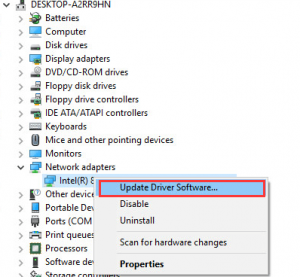
Step 1: Press ‘Windows + X’ keys together on keyboard and select ‘Device Manager’
Step 2: In the opened ‘Device Manager’, locate and expand ‘Network Adapters’ category
Step 3: Right-click on your network adapter and select ‘Update Driver’. Follow on-screen instructions to finish update.
Step 4: Once done, restart your computer to see the changes and check if the issue is still persist.
Update Network Drivers in Windows 10 [Automatically]
You can also try ‘Automatic Driver Update Tool’ to update network adapter driver or other System drivers. This software will automatically find the latest updates for all System drivers and then install them into computer. You can get this tool through button/link below.
Method 10: Disable other available networks
If you have more than one network connection available on your computer, then you can try to disable other connections and leave the current connection enabled. To do so, follow the steps below.

Step 1: Right-click on ‘Network/WiFi’ icon on ‘System Tray’ and select ‘Open Network and Sharing Center’
Step 2: Right-click on other connection if available, and select ‘Disable’. Disable all secondary connections except the current connection.
Method 11: Disable Windows Update Peer-to-Peer feature
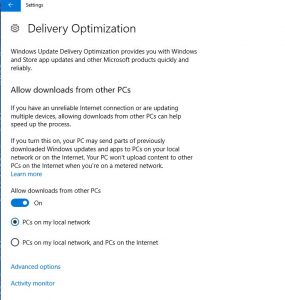
‘Peer-to-Peer’ delivery update mechanism is new feature of Windows 10 helps to save download bandwidth. With this feature, you can share the downloaded Windows update with all computers on your local network so other computers can also download/install the update. However, this feature can cause ‘DNS server is not responding error’ in some case. So, you can disable this feature to resolve the issue.
Step 1: Press ‘Windows + I’ keys together on keyboard to open ‘Settings’ App in Windows 10
Step 2: In the opened ‘Settings’ app, go to ‘Update & Security > Windows Update’
Step 3: Find and click ‘Advanced Options’ under ‘Update Settings’
Step 4: Now, click on ‘Delivery Optimization’
Step 5: In the opened ‘Delivery Optimization’ window, turn OFF the ‘Allow downloads from other PCs’ option by toggling the switch. Once done, please check if the problem is resolved.
Other methods:
Step 1: Disable your firewall/antivirus software temporarily
Step 2: Update Windows 10 to latest version
Step 3: Try different web browser to access the internet and check if the trouble is resolved.
Conclusion
I am sure this post helped you on How to fix DNS server is not responding error in Windows 10 with several easy methods/ways. You can read & follow our instructions to do so. If this post really helped you, then you can share the post with others to help them. That’s all. For any suggestions or queries, please write on comment box below.
