What is ‘Windows 10 stuck on 1909’ issue in Windows 10?
Here, we are discussing on How to fix ‘Windows 10 stuck on 1909’ issue in Windows 10 with several easy methods/steps. You will be guided with easy automatic and manual steps to resolve the issue. Let’s start the discussion.
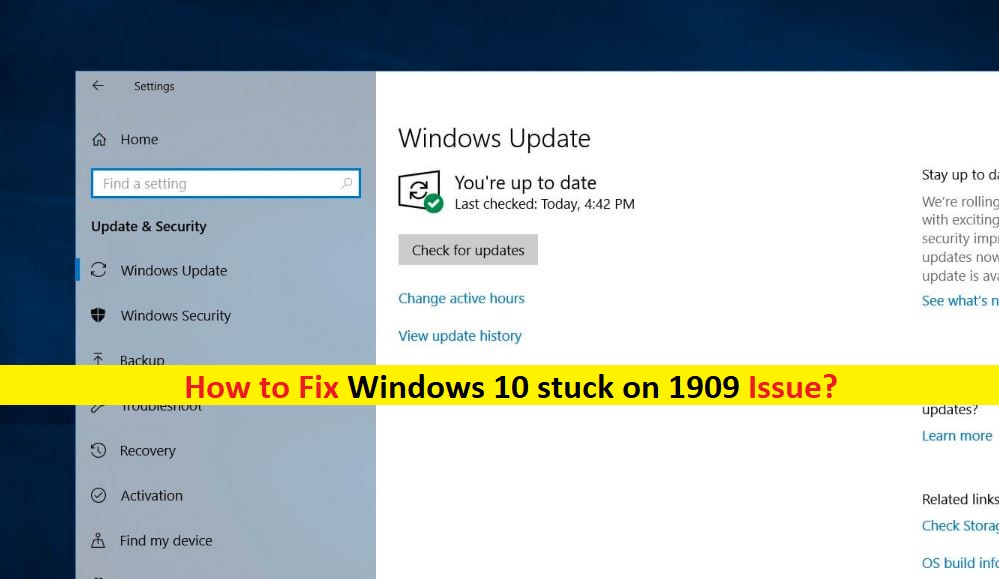
‘Windows 10 stuck on 1909’ issue occurs in Windows 10 due to several reasons. ‘Windows 10 version 1909’ is Windows update release by Microsoft Corporation. Many Windows 10 devices have already received this Windows 10 update. To check Windows 10 OS version installed in your computer, open ‘Settings’ App in Windows 10, navigate to ‘System’, click on ‘About’ in left pane and check ‘Windows 10’ OS version in right-pane.
Check if it shows ‘Windows OS 1909’ version in ‘Settings > system > About’. If it is Windows 10 version 1909 and you are try to update your Windows OS to next Windows 10 versions, then there could be several reasons behind ‘Windows 10 stuck on 1909’ issue that’s why your machine has not yet received Windows 10 2004 or 20H1 update. To update Windows 10, you need to go to ‘Settings App > Update & Security > Windows Update’ and click on ‘Check for updates’. Check if it indicates your system is still ready for Windows 10 version 2004 or 20H2.
One possible reason behind ‘Windows 10 stuck on 1909’ issue is infamous Conexant audio driver issues. Windows 10 computer affected by this known issue with Conexant ISST Audio or Conexant HDAudio drivers. These audio drivers can easily be seen under ‘Sound, video and game controllers’ in ‘Device Manager’ of your computer. Conexant has offered up updated driver for some systems and system can install 20H2 while others, new drivers hasn’t been released.
In such case, you can resolve the issue by uninstall Conexant Audio driver and then perform Windows update to install 20H2 or later Windows version. Once installed, it will find Conexant audio driver and install the update. If you are facing the same issue, then you are in right place for the solution. Let’s go for the solution.
How to fix ‘Windows 10 stuck on 1909’ Issue in Windows 10?
Method 1: Fix ‘Windows 10 stuck on 1909’ issue with ‘PC Repair Tool’
‘PC Repair Tool’ is easy & quick way to find and fix PC problems like BSOD errors, DLL errors, EXE errors, problems with programs, malware or viruses issues, and other system issues with just few clicks. You can get this tool through button/link below.
Method 2: Run Windows Update Troubleshooter
You can run Windows 10 built-in troubleshooter to resolve the issue.

Step 1: Press ‘Windows + I’ keys on keyboard to open ‘Settings’ App in Windows 10
Step 2: Go to ‘Update & Security > Troubleshoot’
Step 3: Select ‘Windows Update’ troubleshooter in right-pane and select ‘Run the troubleshooter’ button
Step 4: This will start troubleshooting your PC for issues. Wait to finish the process. Restart your computer once done, and check if the trouble is resolved.
Method 3: Delete Temporary Windows Update files
Broken Windows 10 update or Windows 10 stuck on 1909 issue can be resolved by deleting temporary files associated with Windows updates.
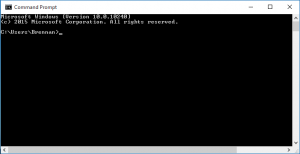
Step 1: Press ‘Windows + X’ keys on keyboard and select ‘Windows PowerShell as Admin’
Step 2: Type the following command one-by-one and hit ‘Enter’ key to execute
net stop wuauserv
net stop bits
Remove-Item -path c:\Windows\SoftwareDistribution
net start wuauserv
net start bits
Step 3: Wait to complete the process. Once done, restart your computer and check if the trouble is resolved.
Method 4: Try manually downloading/updating Windows 10 from ‘Microsoft Update Catelog’
If the issue is still persist, then you can try to update Windows 10 using ‘Microsoft Update Catelog’.

Step 1: Open your browser and visit ‘Microsoft Update Catelog’ (Official) page
Step 2: Search for update using ‘search tool’ on the opened official page, click on ‘Download’ button on the available update link.
Step 3: Once downloaded, double-click on ‘Archive file’ that contain the updates and extract it. Double-click on ‘setup file’ and follow on-screen instructions to finish update process.
Step 4: Now, go to ‘Settings > Update & Security > Windows Update’ and click on ‘Check for updates’ button to check for any additional updates.
Step 5: Restart your computer once done to save the changes, and check if the problem is resolved.
Method 5: Restore Windows 10 to previous built
If Windows 10 stuck on 1909 issue is still persist, then you can try to resolve the issue by reverting the Windows installation using ‘System Restore’. You can restore your computer to a restore point when everything was working well.
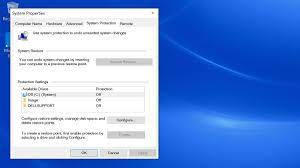
Step 1: Press ‘Windows + R’ keys on keyboard, type ‘rstrui’ in the opened ‘System Restore’ and hit ‘Ok’ to open ‘System Restore’
Step 2: In the opened ‘System Restore’, click on ‘Next’ and select the restore point before failed update and then click on ‘Next > Finish’ to restart restoring process
Step 3: Wait to finish the process. Once done, restart your computer and check if the trouble is resolved.
Method 6: Update Windows 10 drivers
Updating Windows drivers can resolve the driver incompatibility issues and other issues with such device drivers. You can try to get latest updates for all Windows drivers with ‘Automatic Driver Update Tool’. This software will automatically find the latest update for all Windows drivers and then install them into computer. You can get this tool through button/link below.
Conclusion
I am sure this post helped you on How to fix ‘Windows 10 stuck on 1909’ issue in Windows 10 with easy steps. You can read & follow our instructions to do so. That’s all. For any suggestions or queries, please write on comment box below.


