What is ‘sedlauncher.exe high disk usage’ issue in Windows 10?
In this post, we are going to discuss on How to fix sedlauncher.exe high disk usage issue in Windows 10 with several easy step. You will be guided with various easy steps to resolve the issue. Let’s start the discussion.
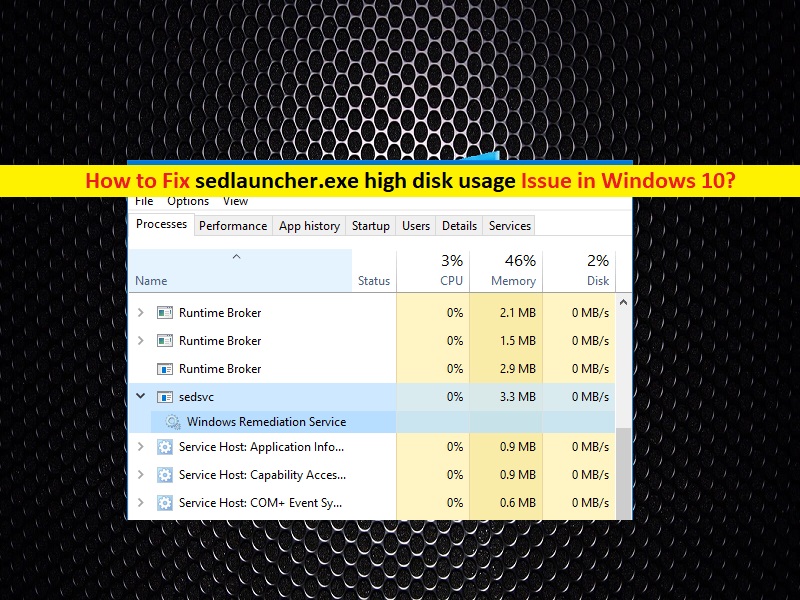
‘sedlauncher.exe’ and ‘sedSvc.exe’ executable files are associated with ‘Windows Remediation Service’ that is part of Microsoft Windows Operating System. These services play important role in downloading/installing Windows’s feature updates means it is necessary that these services or processes are installed and running in Windows computer properly.
sedlauncher.exe and sedSvc.exe can easily be seen in ‘Task Manager’ as running process. The file location of ‘sedlauncher.exe’ is ‘Rempl’ folder inside ‘Program Files’ of your main hard disk drive. If you are not aware, Windows Remediation Service is important Windows Service responsible for installing Windows 10’s feature updates. These feature updates includes only small patches.
Windows Remediation Service is installed in computer as software and can easily be seen in ‘Apps & Features’ or ‘Programs & Features’ in ‘Control Panel’. If you want to install latest security updates as Windows latest feature update in computer, then you should not stop ‘Windows Remediation Service’. However, if you don’t want new security patches or features, then you can easily stop the update through ‘Settings’ App.
Some users reported that they faced ‘sedlauncher.exe high disk usage’ issue that cause negatively impact on system performances. They explained that ‘sedlauncher.exe and sedSvc.exe’ processes are showing high disk percentages. Sometimes, this high CPU/Disk usage issue can occur if the service is downloading/installing huge feature update. In such case, you can try one solution to resolve the issue is to wait for finish the feature update installation or stop the process. You can also try to remove the service from your computer entirely to resolve the issue. Let’s go for the solution.
How to fix sedlauncher.exe high disk usage issue in Windows 10?
Method 1: Fix sedlauncher.exe high disk usage issue with ‘PC Repair Tool’
‘PC Repair Tool’ is easy & quick way to find and fix BSOD errors, EXE errors, DLL errors, problems with programs, malware or viruses issue, and other System issues with just few clicks. You can get this tool through button/link below.
Method 2: Disable ‘Windows Remediation Service’ in Windows 10
You can resolve high CPU/Disk usage issue by disabling ‘Windows Remediation Service’. Let’s try.
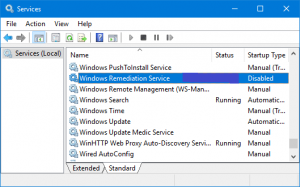
Step 1: Press ‘Windows + R’ keys on keyboard, type ‘services.msc’ in opened ‘Run’ dialog box and hit ‘Ok’ to open ‘Services’ window
Step 2: In the opened ‘Services’ window, locate and double-click on ‘Windows Remediation Service’ to open its ‘Properties’
Step 3: In the opened ‘Properties’ window, select ‘Disabled’ from ‘Startup type’ dropdown and hit ‘Stop’ button under ‘Service Status’ section
Step 4: Finally, click on ‘Apply’ and ‘Ok’ button to save the changes, and check if the trouble is resolved.
Method 3: Remove ‘REMPL’ Task Schedule
Another possible way to resolve the issue is to remove ‘REMPL’ task schedule.
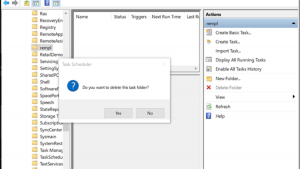
Step 1: Press ‘Windows + R’ keys on keyboard, type ‘taskschd.msc’ in the opened ‘Run’ dialog box and hit ‘Ok’ button to open ‘Task Scheduler’ window
Step 2: Now, navigate ‘Task Scheduler Library > Microsoft > Windows > REMPL’
Step 3: Click the ‘REMPL’ folder, right-click on ‘Shell’ task and select ‘Delete’
Step 4: Once delete, please check if the problem is resolved.
Method 4: Disable ‘Windows Remediation Service’ on Windows Firewall
You can also try to resolve the issue by blocking the ‘Windows Remediation Service’ service on Windows Defender Firewall.
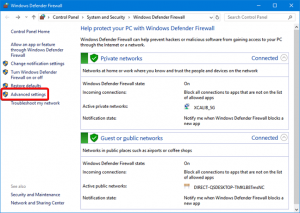
Step 1: Press ‘Windows + R’ keys on keyboard, type ‘wf.msc’ in the opened ‘Run’ dialog box and hit ‘Ok’ button to open ‘Windows Defender Firewall with Advanced Security’ window
Step 2: Select ‘Outbound Rules’ in left pane and click on ‘New Rule’
Step 3: Make sure that a rule for program is selected and hit ‘Next’ button
Step 4: Now, click on ‘Browse’ button and navigate to ‘REMPL’ folder under ‘C:\ Program files’ and locate ‘sedlauncher.exe’, double-click on it
Step 5: Click on ‘Next’ and select ‘Block the protection’ radio button and then hit ‘Next’
Step 6: Check the ‘Domain’, ‘Private’, and ‘Public’ checkboxes, and then hit ‘Next’
Step 7: Enter new rule ‘sedlauncher.exe’ or sedsvc.exe and then hit ‘Finish’ button. Once done, please check if high CPU/Disk usage issue is resolved.
Method 5: Uninstall Windows Remediation Service application
As mentioned, this service is installed in computer as application. You can resolve high CPU/Disk usage issue by uninstalling the service.
Step 1: Press ‘Windows + I’ keys on keyboard to open ‘Settings’ App in Windows 10
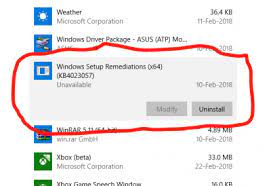
Step 2: Go to ‘Apps > Apps & Features’, find ‘Windows Setup Remediation’ or ‘Update for Windows 10’ option
Step 3: Select it and click on ‘Uninstall’ and follow on-screen instructions to finish uninstall process.
Method 6: Uninstall problematic Windows update
If the issue is still persist, then you can try to resolve the issue by uninstalling the problematic Windows update.
Step 1: Press ‘Windows + I’ keys on keyboard to open ‘Settings’ App
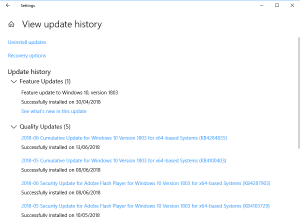
Step 2: Go to ‘Update & Security > Windows Update’
Step 3: Click on ‘View History > Uninstall updates’, find the latest updates installed that is appeared on top of list, right-click on it and select ‘Uninstall’
Step 4: Follow on-screen instructions to finish uninstall process. Once done, restart your computer and check if the trouble is resolved.
Method 7: Run System Restore
You can perform System Restore operation to restore your computer to particular restore point when everything was working well.
Step 1: Press ‘Windows + R’ keys on keyboard, type ‘rstrui’ in the opened ‘Run’ dialog box and hit ‘Ok’ button to open ‘System Restore’
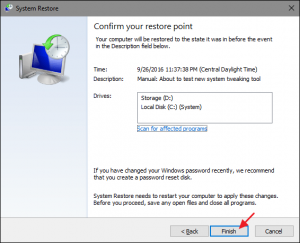
Step 2: In the opened ‘System Restore’, click on ‘Next’ and check ‘Show more Restore Points’ checkbox
Step 3: Select a restore point from list that is before the date on which the issue started occurring and then hit ‘Next > Finish’ to start restoring process.
Step 4: Wait to complete the process. Once done, restart your computer and check if the trouble is resolved.
Conclusion
I am sure this post helped you on How to fix sedlauncher.exe high disk usage issue in Windows 10 with several easy steps. You can read & follow our instructions to resolve the issue. That’s all. For any suggestions or queries, please write on comment box below.


