What is NordVPN not connecting issue in Windows 10?
In this post, we are going to discuss on “How to Fix NordVPN not connecting Windows 10” with several easy steps. You will be guided with easy automatic and manual steps to resolve the issue. Let’s starts the discussion.
NordVPN is one of the most popular & reliable VPN service used by numerous users world-wide. This VPN service is designed & developed by Tefincom & Co., S.A for Windows, MacOS, Linux, Android and iOS platforms. NordVPN has different servers located in different countries means you can choose any locations from different countries as your current location. NordVPN is one of the best choices if you want VPN connection.
However, users reported that they faced ‘NordVPN not connecting Windows 10’ issue and explained that it either stops connecting after update or request to DNS server either return a ‘time out’ response. One possible reasons behind this issue is enabled IPv6 protocol in your Windows 10. Note that enabled IPv6 protocol in Windows 10 doesn’t supported by NordVPN in any of its communication. In such case, you can resolve the issue by disabling IPv6 protocol.
Another possible reason behind ‘NordVPN not connecting Windows 10’ issue can be problem in network configurations & settings of Windows 10. Resetting network settings & configuration in Windows 10 will reset any misconfigured network settings or bad network settings to default and this way, you can fix NordVPN connection issues.
NordVPN not connecting issue can occur due to problem with Network Adapter. If Network adapter associated with your NordVPN connection is not working properly, you might face issue with NordVPN connection also. You can resolve the issue by restarting your network adapter. If you are facing the same issue, then you are in right place for the solution. Let’s go for the solution.
How to fix NordVPN not connecting Windows 10?
Method 1: Fix NordVPN not connecting Windows 10 with ‘PC Repair Tool’
‘PC Repair Tool’ is easy & quick way to find and fix PC problems like BSOD errors, DLL errors, EXE errors, problems with programs or files, malware or viruses issues, and other system issues with just few clicks. You can get this tool through button/link below.
Method 2: Disable IPv6 protocol in Windows 10
As mentioned, NordVPN connection doesn’t support IPv6 protocol. You can disable IPv6 protocol in Windows 10 to resolve the issue if enabled.
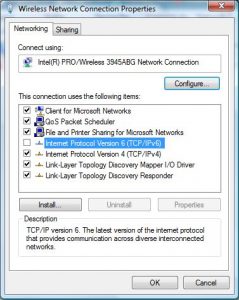
Step 1: Right-click on ‘Network/Wifi’ icon on ‘System Tray’ and select ‘Open Network and Internet Settings’ option
Step 2: Click on ‘Change Adapter Options’. Now, right-click on the adapter you are using and select ‘Properties’
Step 3: In the opened ‘Properties’ window, deselect ‘IPv6’ option and make sure ‘IPv4’ protocol option is enabled.
Step 4: Now, save the changes and restart your computer. Please check if the trouble is resolved.
Method 3: Uninstall problematic/conflicting software
Sometimes, ‘NordVPN not connecting Windows 10’ issue occurs due to other applications/programs which causes conflict with NordVPN connection. You can disable or uninstall such problematic applications to resolve the issue. For example, Glasswire Elite is one such application that can cause this issue. You can either disable it or uninstall the application to resolve the issue.
To disable it, open ‘Task Manager’, find the processes associated with Glasswire Elite and disable it. Also, you can try to uninstall such problematic software from ‘Settings App > Apps > Apps & Features’ in Windows 10
Method 4: Change NordVPN server location
It might possible that your geographical location is causing problem in NordVPN connection. You can resolve the issue by changing your sever location in NordVPN app.

Step 1: Open ‘NordVPN’ app in Windows 10 and click on ‘Servers’ tab at top of the application
Step 2: Select a different server than before and after selecting, and then try opening NordVPN connection again and check if the trouble is resolved.
Method 5: Restart Network Adapter/TAP Adapter
As mentioned, if NordVPN’s network is not working properly in Windows 10, then you might receive ‘NordVPN not connecting Windows 10’ issue. You can fix the issue by restarting Network/TAP adapter associated with NordVPN.
Step 1: Right-click on ‘Network/WiFi’ icon on ‘System Tray’ and select ‘Open Network and Internet settings’
Step 2: Right-click on your network adapter or TAP Adapter and select ‘Disable’
Step 3: Wait for few minute and then right-click on network adapter again, and select ‘Enable’. Once done, please check if the trouble is resolved.
Method 6: Reset Network settings through Command Prompt
Another possible way to resolve the issue is to reset network, IP and DNS settings.
Step 1: Press ‘Windows + X’ keys on keyboard and select ‘Command Prompt as Admisntrator’
Step 2: Type the following command one-by-one and hit ‘Enter’ key after each to execute
ipconfig /release
ipconfig /flushdns
ipconfig /renew
netsh winsock reset
netsh interface ipv4 reset
netsh interface ipv6 reset
netsh winsock reset catalog
netsh int ipv4 reset reset.log
netsh int ipv6 reset reset.log
Step 3: Wait to finish the process. Once done, try opening NordVPN and check if the trouble is resolved.
Method 7: Reinstall NordVPN and TAP Adapter
You can also try to resolve the issue by reinstalling NordVPN application and TAP adapter in Windows 10. This will resolve any problem with NordVPN in computer.
Step 1: Open ‘Settings’ app in Windows 10 and go to ‘Apps > Apps & Features’
Step 2: Find and select ‘NordVPN’ application, right-click it and select ‘Uninstall’
Step 3: Restart your computer once uninstalled. Now, open your browser and visit ‘Nord Official site’ and download the NordVPN application in computer. Once done, please check if the issue is resolved.
Method 8: Change NordVPN protocol
It might possible to get this issue due to protocol configuration in its settings. If one type of protocol is not working properly, then you can change the protocol to resolve the issue.
Step 1: Open ‘NordVPN’ application and make sure to disconnect from any currently active sessions
Step 2: Click on ‘Gear’ icon at top-right corner and go to ‘Settings’
Step 3: Now, click on ‘Advanced > Protocol’ and check ‘TCP’ option
Step 4: Change ‘TCP’ to ‘UDP’. Once done, please check if the trouble is resolved.
Method 9: Change DNS server to Google’s DNS
Another possible way to resolve the issue is to change DNS server to Google’s DNS server settings. Let’s try.
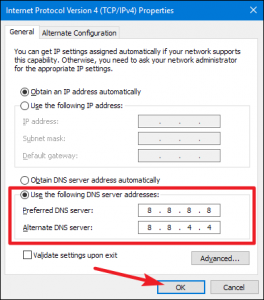
Step 1: Right-click on ‘Network/WiFi’ icon on ‘System Tray’ and select ‘Open Network and Internet Settings’
Step 2: Right-click on your internet connection and select ‘Properties’
Step 3: Double-click on ‘Internet Protocol version 4 (TCP/IPv4)’ to open its ‘Properties’
Step 4: Choose ‘Use the following DNS addresses’, type ‘8.8.8.8’ and ‘8.8.4.4’ in ‘Preferred’ and ‘Alternative’ DNS address box and then hit ‘Ok’ to save the changes.
Method 10: Opening Ports
It might possible that ports that NordVPN uses to communicate with its servers are blocked by your WiFi/router. In such case, you will have to open the ports by logging into the router’s control panel to resolve the issue.
Step 1: Open ‘Command Prompt as Admisntrator’
Step 2: Type ‘ipconfig /all’ command and hit ‘Enter’ key to execute
Step 3: This will show you the list of all information of network adapters connected to your computer
Step 4: Copy the IP address under ‘Default Gateway’ option
Step 5: Paste the IP address within new tab on browser and hit ‘Enter’ key to navigate browser’s login page
Step 6: Enter login credentials to login into accounts. After that, locate ‘NAT’ or ‘Port’ option that allow you to forward ports.
Step 7: Type ‘500’ and select ‘UDP’ from the list and then click on ‘Save’ to forward the 500 UDP port and exit out the control panel. Once done, please check if the trouble is resolved.
Other methods:
Step 1: Disable Firewall/antivirus software temporarily
Step 2: Use mobile’hotspot connection instead of WIFi or other wired connection
Step 3: Try another VPN connection like ‘CyberGhost’.
Conclusion
I am sure this post helped you on How to fix NordVPN not connecting Windows 10 with several easy steps. You can read & follow our instructions to do so. That’s all. For any suggestions or queries, please write on comment box below.
