
What is ‘DNS Lookup failed error’ in Google Chrome on Windows 10?
If you are facing ‘DNS Lookup failed error’ in Google Chrome browser on Windows 10 computer while trying to access certain WebPages, then you are in right place for the solution. Here, you will be guided with easy step/methods to resolve the issue. Let’s starts the discussion.
‘DNS Lookup failed’ error on Chrome: It is common Windows problem associated with Google Chrome browser. This error is usually appeared on Google Chrome while trying to access or visit certain websites. This issue states that ‘The server at XXXXX can’t be found, because the DNS lookup failed’. Here, XXXXX is the webpage address you want to access.
If you are not aware, DNS is network service that converts a website’s name to its Internet address. The error message also says that this issue is occurred due to problem in establishing internet connection, or wrong configured network settings. Also, ‘DNS Lookup failed error’ occurs possibly due to unresponsive DNS server, or Windows Firewall preventing your Google Chrome browser from accessing the network.
This Google Chrome error is appeared with Err_Connection_Reset or Err_Name_Not_Resolved error code and says something happened to your DNS servers that’s why you are facing this error. However, it is possible to resolve the issue with our instructions. You can fix the issue by clearing DNS cache on your computer, changing DNS server addresses, clearing browser cache and cookies, and other possible solution. Let’s go for the solution.
How to fix DNS Lookup failed error – Err_Connection_Reset or Err_Name_Not_Resolved error in Google Chrome on Windows 10?
Method 1: Fix ‘DNS Lookup failed error’ with ‘PC Repair Tool’
You can fix your Windows PC problems with ‘PC Repair Tool’ in order to fix the issue. This software offers you to find and fix BSOD errors, EXE errors, DLL errors, problems with programs, malware or viruses issue, system files or registry issues, and other system issues with just few clicks. You can get this tool through button/link below.
Method 2: Clear Google Chrome cache and cookies
One possible way to resolve this issue is to clear Chrome cache and cookies.
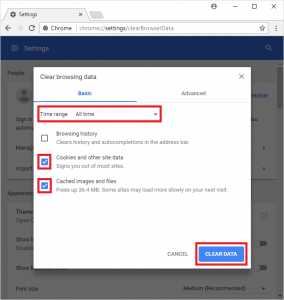
Step 1: Open ‘Google Chrome’ browser and click on ‘Three-Dots’ icon at top-right corner
Step 2: Select ‘More Tools > Clear browser data’
Step 3: In the opened window, click on ‘Advanced’ tab, select ‘All Time’ on time range dropdown
Step 4: Select Cached images and files, Browsing history, and Cookies and other site data checkboxes and hit ‘Clear Data’ button.
Step 5: Wait to complete the process. Once done, restart Chrome browser and check if the issue is resolved.
Method 3: Run Internet Connections Troubleshooter
Windows 10 built-in ‘Internet Connections’ troubleshooter tool can resolve this issue. Let’s try.

Step 1: Press ‘Windows + I’ keys on keyboard to open ‘Settings’ App in Windows 10
Step 2: Go to ‘Update & Security > Troubleshoot’, find and select ‘Internet Connections’ troubleshooter, and click on ‘Run the troubleshooter’ button
Step 3: Follow on-screen instructions to finish the troubleshooting. Once done, please check if the problem is resolved.
Method 4: Change DNS server address
You can also try to fix the issue by changing DNS server address in computer.
Step 1: Right-click on ‘WiFI/Network’ icon on ‘System Tray’, and select ‘Open Network & Internet Settings’
Step 2: Select and right-click on active connection, and select ‘Properties’
Step 3: In ‘Properties’ window, select ‘Internet Protocol Version 4’ and hit ‘Properties’ button
Step 4: Select ‘Use the following DNS server address’, and enter ‘8.8.8.8’ and ‘4.2.2.2’ in preferred and alternative DNS server box
Step 5: Finally, hit ‘Ok’ to save the changes and check if the error is resolved.
Method 5: Flush DNS, restart Network Stack/Winsock
Resetting IP configuration settings/DNS, and restarting winsock can resolve this issue. Let’s try.
Step 1: Press ‘Windows + X’ keys on keyboard and select ‘Command Prompt as Administrator’
Step 2: Type the following command one-by-one and hit ‘Enter’ key to execute
ipconfig /flushdns
netsh winsock reset catalog
Step 3: Wait to complete the process. Once done, reboot your computer and check if the issue is resolved.
Method 6: Update Google Chrome
Updating Google Chrome can resolve issue with Google Chrome browser.
Step 1: Open ‘Google Chrome’ and click on ‘Three-Dots’ icon at top-right corner
Step 2: Click on ‘Help > About Google Chrome’. This will start downloading the available Google Chrome update. Once done, restart Chrome browser and check if the issue is resolved.
Conclusion
I am sure this article helped you on How to fix DNS Lookup failed error in Windows 10 with several easy steps/methods. You can read & follow our instructions to do so. That’s all. For any suggestions or queries, please write on comment box below.


