
What is ‘Camera missing from Device Manager’ issue in Windows 10?
If you are experiencing ‘Camera missing from Device Manager’ issue while trying to see your camera under ‘Camera’ or ‘Imaging Devices’ category, or even you can’t see camera device category in ‘Device Manager’ in Windows 10, then you are in right place for the solution. Here, you will be guided with easy steps/methods to resolve the issue. Let’s starts the discussion.
‘Camera missing from Device Manager’ issue: It is common Windows problem associated with camera or imaging devices issue. This issue indicates that Cameras or Imaging Devices category is not showing in ‘Device Manager’ on Windows 10 computer. If you are not aware, imaging devices like camera/webcam, scanners, or other imaging devices are located under ‘Imaging Devices’ category, and your camera/webcam device is located inside ‘Cameras’ or ‘Imaging Devices’ category in ‘Device Manager’.
This issue also indicates that your webcam/camera device is either disabled or its driver is not installed properly and result in ‘Windows 10 can’t recognize your camera/webcam’ issue can occur. The possible reason behind this issue can be problematic webcam driver. Missing, corrupted or outdated your camera driver in Windows 10 can cause ‘Camera missing from Device Manager’, ‘Webcam not working’ or other issues. So, webcam/camera driver update is necessary.
Updating webcam, driver can resolve this issue and other webcam associated issues in Windows 10. Also, you should make sure webcam device is enabled in your Windows 10. It is possible to fix the issue with our instructions. Let’s go for the solution.
How to fix Camera missing from Device Manager issue in Windows 10?
Method 1: Fix ‘Camera missing from Device Manager’ issue with ‘PC Repair Tool’
You can fix your Windows PC problems with ‘PC Repair Tool’ in order to resolve this error. This software offers you to find and fix BSOD errors, DLL errors, EXE errors, problems with programs, malware or viruses issues, system files or registry issues, and other system issues with just few clicks. You can get this tool through button/link below.
Method 2: Run ‘Hardware and Devices’ troubleshooter
Windows 10 built-in Hardware and Devices troubleshooter can resolve this issue. Let’s try.
Step 1: Press ‘Windows + I’ keys on keyboard to open ‘Settings’ App in Windows 10
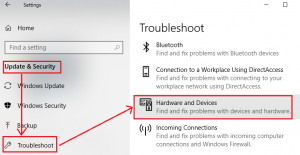
Step 2: Go to ‘Update & Security > Troubleshoot’, find and select ‘Hardware and Devices’ troubleshooter, and click on ‘Run the troubleshooter’ button
Step 3: Follow on-screen instructions to finish troubleshooting process. Once done, please check if the issue is resolved.
Method 3: Update webcam/camera drivers in Windows 10
Step 1: Open your browser and visit your camera/webcam manufacturer official site
Step 2: Download the latest drivers for your camera model according to your Windows OS version like Windows 10 32-bit or 64-bit OS
Step 3: Double-click on ‘Downloaded Driver Setup file’ and follow on-screen instructions to finish installation. Once done, reboot your computer and check if the issue is resolved
Method 4: Download or reinstall Webcam/camera driver update [Automatically]
You can also try to update your camera drivers and all other Windows drivers with ‘Automatic Driver Update Tool’. This software will automatically find the latest updates for all Windows drivers and then install them into your computer.
Method 5: Enable Webcam/camera in ‘Privacy Settings’
Step 1: Press ‘Windows + I’ keys on keyboard to open ‘Settings’ App
Step 2: Go to ‘Privacy > Camera’, Turn ‘Allow apps to access your camera’ toggle ON and make sure apps like ‘Camera’ or other necessary applications are allowed to access your webcam.
Step 3: Once done, please check if webcam/camera not working issue is resolved.
Method 6: Add Legacy Hardware in Device Manager

Step 1: Press ‘Windows + X’ keys on keyboard and select ‘Device Manager’
Step 2: In ‘Device Manager’, click on ‘View > Show hidden devices’
Step 3: Now, click on ‘Action > Add Legacy Hardware’ option
Step 4: In the opened window, hit ‘Next’, select ‘Install hardware that I manually select from list’ option and then hit ‘Next’ button
Step 5: Find and select ‘Imaging Devices’ option and hit ‘Next’
Step 6: Select the webcam/camera that is missing from ‘Device Manager’ and then hit ‘Next’ button. Once done, reboot your computer and check if the problem is resolved.
Method 7: Reset Windows 10
If the problem is still persist, then you can try to resolve the issue by performing Windows 10 reset.
Step 1: Open ‘Settings’ App and go to ‘Update & Security > Recovery’
Step 2: Find ‘Reset This PC’ section and click on ‘Get Started’ button under this section
Step 3: Select ‘Keep my files > Next’ and follow on-screen instructions to finish resetting process. Once done, reboot your Windows computer and check if the problem is resolved.
Conclusion
I hope this post helped you on How to fix Camera missing from Device Manager issue in Windows 10 with several easy steps/methods. You can read & follow our instructions to do so. If the post really helped you, then you can share the post with others to help them. That’s all. For any suggestions or queries, please write on comment box below.


