While using Mac OS on computers, it’s common to think of installing Windows OS as well for which the user need a utility that can aid to create partition supporting Windows operating system. In such context, Apple’s Boot Camp Assistant plays a very important role. This is actually a utility which helps users to set up their Mac to dual-boot Windows .When this application runs, it makes the installation process for windows very easy since it downloads and installs all required drivers for a Mac’s hardware. Apart from this, the tool also setup partitions on hard drive where Windows can be installed, and assures the OS to run properly while booted.
Although, this tool is very helpful to install Windows aside Mac OS on computers, still it can be finicky sometimes. So, in this article, we have included and discussed some common Boot Camp problems on Mac and how to solve them if occurs.
Various BootCamp Problems On Mac
Before you start with BootCamp on your Mac, do make sure you have enough permission with the user account to modify required modifications on your system. Here are some common Bootcamp problems on Mac that may appear before you:
- Boot Camp Assistant might stop responding, or installation failed.
- Startup disk cannot be partitioned or restored to a single partition.
- Boot Camp installer doesn’t open after using Boot Camp Assistant.
- Boot Camp Assistant says your USB drive couldn’t be created or doesn’t have enough space.
So, the users often come to notice above mentioned Bootcamp problems on Mac which requires some attention in order to fix those. To learn how to resolve such issues on a computer, get through the methods to fix the issues in all above mentioned conditions.
1: Boot Camp Assistant might stop responding, or installation failed
If you end up to see this message on screen, then probably the Boot Camp will not work. It has actually stopped while making a copy of Windows 10 installation files. To resolve this issue, we suggest you to use Option-Command-Escape (Esc) to enforce the Boot Camp application to quit. Once done, restart the process again as doing so will get rid of any other apps running in background and might be causing the issue.
2: Startup disk cannot be partitioned or restored to a single partition
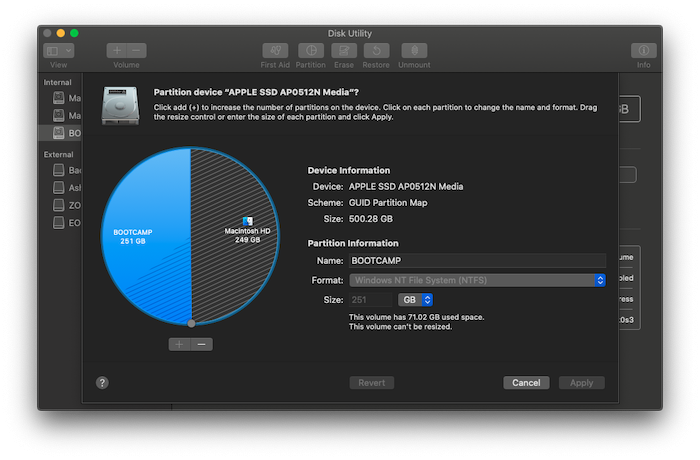
While installing Windows on a Mac computer, it actually shares the storage space. Therefore, while installing the Windows, it asks you to split the current disk into the one that can support the other operating system. While partitioning the disk for the first time, it creates OSXRESERVED partition, that’s actually a recovery partition. Later, you will see OSXRESERVED and BOOTCAMP as two empty partitions which the Boot Camp Assistant use to create during failed installation process. It’s suggested to delete not the partition when the installation process is on. If you are re-installing, get through the steps to bring back MacOS’s storage space.
- Hit the Command and space bar together to bring search spotlight.
- Type “Disk Utility” and open it.
- In the disk utility tool, choose the Mac startup disk (Macintosh HD)
- In case if the Disk Utility asks whether you would like to add a volume to the container or partition the device, just click on Partition
- Choose OSXRESERVED in the graph shown to you, and click the remove button
- At next, choose BOOTCAMP in the same way as above, and click remove button
- Click on Apply button and click Partition to confirm
- Now, open the Boot Camp Assistant and try to re-install Windows once again
3: Boot Camp installer doesn’t open after using Boot Camp Assistant
After the Boot Camp installation is done, Macbook should open Windows and display the Boot Camp installer. In case if you fail to see the same, installing Windows support software and drivers might have failed. In such instance, it’s suggested to re-initiate the installation process, however this can also be done using OSXRESERVED partition if it’s visible. Get through the steps mentioned ahead to perform the same.
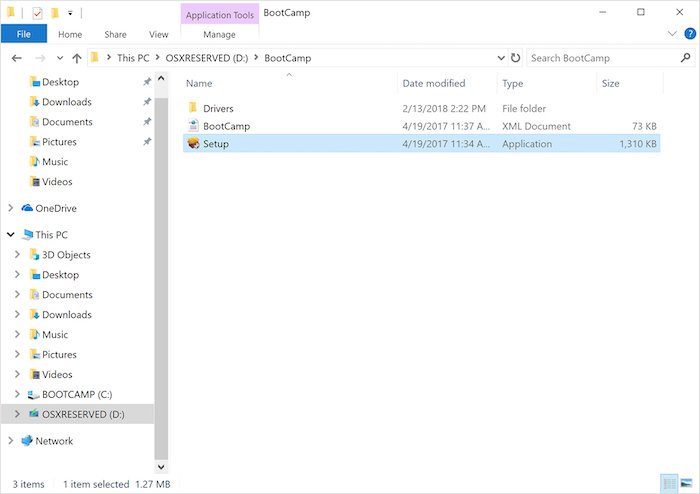
- Launch File Explorer and navigate to OSXRESERVED partition
- Find the Bootcamp directory and open it
- Within Bootcamp directory, you can see Setup.exe file, just double click to launch the exe file
- Now, you will be asked to allow Boot Camp to do changes on your device. Confirm the same by clicking on Yes
- Next is to click on Repair to start the installation
- Once done, restart your device
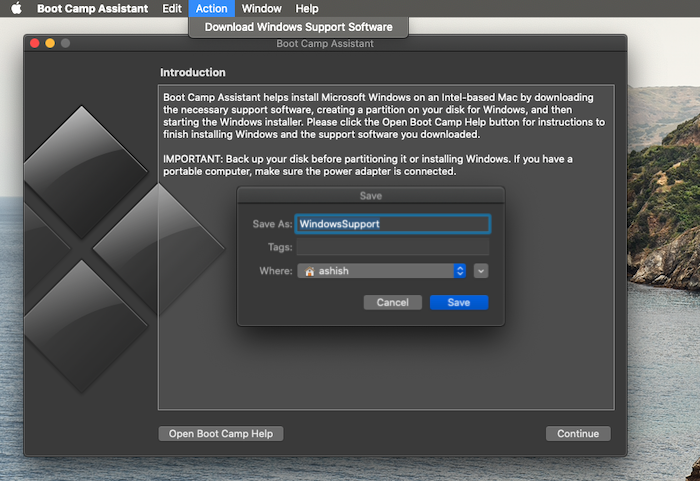
But, in case if you can’t see the partition, then you would have to use Boot Camp application on Mac once again to download the driver. Just open the finder and type Boot Camp Assistant and open it. Once opened, click on Action > Download Windows Support Software, and save it under a formatted USB drive. Boot into windows and locate the Setup.exe file to install all required Mac drivers that is needed to run Windows OS.
This process is necessary to be done when users are facing problems like accessories not working, audio is not working, brightness adjustment is not possible, etc. The Apple’s software will get those missing driver for Windows. If you are using a Mac system powered by AMD version, it’s suggested to visit AMD official website to download those missing drivers.
4: USB drive couldn’t be created or doesn’t have enough space
While using BootCamp software, it’s suggested to use a bootable USB drive of Windows 10 media. Although, windows installation files requires not much space, still the BootCamp requires a storage capacity of 16GB or more as recommended. Do make sure to have the latest version of Mac and Windows operating system to use Boot Camp Assistant application to start the installation. Therefore, if you see this issue, then you should also make sure to use a USB drive having 16GB or more space on it.
Hope, the above mentioned methods to resolve Bootcamp problems on Mac OS have helped you.
