About VidX and Its Removal Instructions
Found as a new Potentially Unwanted Program or PUP, VidX is a newly discovered trait by researchers. This app is technically created by a company named Vidx Project Ltd. This application gets installed on browsers like Chrome, IE, Firefox without any prior notice. This actually happens while the user downloads/installs some free software off the web. The creators of this application basically claims that the app can easily allow them to enhance video viewing experience on computers. However, this app is just an undesired trait and causes intrusive adverts or pop ups on screen.
Means, if a user end up installing VidX on their browsers somehow, they will instantly start to notice various banners, coupons, vouchers, in-text ads, and so on throughout the web sessions. In addition to these, VidX also acts like an adware to track user’s browsing activities, inputs, search key preferences, browsing history, and so on. Also, more other personal details like IP addresses, system information, banking or social credentials, etc can also be collected, which can impact user’s online or offline privacy concerns.
Technically, the VidX adware adds no significant values on browsers to enhance the internet sessions, rather it actually diminishes the browsing performance by eating resources to show its own deceptive ads. Moreover, the adware may also lead to installation of serious malware infections which can affect users and their privacy. All this indicates that if a user is somehow getting intrusive adverts or pop ups on their screen with tagline “Ads by VidX” or “Powered by VidX”, then they should instantly take appropriate actions to eliminate the adware out of their machine or browsers.
In most of the cases, the vicious adware terms like VidX is installed deceptively through deployed techniques which includes Software Bundling and more other socially engineered methods. The users are tricked by various freeware or shareware applications, that if downloaded and installed, discloses no additional offers with them. As a result, the PUPs like VidX is installed on computers secretly. To prevent those, a user should be highly attentive to choose Advanced/Custom installation mode which often allows users to de-select and prevent any unwanted items from being installed. Also, the users should pay attention to source from where they are downloading such free elements. However, in current scenario, if the system is infected, it should be treated without delay.
Summary About VidX
Name: VidX
Type: Adware, PUP
Description: VidX is generally installed on computer through deceptive methods as it come packed or bundled with freeware or shareware apps. This leads the browsers to show tons of irritating adverts, which impacts the overall online experiences drastically.
Distribution: Bundled freeware or shareware apps, malicious ads or links, and many more.
Removal: To check out the details regarding how to remove VidX from compromised browsers, we suggest you to follow instructions mentioned in this article.
Special Offer (For Windows)
VidX can re-install itself if its associated files remain on system somehow. We suggest users to try Spyhunter to check and clean their system against all malicious files completely.
For more information, read SpyHunter’s EULA, Threat Assessment Criteria, and Privacy Policy. Spyhunter checks that your computer has malware with its free trial version. If found any threat, it takes 48 hours time for its removal. If you need to eliminate VidX instantly, you are required to purchase licensed version of this software.
Special Offer (Macintosh)
Mac users if infected by VidX, can try a suggested application to do scan and check if all malicious files and entries are completely removed.
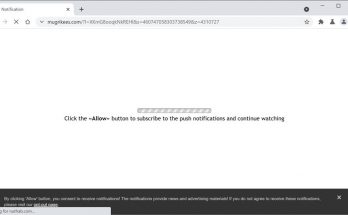
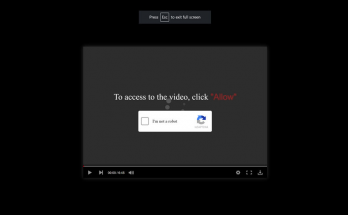
The VidX pop-ups or redirection tornado is very messy and there are multiple ways of getting infected by the Adware or PUPs that causes such issues. In most cases, this computer virus appears after any freeware or cracked program is downloaded from untrusted sources especially the shared networks. The adware program is promoted as a legitimate bundled application. It is not needed to blame yourself for every chaos on the work-station. Sometime even the most trusted application could be a hacked program. It is very common for cyber-criminals to cover VidX under a part of license hacking scripts or as a part of self-made algorithm within any optimization application for Windows.
According to various surveys conducted and researched by cyber-experts, VidX pop-ups and ads are hidden in the advertisements somewhere placed in the odd websites. Such domains have highly intense and blinking ads. The owner or such websites often accept any kind of banners and promotional campaigns to get posted. This type of campaigns and marketing strategies are very risky for the visitors because only the webpage proprietors know what will happen or occur on interaction with such ads. There could be general infection such as an adware or browser or you may even receive something that is very dangerous such as ransomware, coin miners and so on.
It is very important that you read the license agreement before installing any kind of so called “hand” program or browser extensions. The users terms agreement discloses so many things about the program that helps to distinguished between a genuine application or a spam. During the installation process, don’t check the boxed responsible for additional files or program installation. Regardless of its sources, the additional or hidden files should be avoided.
Another thing that you have to be careful is malspam. They may contain malicious URLs as well as file attachments. Maximum of the malspam uses domain spoofing. Apart for circulating adware and browser-hijackers, it is used to spread infections such as infostealers, banking Trojans, malware loaders, backdoor Trojans, remote access Trojans and so on.
Follow the below steps to remove VidX fully:
- Delete VidX from Windows
- Remove VidX from MacOS
- Get rid of VidX from Google Chrome
- Uninstall VidX from Mozilla Firefox
- Erase VidX from Internet Explorer
- Delete VidX from Microsoft Edge
- Remove VidX from Safari
If you are a computer expert, you can easily find all suspicious files and processes related to VidX on different files, folder and locations within your system and web browser. However, this task will be difficult particularly in the case when you are less tech savvy user. You might lose your important files and endanger your whole system in the manual process. So, especially for you, we have added automatic VidX removal tutorial using third party software.
Let me clear you one thing that your systems have built-in Antivirus tool to ensure the system protection against malware or viruses. You have Windows defender (on WIndows) and Xprotect (on Mac)that are enabled by default and start at each system startup.However, the search density for third party antivirus tool is high because of their faster and quick scanning/ removing capability and ability of detecting and deleting adware, potentially unwanted applications, browser hijackers, rootkits, Trojan horse virus, backdoor virus, worms, keyloggers and other type of malware that may find easy to bypassing the built-in antivirus programs on the device.
〈Spy-hunter for Windows〉
Spyhunter is a powerful antivirus tool for Windows. It can scan for, identify, remove and block malware, PUPS and all other objects using advanced scanning mechanism. It is specially designed to adapt and update so its virus detection database with have all latest released malware detection all the time. Additionally, it is user-friendly and also provides the effective ‘24 X 7’ Customer Support, HelpDesk Customer Support service and full custom support with HelpDesk Feature. Below, you will have the complete instruction on how to download and Install SpyHunter.
Download/ install SpyHunter to Windows
- Click on the below Download button to initiate SpyHunter Antivirus software download,
- This will install the setup up file (SpyHunter-Installer.exe) that you find on download dialogue box,
- Double-click on the SpyHunter-Installer.exe fileto open it,
- Confirm with yes if the User Account Control dialog shows up,
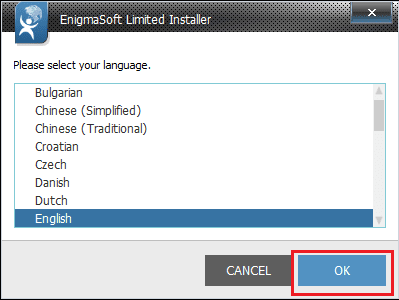
- Then, Select preferred language and click on Ok button,
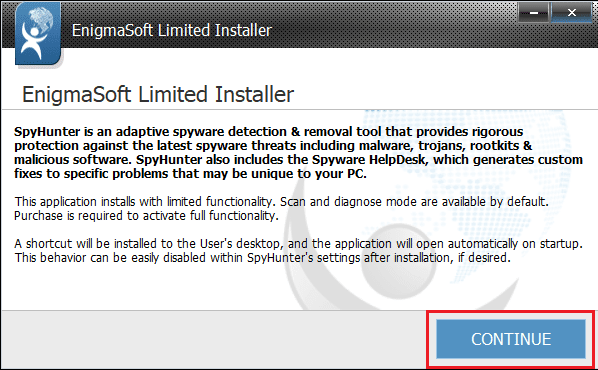
- Click Continue,
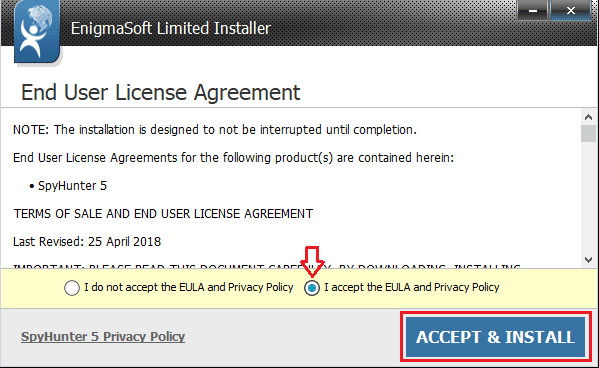
- Read and Accept the End User License Agreement and Privacy Policy and select Install,
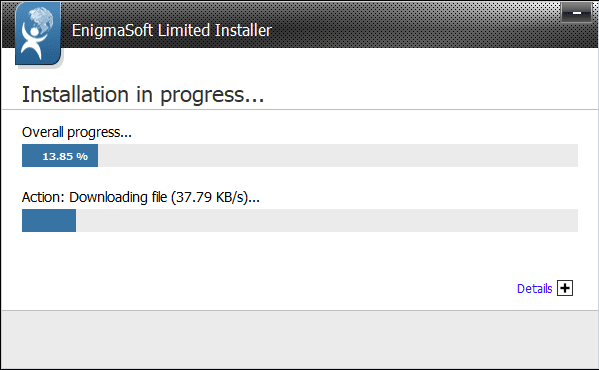
- Wait, till the installation process completed,
- Click Finish to complete the installation process.
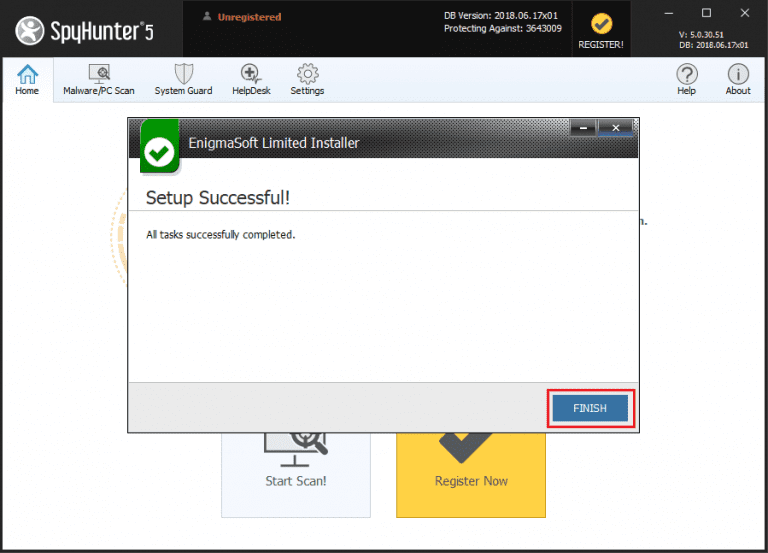
After the program is successfully installed, you can delete the file name SpyHunter-Installer.exe from the Desktop. Then, open SpyHunter using its icon appears on the Desktop or go to the Windows Start menu> Programs> All Programs and click on SpyHunter icon.
⇒ User guide on how to scan systems using SpyHunter
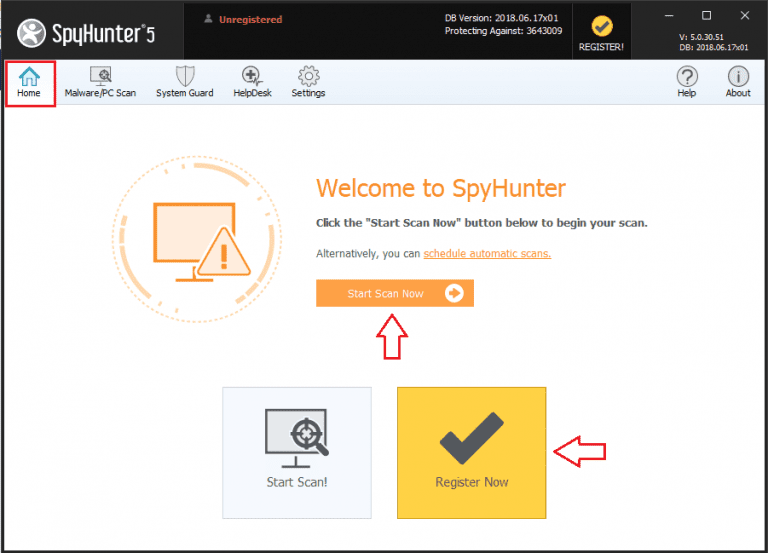
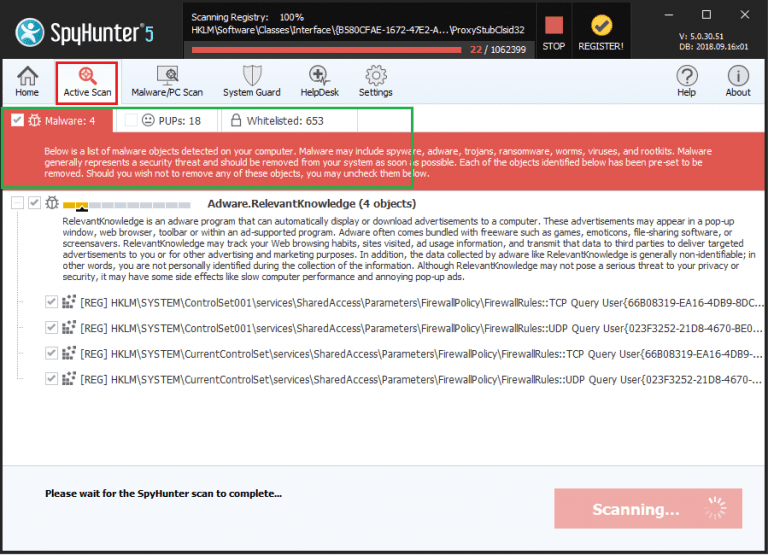
- Open SpyHunter and click on Home menu item,
- Go to the Home tab and click on Start Scan! Button,
Wait for the scanning process to complete (you can however anytime stop the scanning process if you want by clicking the stop button),
After the scan, Spyhunter provides the report where you find the details of the scan result along with system errors, vulnerabilities and malware found
Register for the Spyhunter and remove VidX and all detected threats
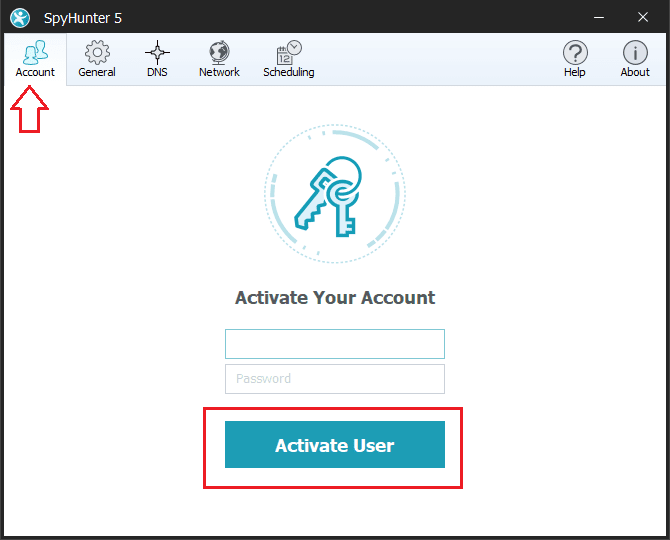
To delete VidX and all associated threats found through the system scan, you need to register for the SpyHunter:
- Click on the register button available on the top-right corner of the program window,and then click on buy button.
- You will automatically be redirected to the purchasing page, enter your customer detail and valid email address,
- After the successful payment, you will receive email confirmation message. The email contains the account information such as usernames and passwords and so on,
- Thereafter, enter the same detail in the Account tab of the settings section of the program. Now, you can avail full features and protection to your system.
Steps to remove VidX and other detected threats:
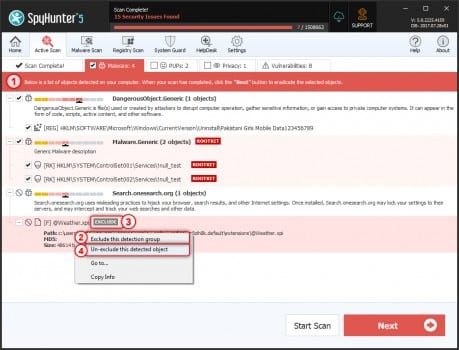
- Spyhunter antivirus tool categorizes the type of objects detected during system scans in total five sections – “Malware“, “PUPs” (Potentially Unwanted Programs), “Privacy“, “Vulnerabilities“, and “Whitelisted objects“
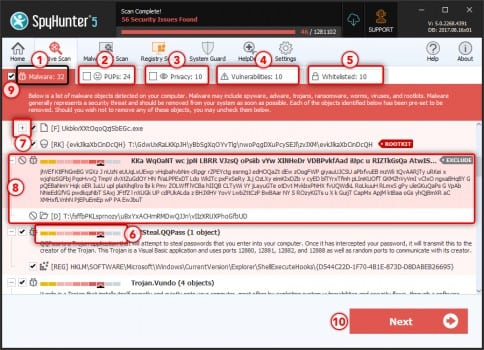
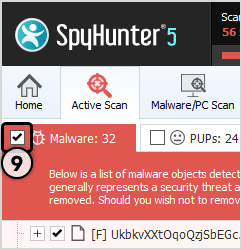
- Select the object you want to remove and then click on Next button (you can quarantine an object so that you can anytime restore it to the system using restore feature)
〈Mac Keeper for Mac Os X system〉
Mac Keeper is specially designed to tune up performance and protect your Mac. It can block malware, adware and major security threats from harming your personal data. Also, it can clean junk, duplicates and useless apps to save gigabytes of disk space to get the things running like the way before. So, we recommend download and install this application, if you are Mac user and are infected with VidX infection and want to get rid of it fully. Check below for the download/ installation guide and the steps how to scan and delete the suspicious application from the system.
Steps to download and install MacKeeper
- Click below the button to download Mackeeper application,
- Open the MacKeeper.dmg or MacKeeper.pkg (the downloaded file that you find in Finder>Downloads),
- Follow the on-screen instructions and complete installation process
How to scan PC and remove VidX using MacKeeper
To begin with, click on One-Click Scan icon on the program’ window (Six drive clean-up utilities Binaries Cutter, Cache Cleaner, Duplicates Finder, Languages Cutter, Logs Cleaner and Old Files Finder will altogether scan the hard drive for the space to be cleaned and the One-click scan will show the total space in the drive),
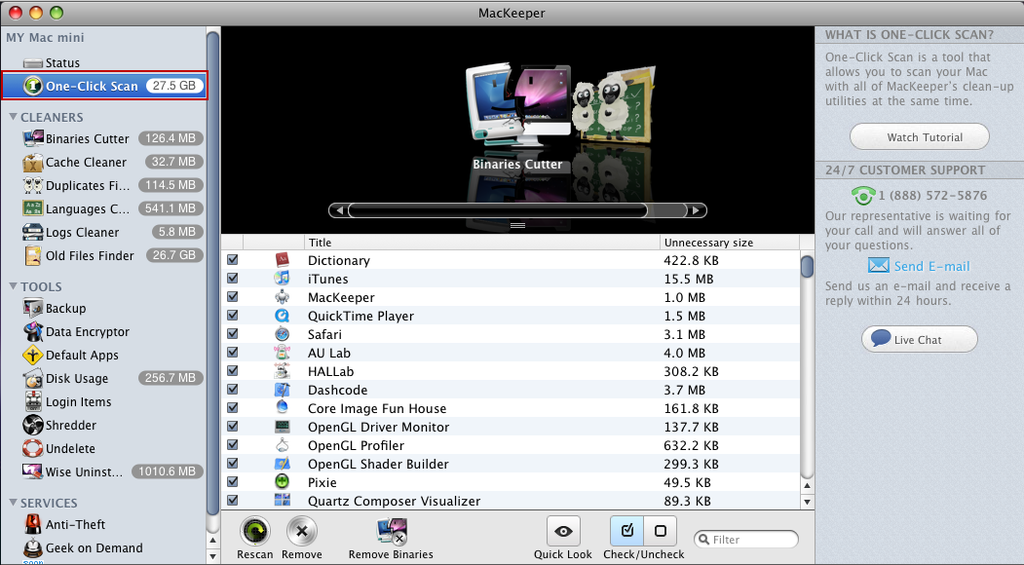
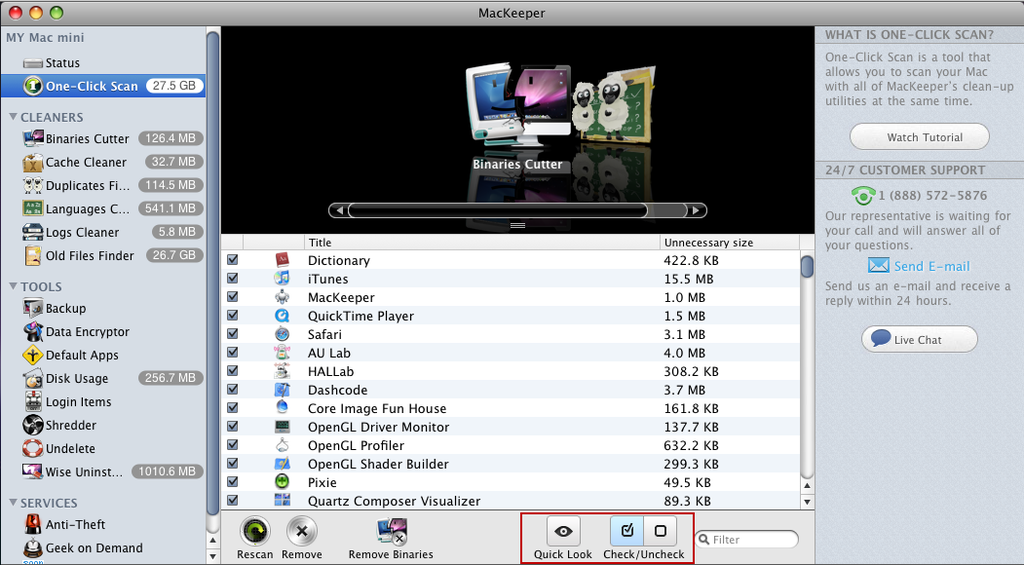
Check the list of all files by scrolling horizontally and decide which one to delete (you can preview the file content using Quick Look),
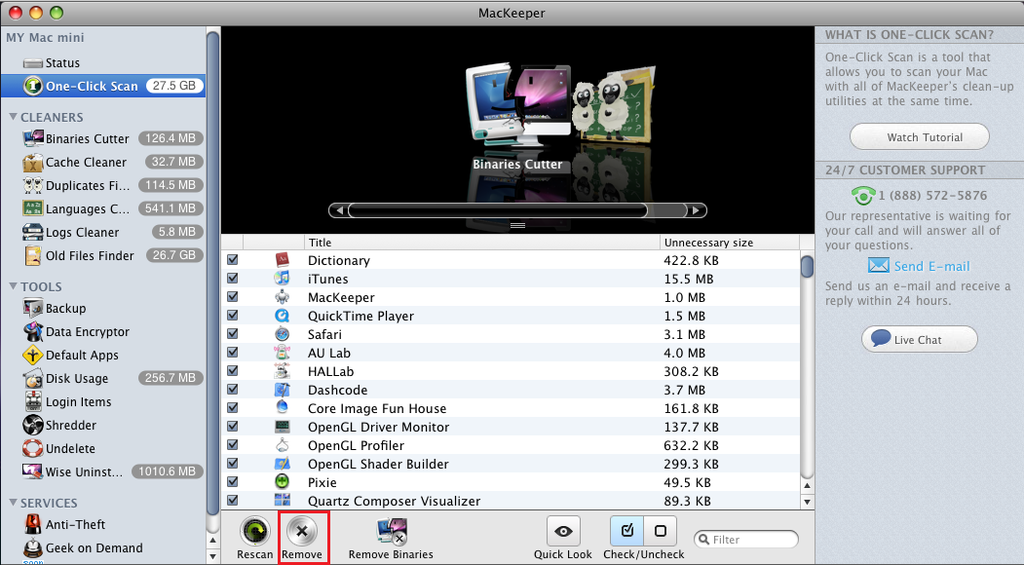
Select VidX all useless files and click on Remove button to get rid of them (you can filter to find a specific among the scan results and scan the drive once again for Rescan).
Then, customize the list of the cleaners using the preferences Window, if you want.
Congratulations! VidX will be completed removed after this. Below, we are providing you how you can approach to the malware deletion by hand. As we already said, proceed to these steps only by ensuring that you have IT skill and previous virus removal experience as it will be complex tasks for the beginner. Nonetheless, we try our best to keep the manual VidX removal guide simple so that you can easily step to the removal process.
[Important note: Before we go, you should know the above mentioned steps are basically an automatic process where you simply have to use the anti-malware tool to detect and delete the malware. These kinds of PC security application clean up the work-station as well as provide protection from such malware in future as well. It provides internet security, malware protection as well as boosts up the overall PC performance.
On the other hand, for all those who are computer experts or have technical knowledge in PC components and software, the depth manual process has been discussed below. Again, remember that this is a cumbersome process and requires a lot of expertise and precision. This is a long process and should be executed as it is mentioned.]
Special Offer (For Windows)
VidX can re-install itself if its associated files remain on system somehow. We suggest users to try Spyhunter to check and clean their system against all malicious files completely.
For more information, read SpyHunter’s EULA, Threat Assessment Criteria, and Privacy Policy. Spyhunter checks that your computer has malware with its free trial version. If found any threat, it takes 48 hours time for its removal. If you need to eliminate VidX instantly, you are required to purchase licensed version of this software.
Special Offer (Macintosh)
Mac users if infected by VidX, can try a suggested application to do scan and check if all malicious files and entries are completely removed.
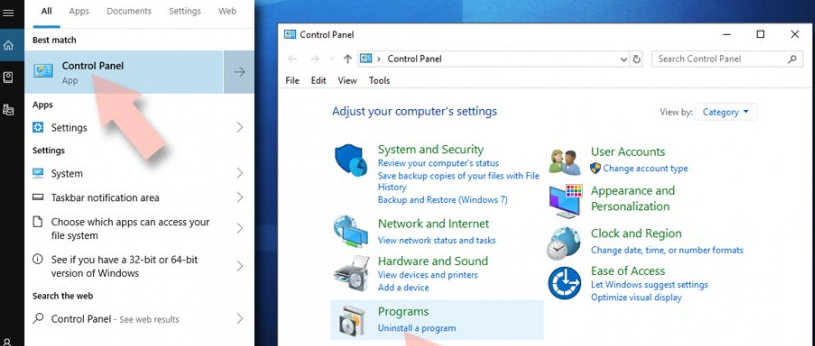
⇒ Delete VidX from Windows
To remove VidX from Windows OSs versions10/ 8, perform the below steps:
- Go to the Windows’Control Panel(simply by opening search box and searching by the name then clicking on the search result),
- Click on programs option and select Uninstall a program,
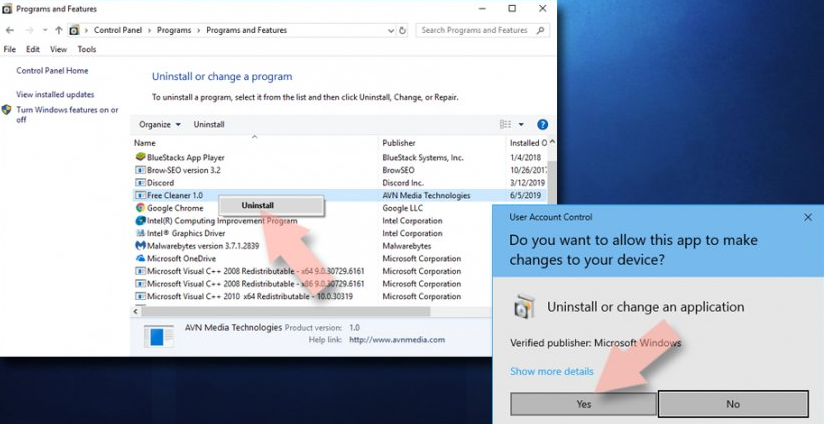
- In the provided list, check for all VidX’s entries (or all recently installed suspicious programs),
- Right-click on the application, and click on Uninstall option,
- Click “Yes” tothe User Account Control page shown to you, then wait,
- After the installation process completed, click Ok to finish the process.
If you are Windows 7/XP users, perform these steps:
- Click on Windows Start> Control Panel on the right pane (or click Add/Remove programs on XP running devices),
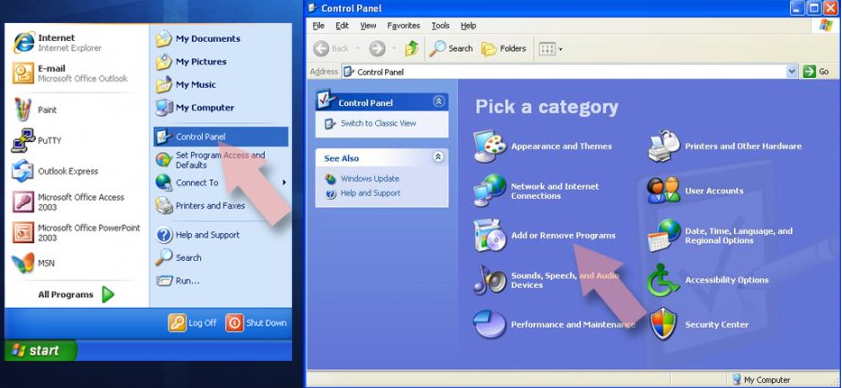
- Select Programs>Uninstall a program,
- Click once on the app for the selection,
- Tap Uninstall/Change,
- Confirm with Yes on the confirmation prompt,
- Then, click OK and finish the removal process
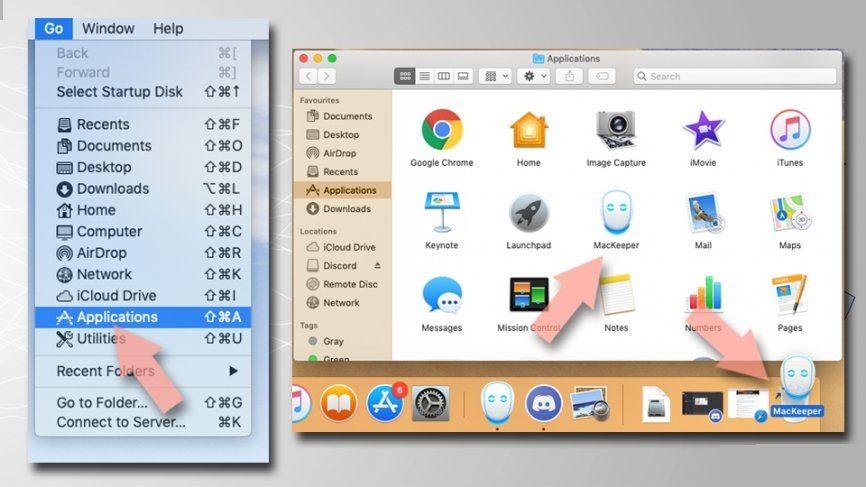
⇒ Remove VidX from Mac OS X system
Delete VidX from Application folder:
- Go to the application folder (by selecting Go>Applications on the menu bar),
- Find VidX related entries in the Applications folder,
- Click on the app and move it to the Trash (just drag it or perform right-click and pick Move to Trash option),
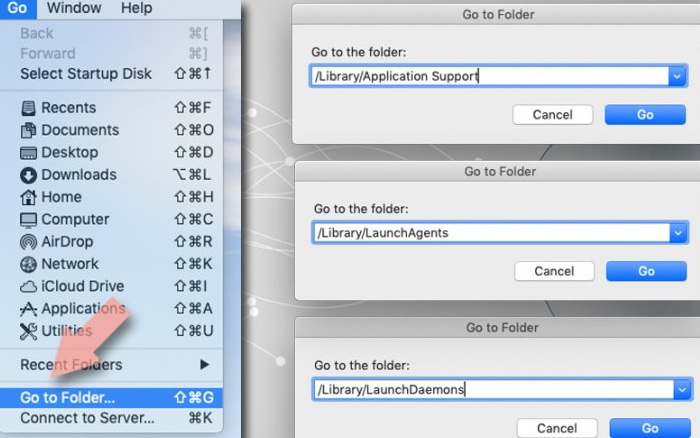
Now delete VidX and all relevant files from Application Support, LaunchAgents and LaunchDaemons folder using the below steps:
- In the menu bar, click Go> Go to Folder,
- Enter /Library/Application Support, press Go and hit Enter,
- Check for dubious entries in the Application Support folder and delete them,
- Then enter /Library/LaunchAgentsand /Library/LaunchDaemons one after another and find and delete the VidX related entries presented in the two folders
⇒ Get rid of VidX from Google Chrome
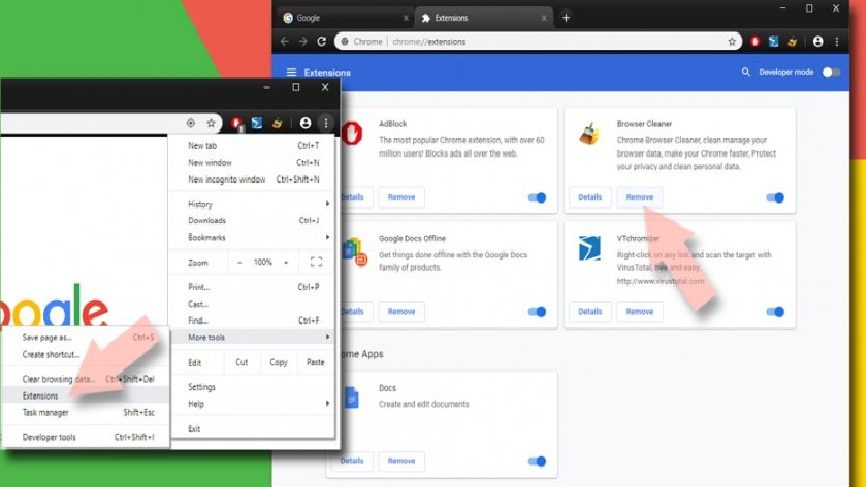
Delete malicious extensions from Chrome browser:
- Open the web browser and click on Menu button (on the three vertical dot appears at the top-right corner of the page),
- Select More tools> Extensions,
- A newly opened window shows you all installed extensions,
- find the suspicious ones related to VidX and remove them by clicking on Remove option
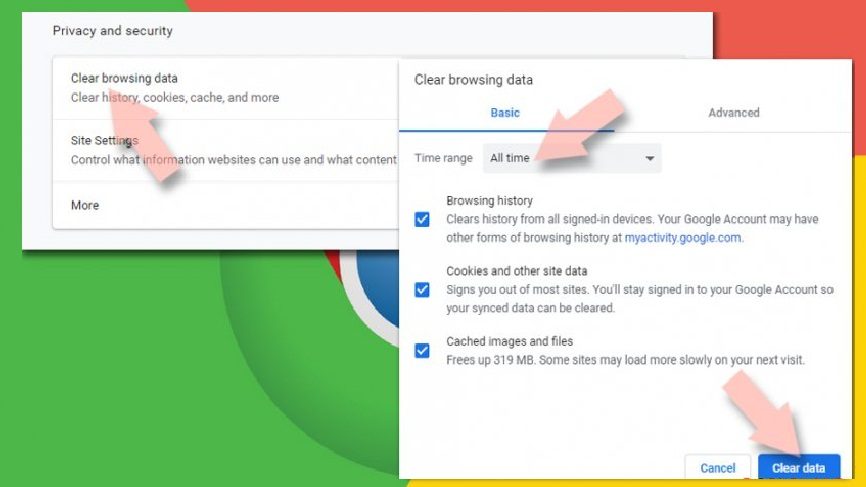
Clear the Chrome Cache and web data:
- Click on Menu and select settings,
- In the Privacy and Security, choose Clear browsing data option,
- Then select Browsing history, Cookies and other site data, and also the cached images and files,
- Click on Clear data
Change Chrome’s homepage:
- Click menu option and select settings,
- Go to On Startup section to look for the suspicious site (VidX),
- Now, click on Open a specific or set of pages, and click on remove option (appears on the drop down menu appears on clicking the three dots)
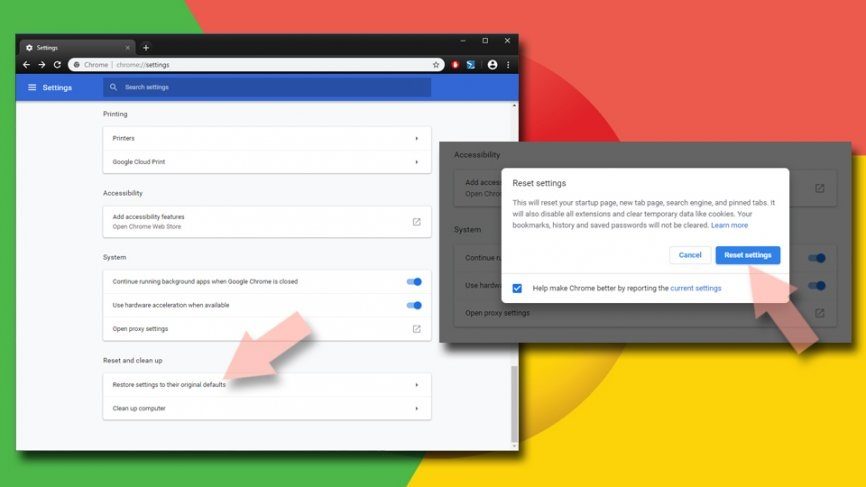
Reset Google Chrome if the previous methods did not help you.
Steps to reset Chrome browser:
- Under the Settings option, Scroll down to find Advanced,
- Locate Reset and Clean up section,
- Now click on Restore settings to their original defaults,
- Click on Reset Settings to finish the VidX removal.
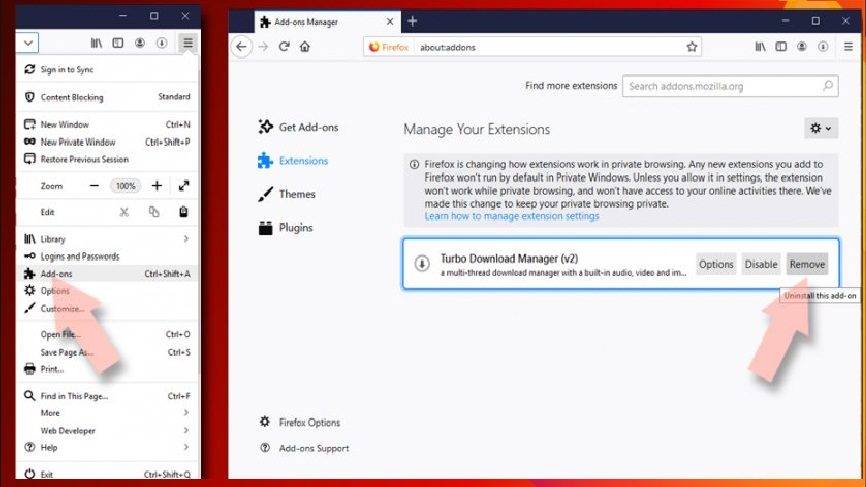
⇒ Uninstall VidX from Mozilla Firefox
Remove all dangerous extensions:
- Open the browser, click on Menu option by clicking three horizontal dot appears at the top-right window,
- Select Add-ons option,
- Here, select all plug-ins related to VidX and remove them
Reset the homepage:
- Choose Options on the opened menu after clicking the three horizontal dots,
- Go to the home option,
- Enter the preferred site
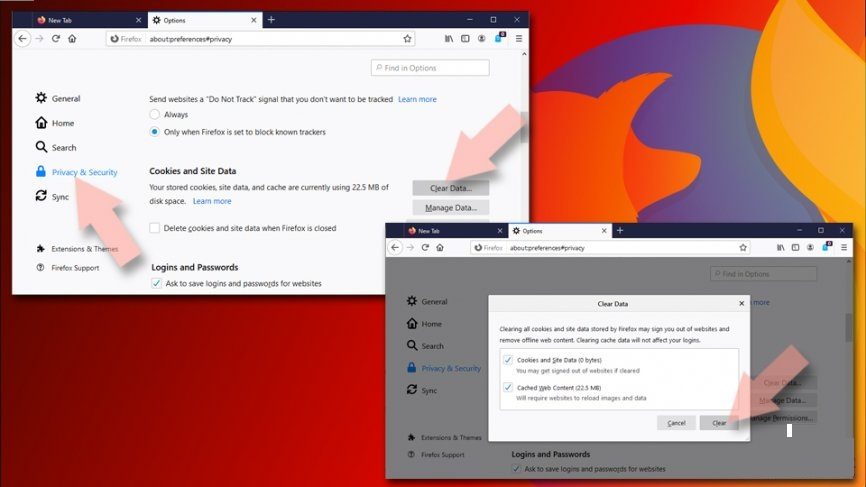
Clear cookies and site data on Firefox:
- Go to the Privacy & Securityunder Options,
- Navigate to Cookies and Site Data
- Click on Clear data option,
- Then, select the Cookies and Site Data as well as Cached web content and hit Clear
⇒ Reset Mozilla Firefox:
Reset the web browser if VidX did not get removed even after performing the above steps:
- Open Firefox and click on Menu,
- Click help and find Troubleshooting information,
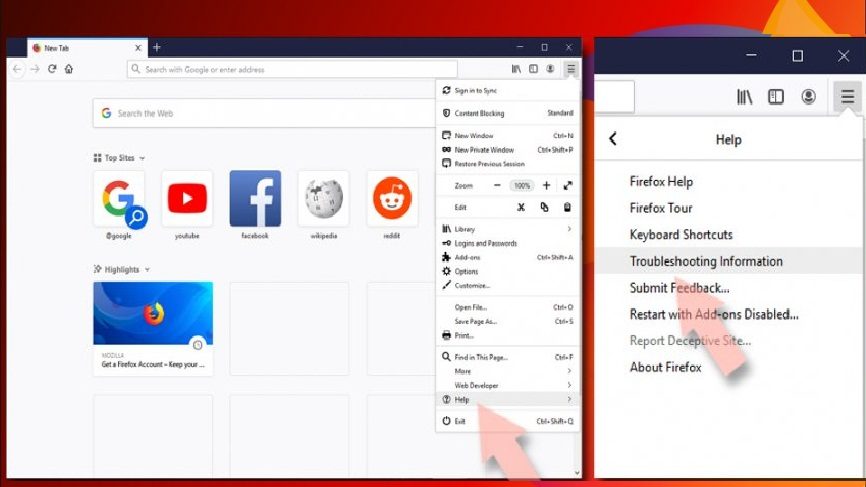
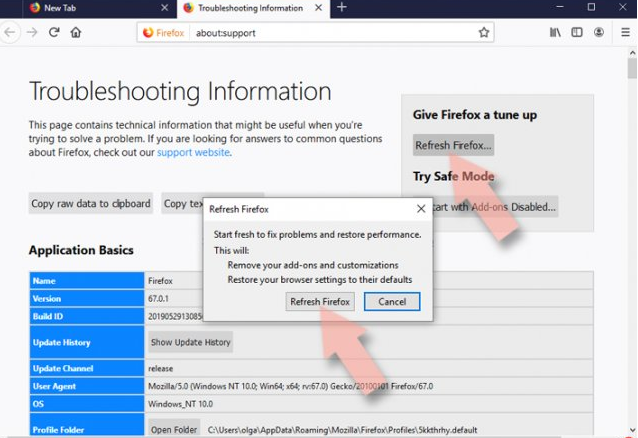
- Go toGive Firefox a tune up section, click on Refresh Firefox…,
- Confirm the action by clicking on Refresh Firefox on the pop-up shows up to you
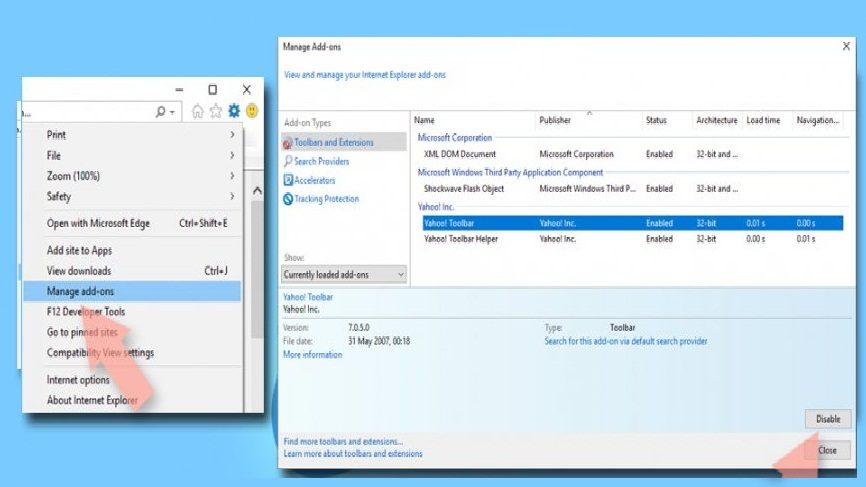
⇒ Erase VidX from Internet Explorer
Remove all malicious extensions:
- Open IE, Click on Gear icon,
- Select Manage Add-ons,
- In the Manage Add-ons Window, find all suspicious plug-ins related to VidX and disable their entries by clicking Disable option
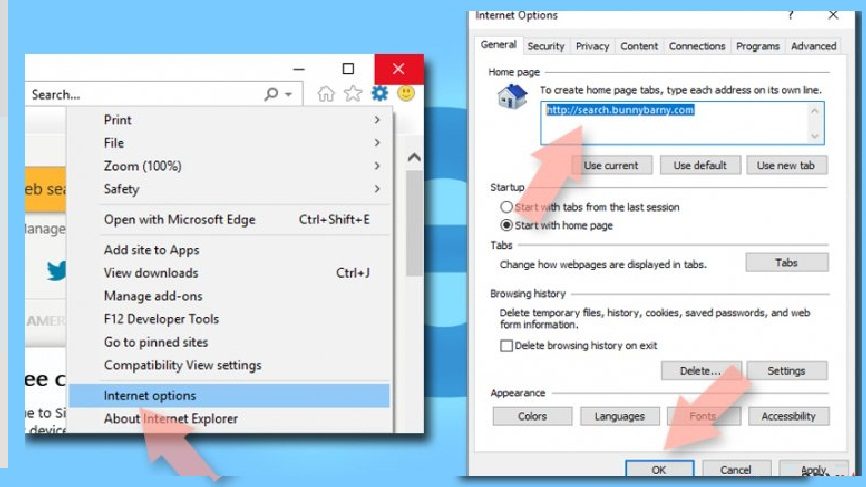
Change browsers’ homepage:
- Select Internet option in the IE’s menu,
- Under the General Tab, delete the homepage address and replace it with the one of your choice,
- Click Apply and then Ok to make the changes take place
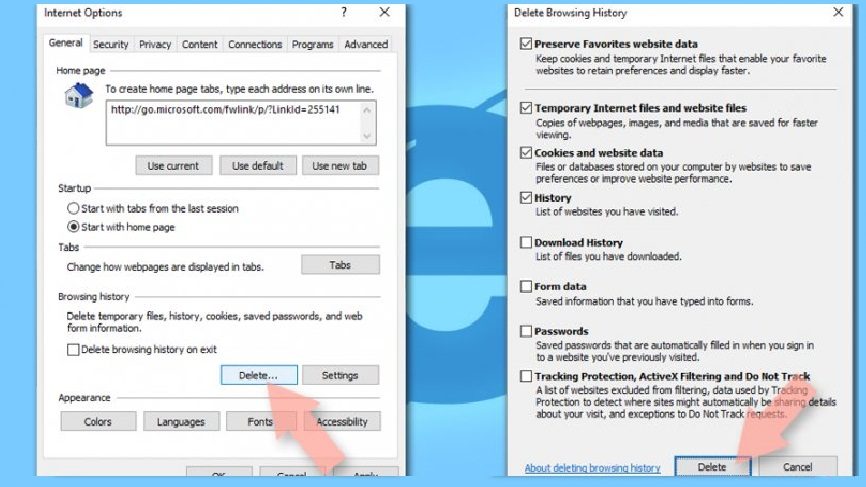
Clear all temporary files:
- Again, go the Internet options,
- Now, find Browsing history,
- Click Delete…,
- Make selection to all relevant fields and hit Enter
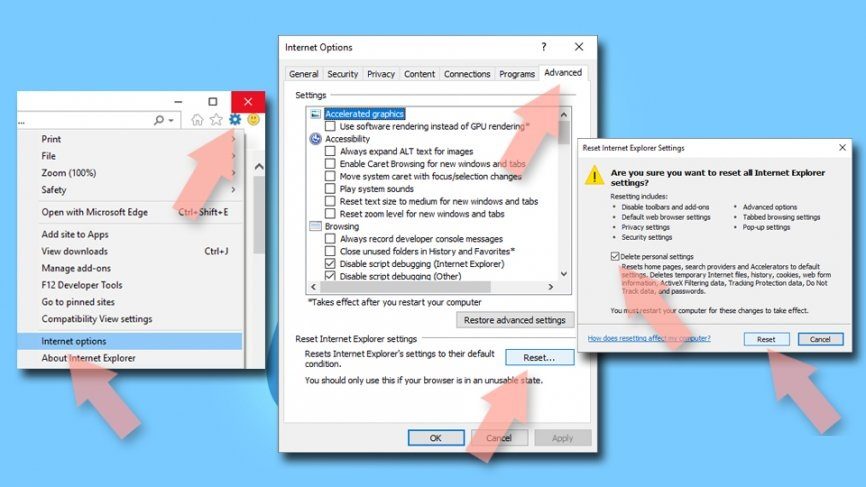
Reset the web browser:
- Open IE, click on Gear icon,
- Select Internet Options> Advanced,
- In the opened window, select Delete personal settings> reset to complete VidX removal.
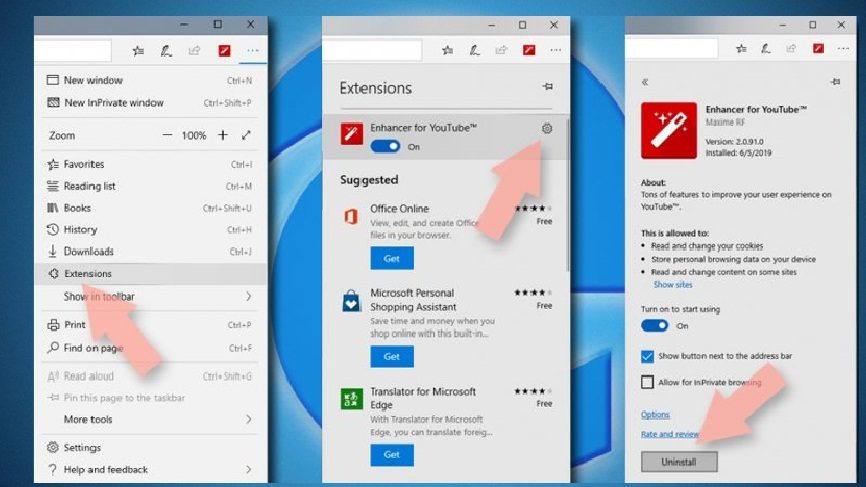
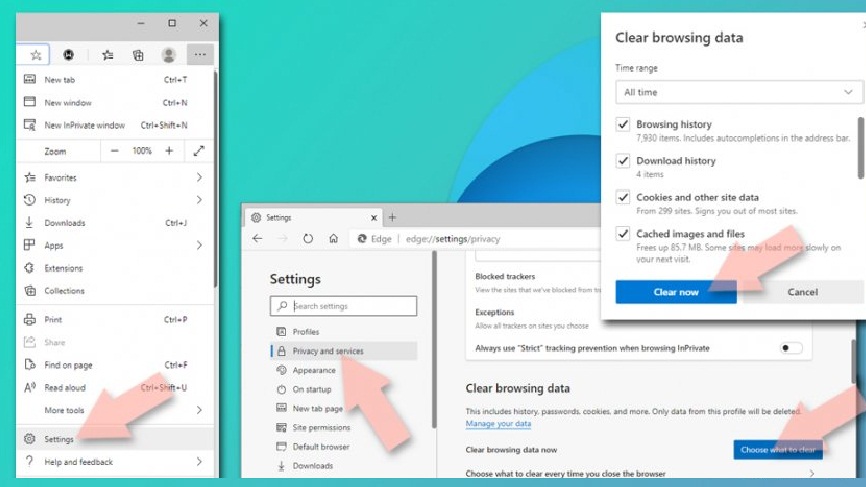
⇒ Delete VidX from Microsoft Edge
Erase all unknown extensions from MS Edge:
- Open the browser and click on the three horizontal dots at the top-right of the browser window,
- Pick Extensions,
- From the list, select all VidX related extensions,
- Click on Uninstall(appears at bottom on clicking the Gear icon)
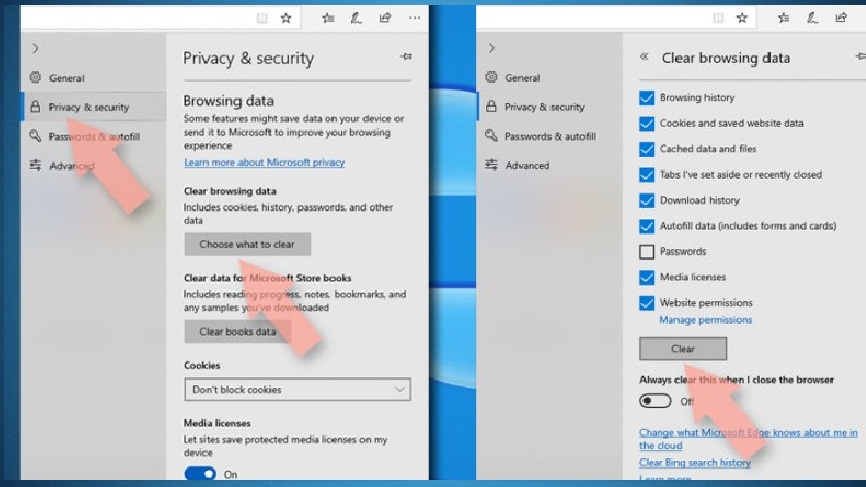
Clear the cookies and other browsing based data:
- Select Menu>Privacy & security,
- Go the Clear browsing data and pickChoose what to clear,
- Select all except the passwords (and Media licenses if applicable) and then click on Clear option
Change browsers’ homepage and new tab pages:
- In the menu, choose settings,
- Navigate to On startup section,
- Disable the suspicious domain
⇒ Reset MS Edge
Reset the browser if the above steps did not remove VidX:
- Open Task Manager(by Ctrl + shift +Esc shortcut),
- In this window, click on More details> Details tab,
- Now, find all entries with Microsoft Edge name, right-click on each of them and click End Task

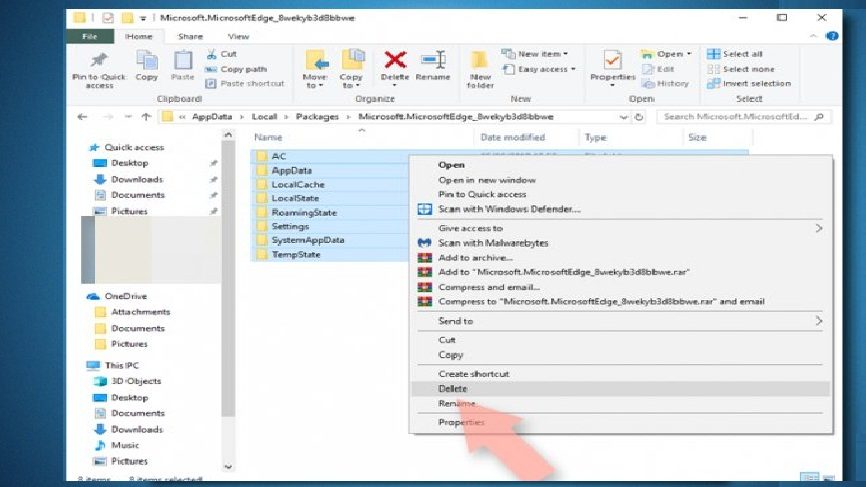
Alternatively, you can use Advanced Edge reset method. For this, you need to backup your data at first:
- Check the system for the following folder,
C:\\Users\\%username%\\AppData\\Local\\Packages\\Microsoft.MicrosoftEdge_8wekyb3d8bbwe.
- Select all folders, right-click on them and choose Delete,
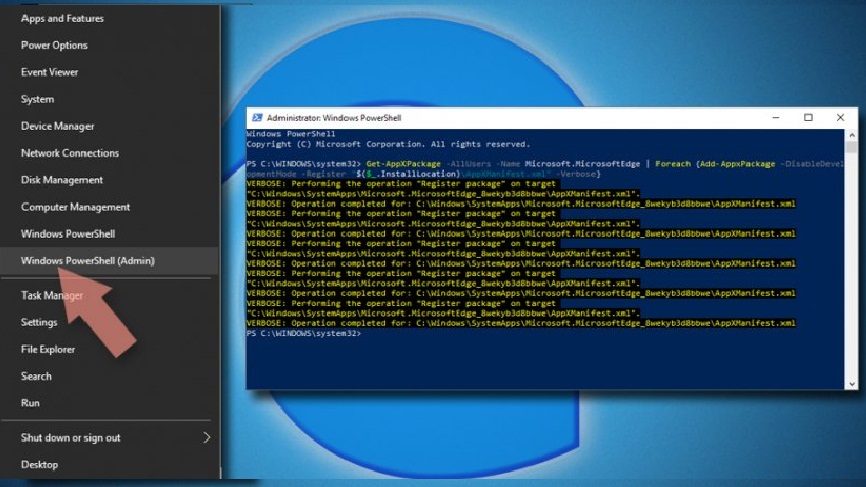
- Now, right-click on start button and choose Windows PowerShell (Admin),
- A new window shows up to you, copy and paste the following command and hit Enter,
Get-AppXPackage -AllUsers -Name Microsoft.MicrosoftEdge | Foreach {Add-AppxPackage -DisableDevelopmentMode -Register “$($_.InstallLocation)\\AppXManifest.xml” -Verbose
⇒ For Chromium-based Edge
Delete the malicious extensions using the following steps:
- Open the browser, select Settings> Extensions,
- Find all unwanted extensions and remove them by clicking Remove option

Clear the Cache and site data:
- Go to Settings>Privacy and services,
- Under Clear browsing data, select Choose what to clear,
- Select Time Range and Pick All Time
- And then Select Clear now option
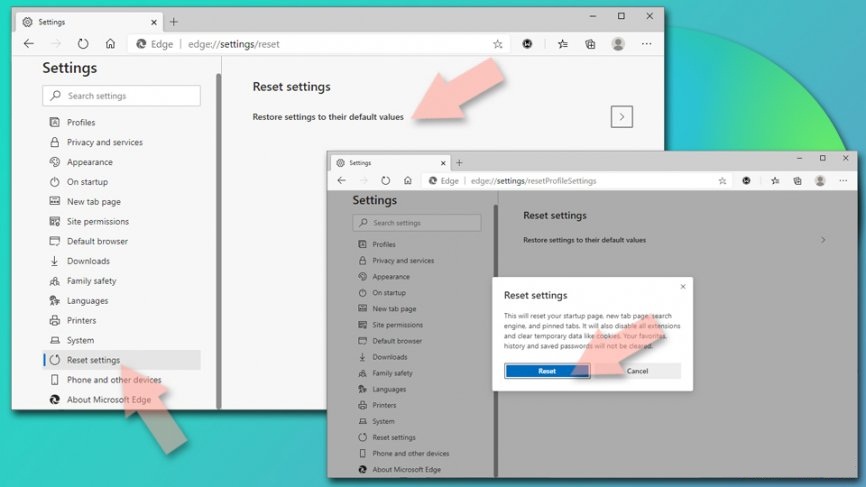
Reset chromium based MS Edge browser:
- Under the settings, click on Reset settings,
- Select Restore settingsto their default value,
- Click Reset to confirm
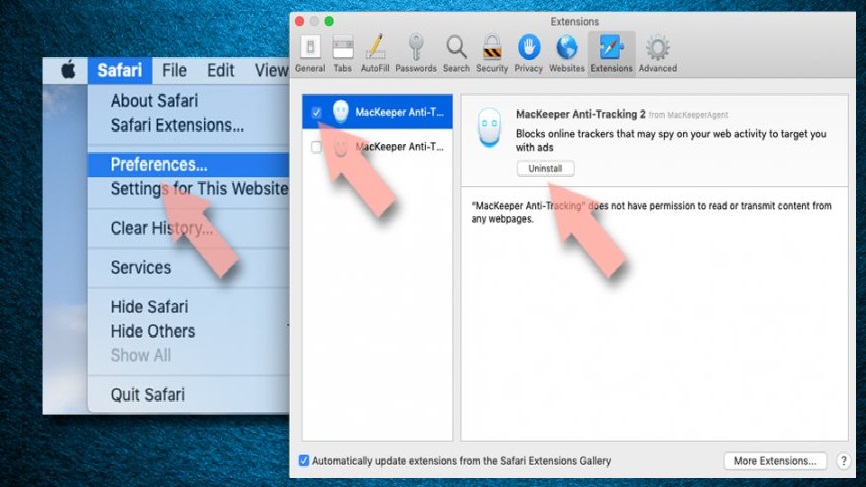
Remove VidX from Safari
Delete all unwanted extensions:
- Click the tab Safari,
- Select preferences,
- Pick Extension from the newly opened window,
- Now, find all unwanted extensions related to VidX and select uninstall
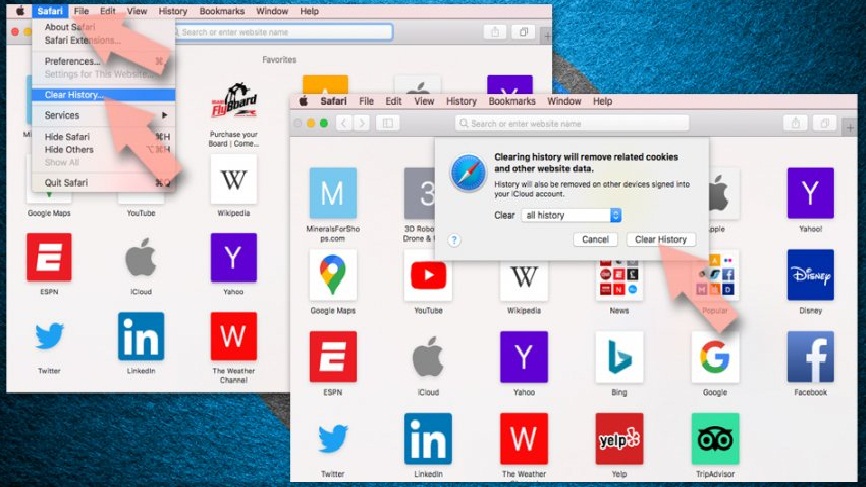
Clear cookies and site data:
- Click on Safari> Clear History,
- In the drop down menu, select all history under Clear,
- Then, click on Clear History option
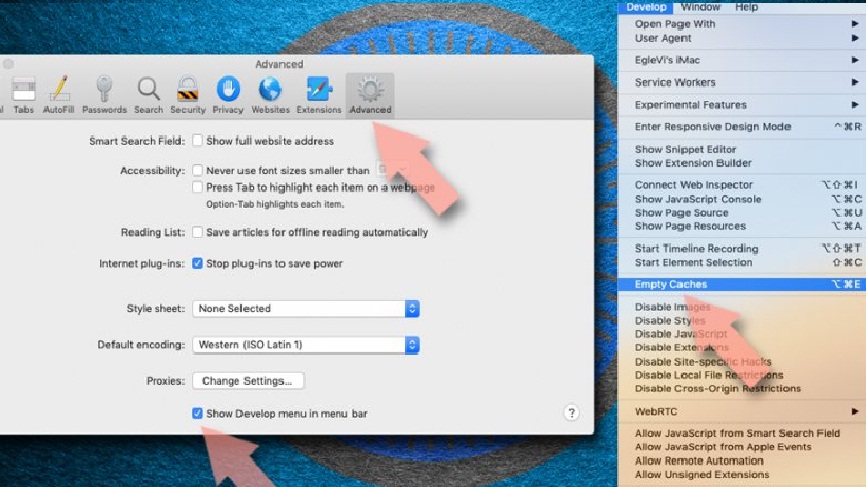
Reset the web browser:
- Click on Safari> Preferences…,
- Select Advanced tab,
- Mark Show Develop menu,
- Click Develop and select Empty Caches
After uninstalling the potentially unwanted application and fixing all installed web browsers, you need to run a full system scan using some professional antivirus tool. This software will help you in getting rid of all VidX registry traces as well as identity other parasites and possible malware infections on the system.
Special Offer (For Windows)
VidX can re-install itself if its associated files remain on system somehow. We suggest users to try Spyhunter to check and clean their system against all malicious files completely.
For more information, read SpyHunter’s EULA, Threat Assessment Criteria, and Privacy Policy. Spyhunter checks that your computer has malware with its free trial version. If found any threat, it takes 48 hours time for its removal. If you need to eliminate VidX instantly, you are required to purchase licensed version of this software.
Special Offer (Macintosh)
Mac users if infected by VidX, can try a suggested application to do scan and check if all malicious files and entries are completely removed.
Protect your system from Adware, Trojan and Rasomware in future
Adware, Trojan, Ransomware and other malicious malware take some specific routes all the time to infiltrate systems. Most often, crooks ensure malware infiltration through spam email campaigns, freeware downloads, fake updates and unofficial activators for licensed programs. Stay cautious when surfing the day to day browsing activities, and act wise-fully when you come across such sources through which there is a maximum chance of malware infiltration to the system.